~/blog /
Aspire with AI(MCP)

Intro
In this blog post, we will create an API project with dotnet to consume github models to create agent. This agent will use MCP toolkit we will be creating as part of the workflow. We will use Aspire to orchestrate the solution and use dashboard to monitor GenAI logs. Final code can be found in here
Setup
Verifying Requirements
To follow this tutorial, you will need aspire cli as well as dotnet sdk installed. You can verify the requirements by running the following commands in your terminal:
$ dotnet --version
10.0.100
$ aspire --version
13.2.2+25961cf7043e413abaf8ad84348988f2904b90d5
Creating the API and MCP projects
By following the steps below, we will create skeleton of the project and then we will start using it later.
$ mkdir AspireWithAI
$ cd AspireWithAI

$ dotnet new sln -f slnx
The template "Solution File" was created successfully.

$ git init
Initialized empty Git repository in /Users/sinannar/source/AspireWithAI/.git/

$ dotnet new gitignore
The template "dotnet gitignore file" was created successfully.

$ dotnet new webapi -n AspireWithAI.Api
The template "ASP.NET Core Web API" was created successfully.
Processing post-creation actions...
Restoring /Users/sinannar/source/AspireWithAI/AspireWithAI.Api/AspireWithAI.Api.csproj:
Restore succeeded.

$ dotnet new webapi -n AspireWithAI.Mcp
The template "ASP.NET Core Web API" was created successfully.
Processing post-creation actions...
Restoring /Users/sinannar/source/AspireWithAI/AspireWithAI.Mcp/AspireWithAI.Mcp.csproj:
Restore succeeded.

$ dotnet sln add AspireWithAI.Mcp/AspireWithAI.Mcp.csproj
Project `AspireWithAI.Mcp/AspireWithAI.Mcp.csproj` added to the solution.

$ dotnet sln add AspireWithAI.Api/AspireWithAI.Api.csproj
Project `AspireWithAI.Api/AspireWithAI.Api.csproj` added to the solution.
By this time, I would recommend committing your progress before you move forward to keep track of your changes.
Introducing Aspire
We will use aspire cli, to orchestrate our solution. After aspire is introduced to our solution, we should be able to run the application with aspire and see the default weatherforecast controller in action. To introduce aspire to our solution, we can run the following command:
`$ aspire init

Select AppHost Language
Choose the programming language for your Aspire AppHost.
This selection will be saved for future use.

Which language would you like to use?

> C# (.NET)
  TypeScript (Node.js)

✔  Language preference saved to local configuration: C# (.NET)
ℹ  Solution detected: AspireWithAI.slnx


Add existing projects to AppHost?
The following projects were found in the solution that can be
hosted in Aspire. Select the ones that you would like to be
added to the AppHost project. You can add or remove them
later as needed.

Select projects to add to the AppHost:

> [X] AspireWithAI.Api
> [X] AspireWithAI.Mcp

Add ServiceDefaults reference to selected projects?
Do you want to add a reference to the ServiceDefaults project to
the executable projects that will be added to the AppHost? The
ServiceDefaults project contains helper code to make it easier
for you to configure telemetry and service discovery in Aspire.

Add ServiceDefaults reference?

> Add to all previously added projects
  Let me choose
  Do not add to any projects

ℹ  The following projects will be added to the AppHost:
☑  AspireWithAI.Api.csproj
☑  AspireWithAI.Mcp.csproj

Create NuGet.config for selected channels?
> Yes
  No
📦 Created NuGet.config for the selected package channel.
✔  Aspire initialization complete!

Would you like to configure AI agent environments for this project? [y/n] (y): y

> [X] Install Aspire skill file (Recommended)
  [ ] Install Playwright CLI (Recommended for browser automation)
  [ ] Install Aspire MCP server

✔  Create Aspire skill file (.github/skills/aspire/SKILL.md)
✔  Agent environment configuration complete.
What we have done here is:
- Initialized aspire apphost with C# language
- Added our projects(api and mcp) to aspire apphost
- Added ServiceDefaults reference to our projects(api and mcp)
- Configure NuGet.config
- Created aspire skill as part of agent environment configuration
Adding Projects to AppHost
We will add these following lines to AppHost.cs file to make sure our projects are part of the apphost and they will run when we run aspire.
var mcp = builder.AddProject<Projects.AspireWithAI_Mcp>("mcp");

builder.AddProject<Projects.AspireWithAI_Api>("api")
    .WithReference(mcp).WaitFor(mcp);
If you are using VS Code Insider version, which I am, version 1.117.0-insider, you can run your aspire project from integrated terminal with aspire run and use integrated browser to navigate to dashboard as shown below.
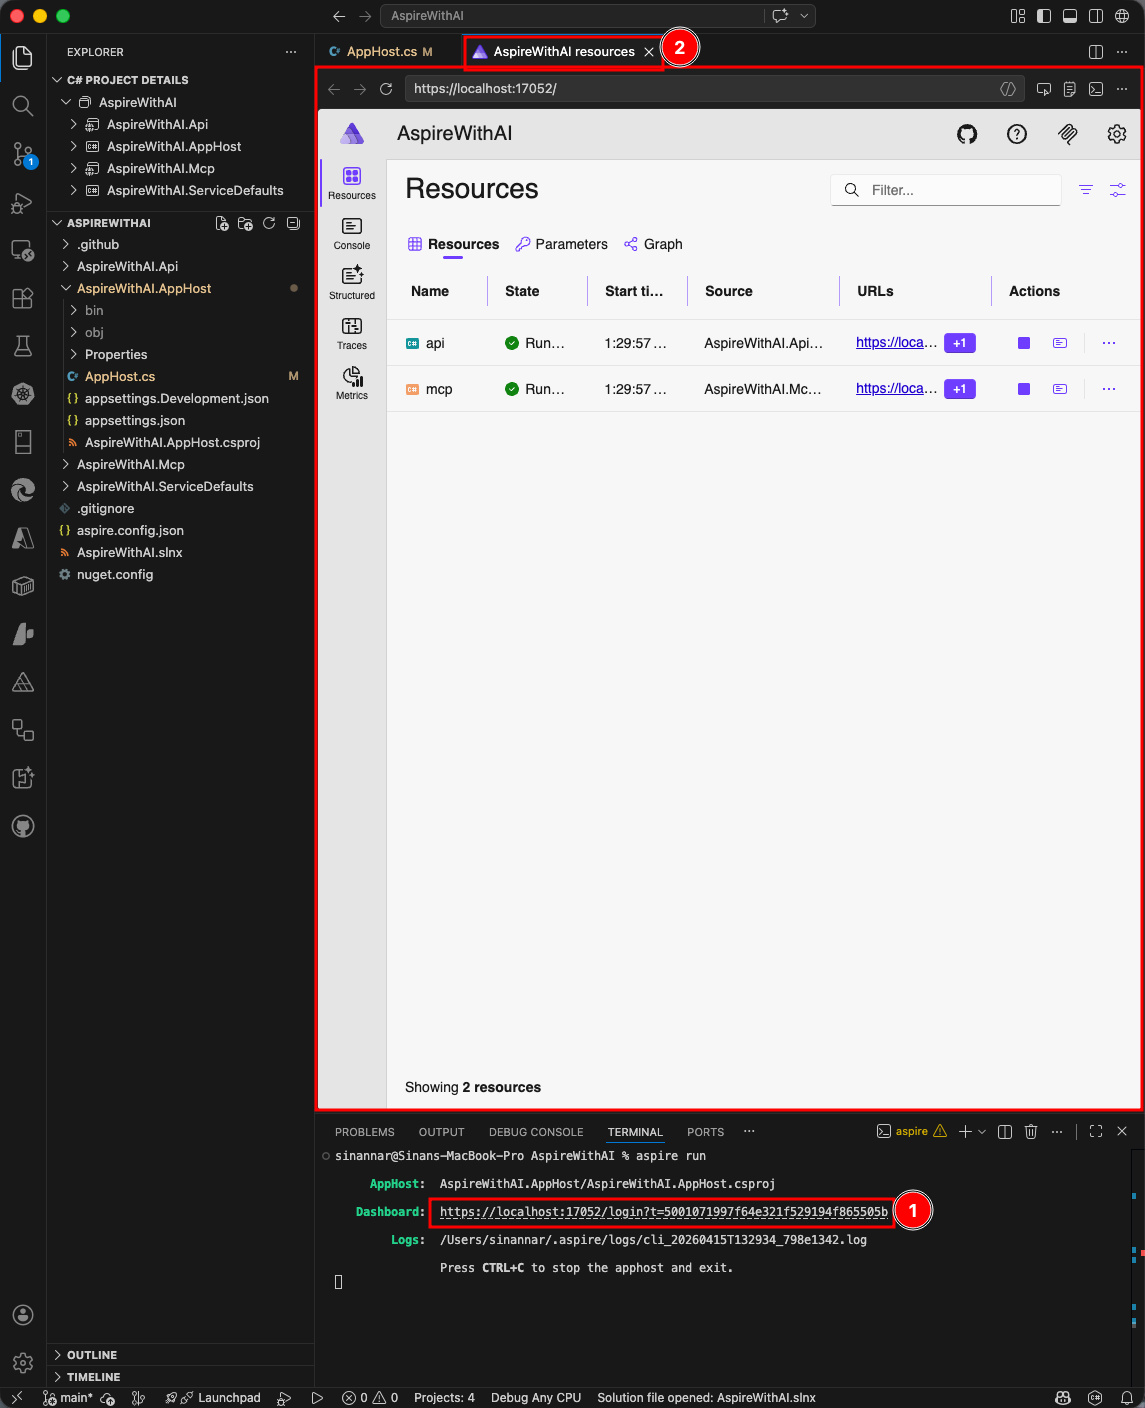
You can also click the urls for both api and mcp projects and append the urls with /weatherforecast to see the default weatherforecast controller in action as shown below.
Removing Boilerplate and Adding Defaults
Since we know from previous step that our both webapi project works, for both projects, api and mcp, replace Program.cs with the following code to remove the boilerplate code and have a clean slate to start with. We will add what we need as we move forward.
var builder = WebApplication.CreateBuilder(args);
builder.Services.AddOpenApi();
builder.AddServiceDefaults();

var app = builder.Build();
if (app.Environment.IsDevelopment())
{
    app.MapOpenApi();
}
app.UseHttpsRedirection();
app.MapDefaultEndpoints();

app.Run();
Implementing MCP Server
There is normally a dotnet template that lets you build MCP server easily but that template is creating a console application that you expose tools through stdio, but we want to expose tools through http so we will not use this template.
We will start adding mcp nuget package to our mcp project as shown below:
$ dotnet add package ModelContextProtocol.AspNetCore --project AspireWithAI.Mcp/AspireWithAI.Mcp.csproj
info : X.509 certificate chain validation will use the fallback certificate bundle at '/usr/local/share/dotnet/sdk/10.0.100/trustedroots/codesignctl.pem'.
info : X.509 certificate chain validation will use the fallback certificate bundle at '/usr/local/share/dotnet/sdk/10.0.100/trustedroots/timestampctl.pem'.
info : Adding PackageReference for package 'ModelContextProtocol.AspNetCore' into project 'AspireWithAI.Mcp/AspireWithAI.Mcp.csproj'.
info :   GET https://api.nuget.org/v3/registration5-gz-semver2/modelcontextprotocol.aspnetcore/index.json
info :   OK https://api.nuget.org/v3/registration5-gz-semver2/modelcontextprotocol.aspnetcore/index.json 752ms
info : Restoring packages for /Users/sinannar/source/AspireWithAI/AspireWithAI.Mcp/AspireWithAI.Mcp.csproj...
info :   GET https://api.nuget.org/v3/vulnerabilities/index.json
info :   OK https://api.nuget.org/v3/vulnerabilities/index.json 668ms
info :   GET https://api.nuget.org/v3-vulnerabilities/2026.04.15.06.14.32/vulnerability.base.json
info :   GET https://api.nuget.org/v3-vulnerabilities/2026.04.15.06.14.32/2026.04.15.06.14.32/vulnerability.update.json
info :   OK https://api.nuget.org/v3-vulnerabilities/2026.04.15.06.14.32/vulnerability.base.json 206ms
info :   OK https://api.nuget.org/v3-vulnerabilities/2026.04.15.06.14.32/2026.04.15.06.14.32/vulnerability.update.json 661ms
info : Package 'ModelContextProtocol.AspNetCore' is compatible with all the specified frameworks in project 'AspireWithAI.Mcp/AspireWithAI.Mcp.csproj'.
info : PackageReference for package 'ModelContextProtocol.AspNetCore' version '1.2.0' added to file '/Users/sinannar/source/AspireWithAI/AspireWithAI.Mcp/AspireWithAI.Mcp.csproj'.
info : Writing assets file to disk. Path: /Users/sinannar/source/AspireWithAI/AspireWithAI.Mcp/obj/project.assets.json
log  : Restored /Users/sinannar/source/AspireWithAI/AspireWithAI.Mcp/AspireWithAI.Mcp.csproj (in 2.1 sec).
Implementing MCP Tool
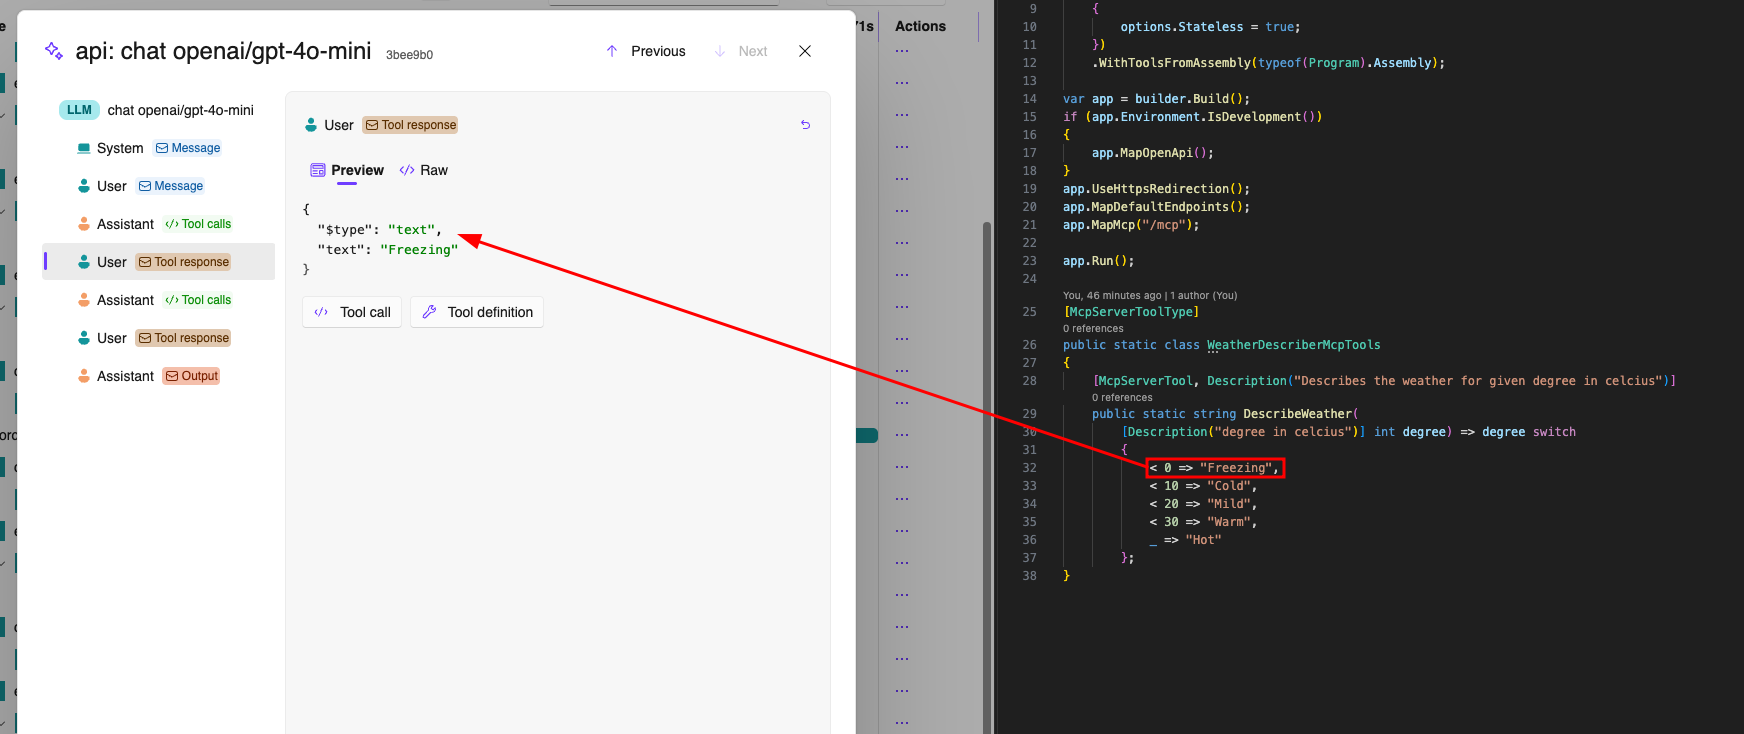
We implement a simple tool to descibe given temperature as shown below. We will use McpServerToolType attribute to mark the class that contains mcp tools and we will use McpServerTool attribute to mark the method that we want to expose as mcp tool. We can also use Description attribute to add description to both tool and its parameters which will be helpful for agent to understand the purpose of the tool and how to use it.
[McpServerToolType]
public static class WeatherDescriberMcpTools
{
    [McpServerTool, Description("Describes the weather for given degree in celcius")]
    public static string DescribeWeather(
        [Description("degree in celcius")] int degree) => degree switch
        {
            < 0 => "Freezing",
            < 10 => "Cold",
            < 20 => "Mild",
            < 30 => "Warm",
            _ => "Hot"
        };
}
Setting up MCP Server
We will add the following lines after AddServiceDefaults in Program.cs of mcp project to add mcp server to our application and expose our tools through http transport. By default, mcp server uses stdio as transport and it is stateful, but since we want to use http as transport and we want to keep it stateless, we need to configure these options accordingly.
builder.AddServiceDefaults();
builder.Services.AddMcpServer()
    .WithHttpTransport(options =>
    {
        options.Stateless = true;
    })
    .WithToolsFromAssembly(typeof(Program).Assembly);
We will also call MapMcp as below to map mcp server endpoints to our application.
app.MapDefaultEndpoints();
app.MapMcp("/mcp");
Implementing API
Now that we have our mcp server is implemented, we are going to use GitHub Models to create an agent that will use our mcp tool to describe the weather.
Setting up Dependencies
We will setup GitHub model hosting by using aspire cli, then we will add necessary packages to our api project to consume GitHub models and create agent. You can run the following commands to setup dependencies:
$ aspire add github-models
✔  The package Aspire.Hosting.GitHub.Models::13.2.2 was added successfully.

$ dotnet add package Aspire.Azure.AI.Inference --project AspireWithAI.Api/AspireWithAI.Api.csproj --prelease

$ dotnet add package Microsoft.Agents.AI --project AspireWithAI.Api/AspireWithAI.Api.csproj

$ dotnet add package ModelContextProtocol --project AspireWithAI.Api/AspireWithAI.Api.csproj
PS: At the time of writing, Aspire.Azure.AI.Inference had to be added as prelease.
Setting up GitHub Model at AppHost
When we added GitHub Models integration through aspire cli, it added Aspire.Hosting.GitHub.Models package to AppHost project. What we need to do is to add what model we want to use and reference it to our api project as shown below.
var chat = builder.AddGitHubModel("chat", GitHubModel.OpenAI.OpenAIGpt4oMini);

builder.AddProject<Projects.AspireWithAI_Api>("api")
    .WithReference(mcp).WaitFor(mcp)
    .WithReference(chat).WaitFor(chat);
Implementing Agent that uses MCP Tool
We will start setting up using ChatClient via the following code in Program.cs of api project:
builder.AddAzureChatCompletionsClient("chat")
    .AddChatClient();
We will then implement our mcp client setup via the following code:
builder.Services.AddActivatedSingleton(sp =>
{
    var mcpClient = McpClient.CreateAsync(new HttpClientTransport(
    new HttpClientTransportOptions()
    {
        Endpoint = new (Environment.GetEnvironmentVariable("services__mcp__https__0")! + "/mcp")
    })).GetAwaiter().GetResult();
    return mcpClient;
});
Next we need to implement an agent that will use both ChatClient and McpClient to call our tool to describe the weather. We will implement a simple agent as shown below:
builder.Services.AddActivatedKeyedSingleton("weatheragent", (sp, _) =>
{
    var mcpClient = sp.GetRequiredService<McpClient>();
    var tools = mcpClient.ListToolsAsync().GetAwaiter().GetResult();
    var chatClient = sp.CreateAsyncScope().ServiceProvider.GetRequiredService<IChatClient>();
    return chatClient.AsAIAgent(
        name: "weatheragent",
        instructions: "you take the weather related information as JSON and provide a summary, including description of the degree in celcius using the mcp tools",
        tools: [.. tools.Cast<AITool>()]
    );
});
Implementing API Endpoint to Call Agent
Finally, we will implement an API endpoint that will call our agent to get the weather description for given degree in celcius. Before we implement the endpoint, we need the record that we removed earlier
record WeatherForecast(DateOnly Date, int TemperatureC, string? Summary)
{
    public int TemperatureF => 32 + (int)(TemperatureC / 0.5556);
}
We will implement a simple endpoint as shown below:
app.MapGet("/weatherforecast", ([FromKeyedServices("weatheragent")] ChatClientAgent weatheragent) =>
{
    var forecast =  Enumerable.Range(1, 2).Select(index =>
        new WeatherForecast
        (
            DateOnly.FromDateTime(DateTime.Now.AddDays(index)),
            Random.Shared.Next(-20, 55),
            weatheragent.RunAsync($"What is the weather like for a temperature of {Random.Shared.Next(-20, 55)} degree in celcius? Include 3 different language, but include English and Turkish for sure. Response will be shown to human, so no json or other structured format.").Result!.Text
        ))
        .ToArray();
    return forecast;
})
.WithName("GetWeatherForecast");
Configuring access for GitHub Models
In my previous blog post, I detailed how to get token for using GitHub models, you can find the details here.
After you gather your token, you can set it via running the following command in your terminal:
$ aspire secret get Parameters:chat-gh-apikey <YOUR_TOKEN_HERE>Testing the Endpoint
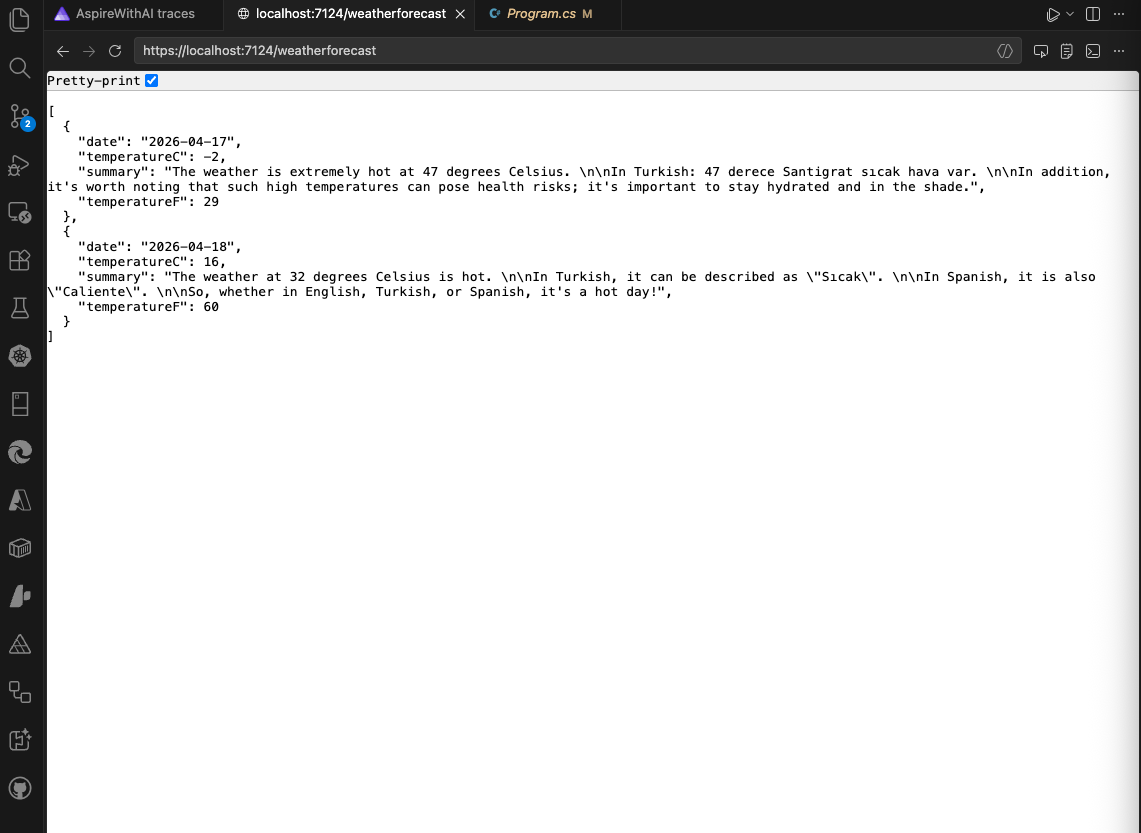
After running the application with aspire run, click to the url for api project and append it with /weatherforecast to see the agent in action as shown below. You should see the weather description for given degree in celcius in different languages including English and Turkish as shown below:
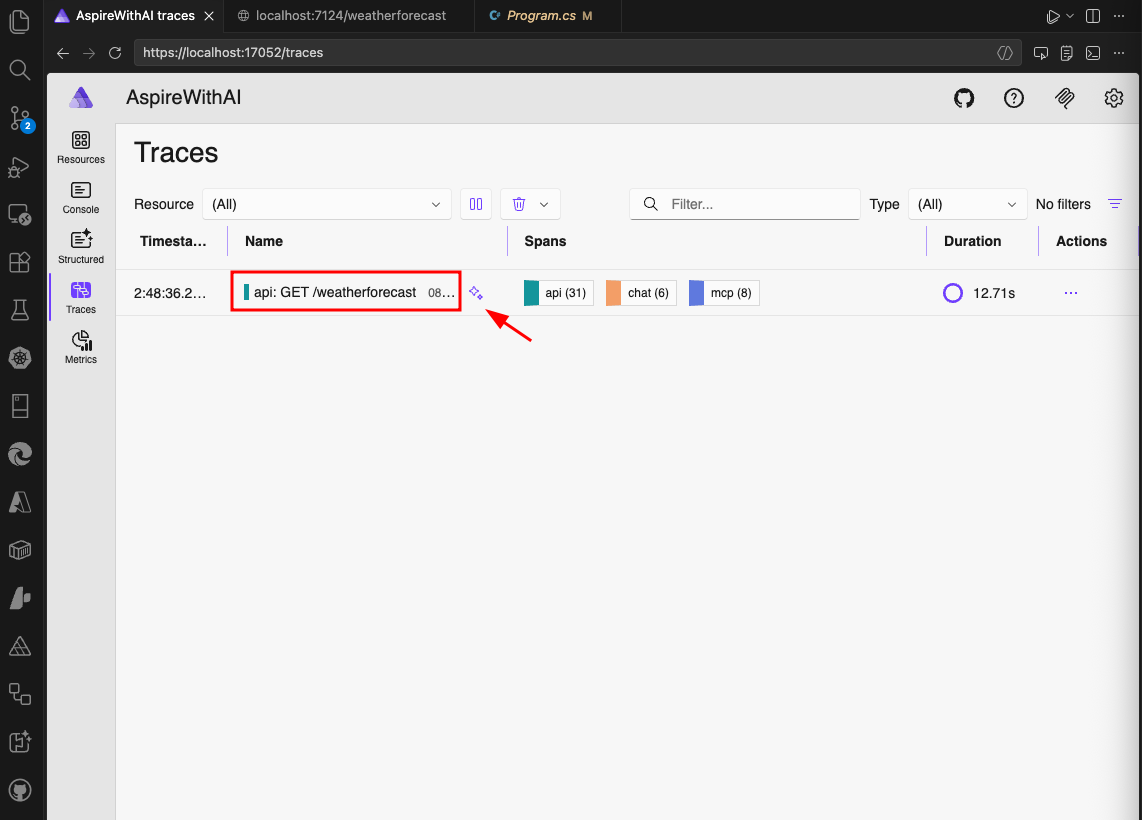
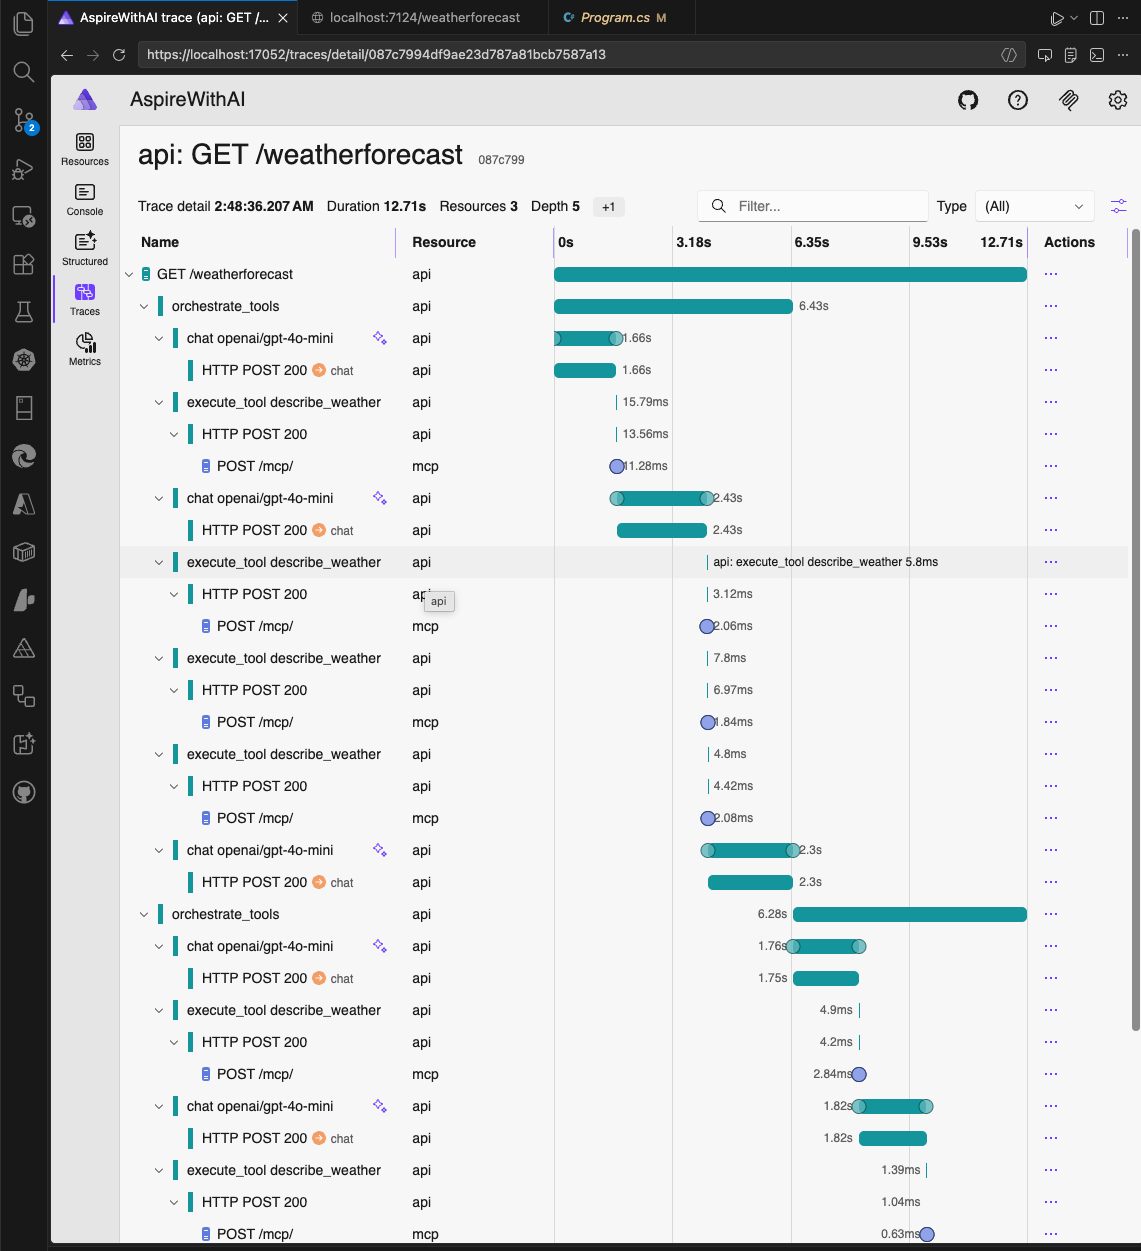
If you navigate to Traces on dashboard, you should see the trace for the request you just made and if you click to the trace, you should be able to see the details of the trace including the calls made to mcp server as shown below, this icon indicates GenAI:
When you go to the details of the trace, you can see the detailed journey with multiple chat and tool exeuctions as shown below:
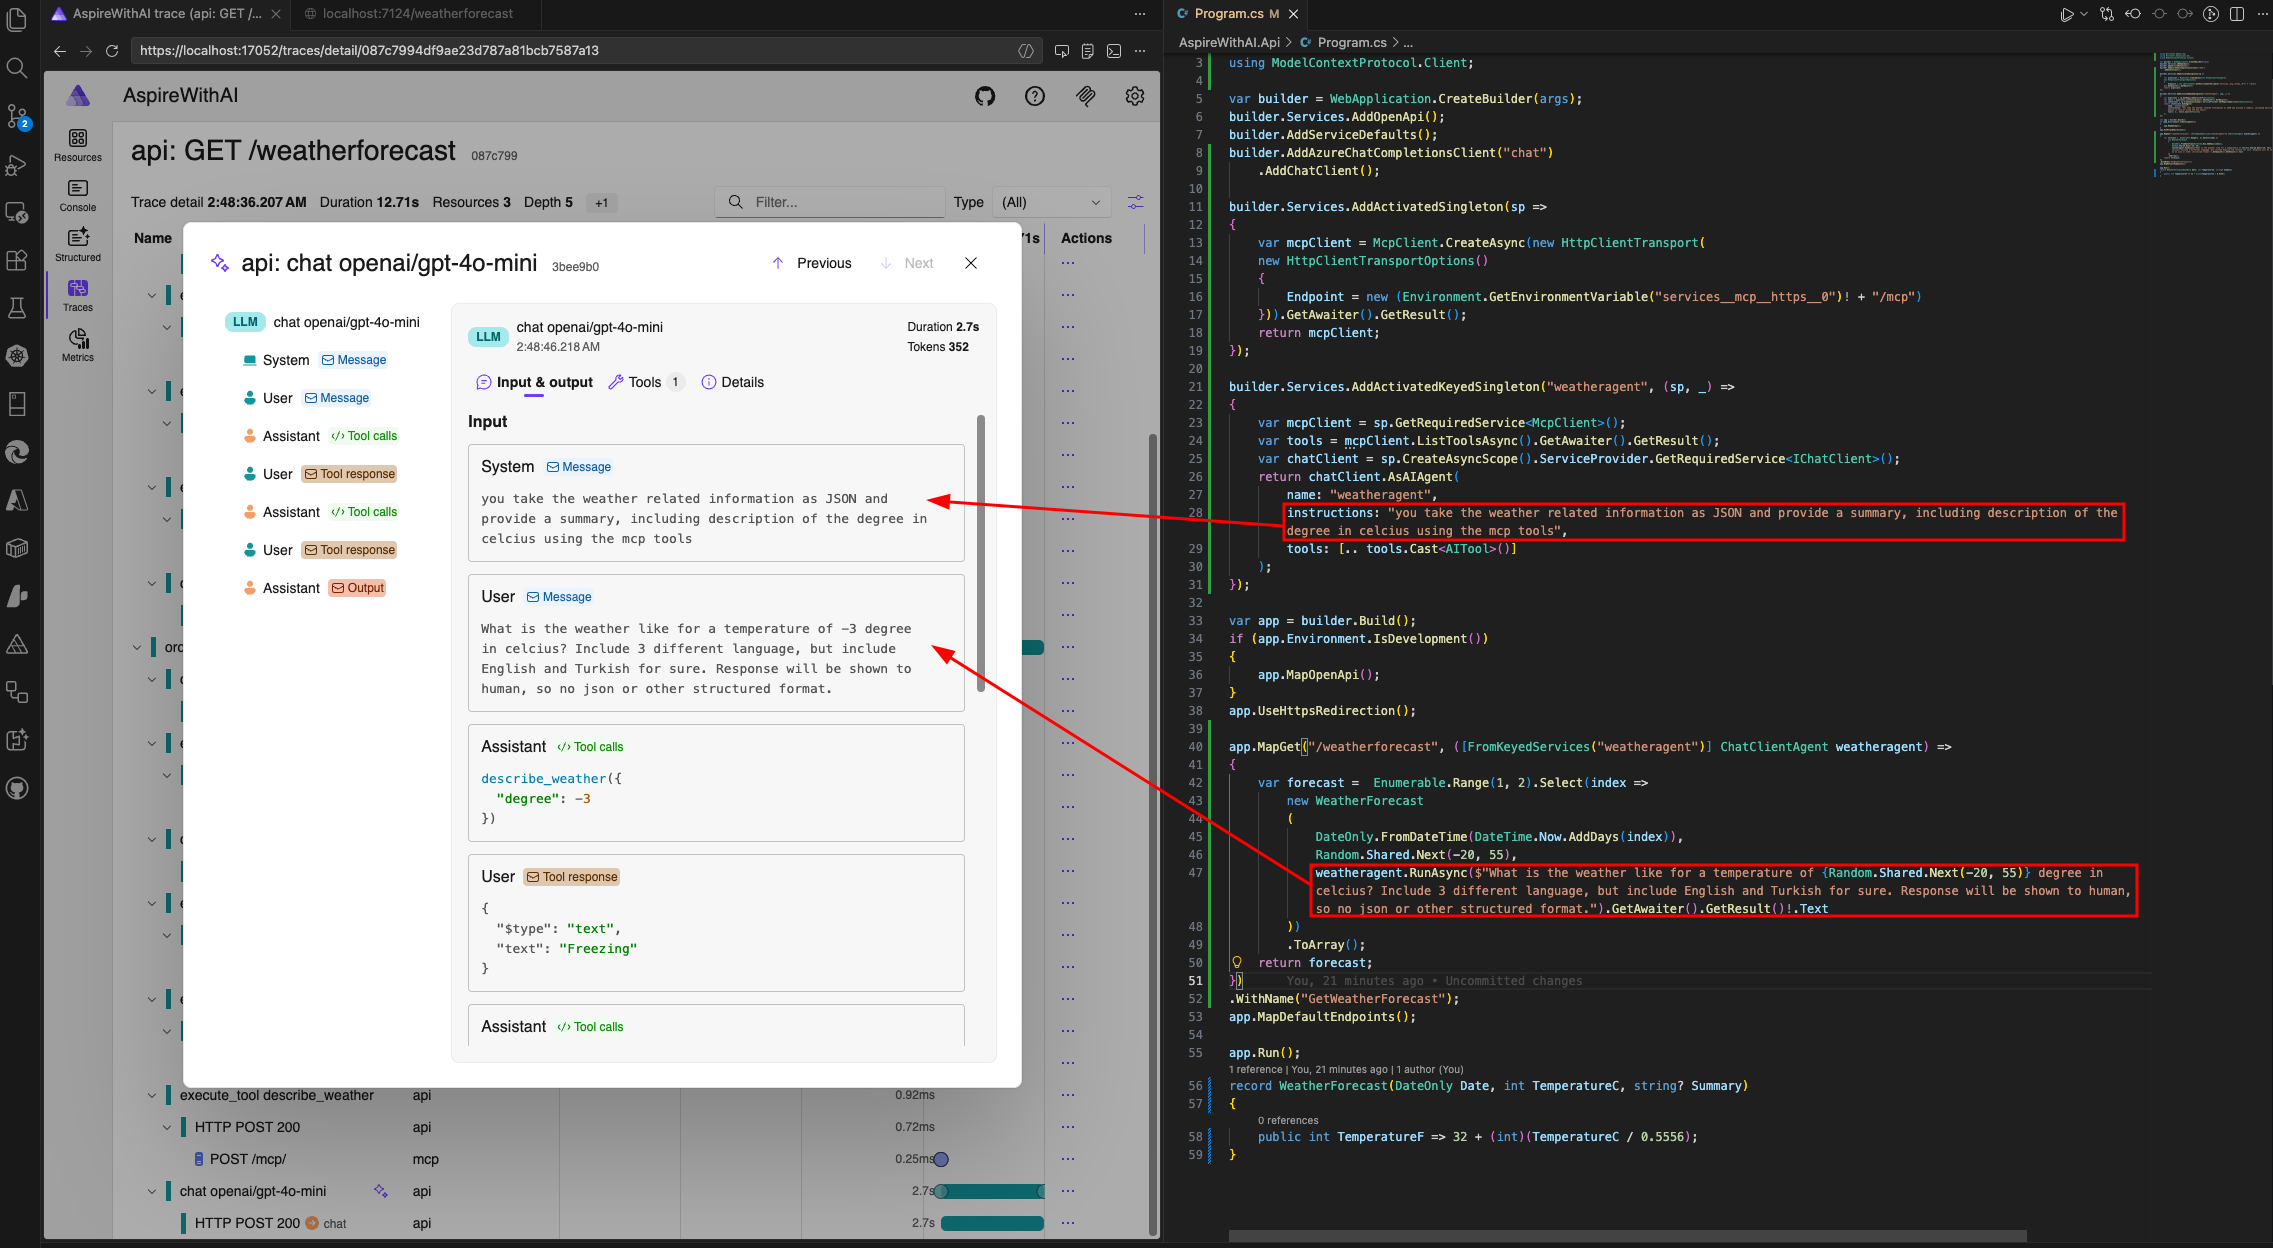
If you open one of the GenAI details, you can see the system prompt and user prompt that was sent to the model, as well as duration and tokens at and bunch of other information.
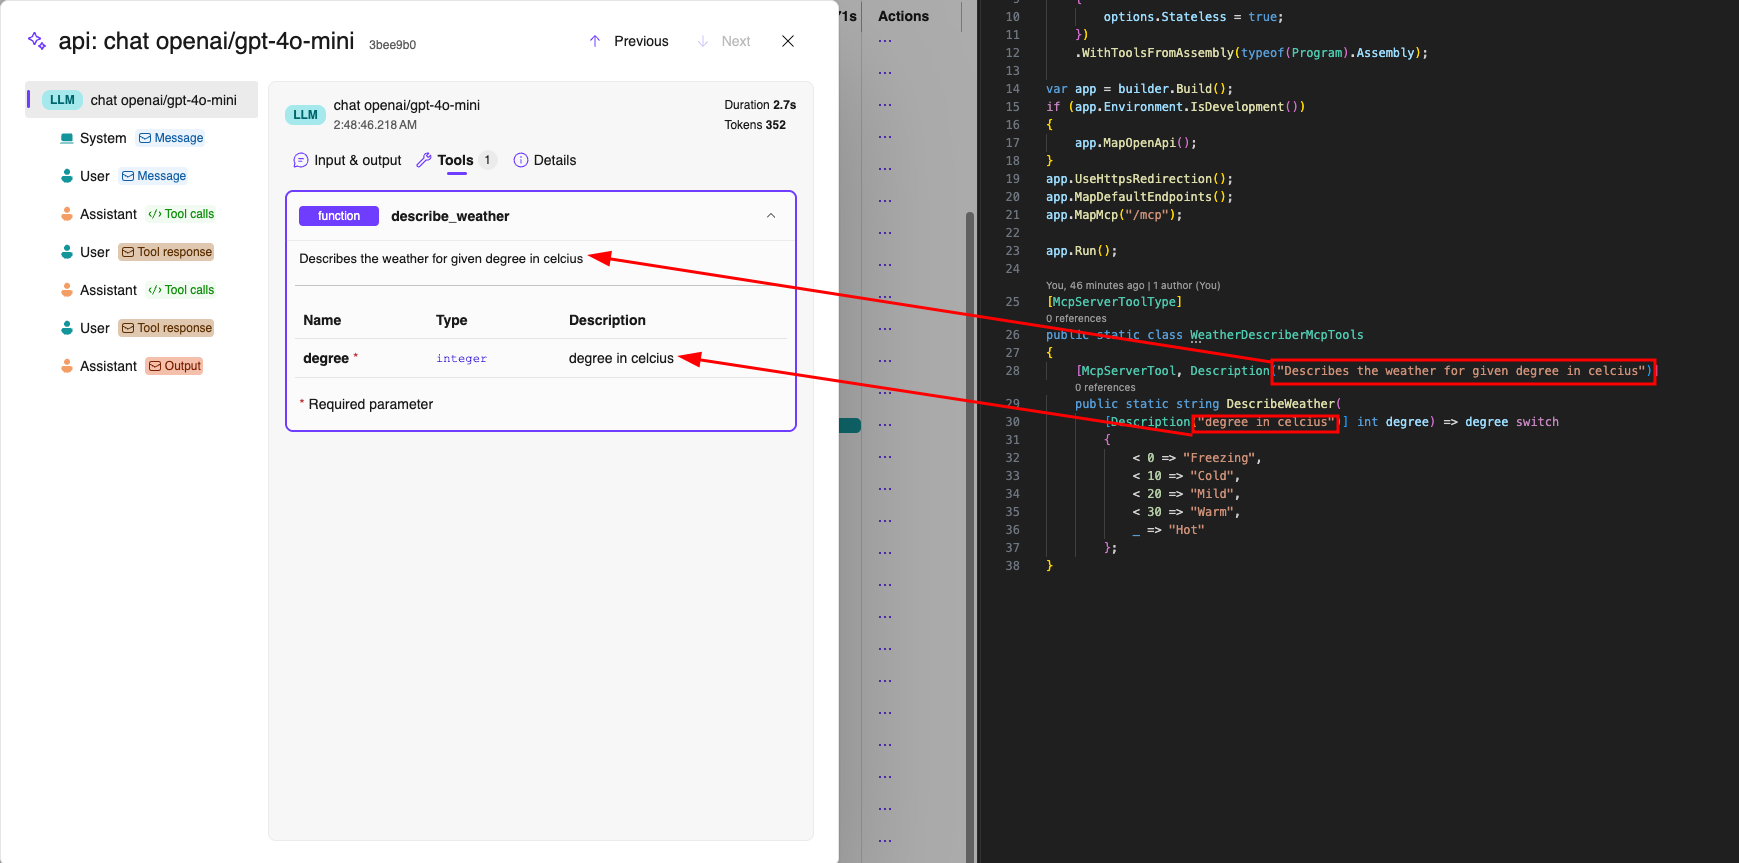
We can see the tool definition that was used as below, at Tools section of the trace:
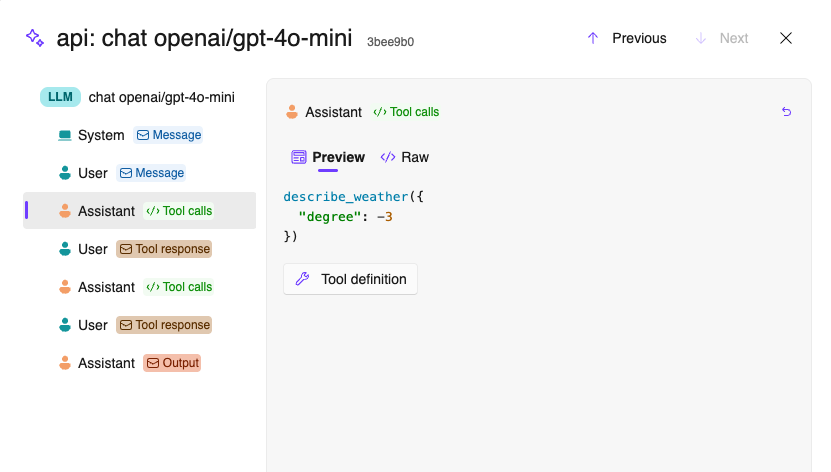
Trace has Tool Calls parts you can see the calls made to the tool with the parameter sent:
We can also see the tool response in the trace details as shown below: