Hands-On with Aspire
Intro
During a recent Auckland .NET User Group session, I ran a hands-on, one-hour demo exploring how to build a modern distributed application using .NET Aspire.
Rather than focusing on theory, the session walked through a practical, end-to-end scenario—starting from project creation and progressively integrating real-world components like databases, frontend frameworks, background processing, and AI-powered enhancements.
This blog post distills that session into a step-by-step guide so you can follow along and build the same solution yourself.
We’ll cover:
- Bootstrapping a new Aspire project using the CLI
- Adding SQL Server and implementing CRUD APIs
- Replacing Blazor with an Angular frontend
- Running background jobs using Azure Functions
- Enhancing data using GitHub Models
If you prefer to jump straight into code, you can find the complete solution on GitHub, which I recommend referencing alongside this guide.
Prerequisites
To follow along with this demo, make sure you have the following installed:
- .NET SDK
- Aspire CLI
- Azure Functions Core Tools (func CLI)
- Node.js and Angular CLI
All of these are straightforward to install—refer to their official documentation for setup instructions.
Below are the versions used during the demo. Most are the latest available at the time, with the exception of Angular:
sinannar@Sinans-MacBook-Pro BlogTemp % dotnet --list-sdks
8.0.409 [/usr/local/share/dotnet/sdk]
9.0.300 [/usr/local/share/dotnet/sdk]
9.0.303 [/usr/local/share/dotnet/sdk]
10.0.100 [/usr/local/share/dotnet/sdk]
sinannar@Sinans-MacBook-Pro BlogTemp % dotnet --version
10.0.100
sinannar@Sinans-MacBook-Pro BlogTemp % node --version
v22.15.1
sinannar@Sinans-MacBook-Pro BlogTemp % npm --version
11.8.0
sinannar@Sinans-MacBook-Pro BlogTemp % ng --version
19.2.12
sinannar@Sinans-MacBook-Pro BlogTemp % aspire --version
13.1.0+8a4db1775c3fbae1c602022b636299cb04971fde
sinannar@Sinans-MacBook-Pro BlogTemp % func version
4.5.0
Note: While preparing this blog, a newer version of Aspire (13.2) was released. You may notice minor differences between the screenshots and your local setup.
Project Setup
Let’s start by creating a new Aspire project using the Aspire CLI:
sinannar@Sinans-MacBook-Pro BlogTemp % aspire new

Select a template:
> Starter App (ASP.NET Core/Blazor)
  Starter App (ASP.NET Core/React)
  Starter App (FastAPI/React)
  Empty AppHost

Enter the project name (BlogTemp): AspireCrud

Enter the output path: (./AspireCrud): ./AspireCrud

Use *.dev.localhost URLs
> No
  Yes

Use Redis Cache
  Yes
> No

Do you want to create a test project?
> No
  Yes
For this demo, we’re using the Starter App (ASP.NET Core/Blazor) template as a baseline, which we’ll progressively evolve throughout the guide.
Understanding the Project Structure
Once the project is created, navigate into the folder, You’ll see a structure similar to the following:
sinannar@Sinans-MacBook-Pro BlogTemp % cd AspireCrud
sinannar@Sinans-MacBook-Pro AspireCrud % ls -alrt
total 8
drwxr-xr-x@  3 sinannar  staff    96 13 Feb 21:49 ..
-rw-r--r--@  1 sinannar  staff  2693 13 Feb 21:49 AspireCrud.sln
drwxr-xr-x@  7 sinannar  staff   224 13 Feb 21:49 .
drwxr-xr-x@ 11 sinannar  staff   352 13 Feb 21:49 AspireCrud.Web
drwxr-xr-x@  9 sinannar  staff   288 13 Feb 21:49 AspireCrud.ApiService
drwxr-xr-x@  5 sinannar  staff   160 13 Feb 21:49 AspireCrud.ServiceDefaults
drwxr-xr-x@  8 sinannar  staff   256 13 Feb 21:49 AspireCrud.AppHost
sinannar@Sinans-MacBook-Pro AspireCrud %
At a high level:
- AppHost → Orchestrates and wires up your distributed application
- ApiService → Backend API layer
- Web → Frontend application (initially Blazor)
- ServiceDefaults → Shared configuration (logging, resilience, etc.) This structure is one of Aspire’s strengths—it gives you a clean separation of concerns out of the box.
Switching to .slnx
Before continuing, I prefer switching the solution file format to .slnx:
sinannar@Sinans-MacBook-Pro AspireCrud % rm AspireCrud.sln
sinannar@Sinans-MacBook-Pro AspireCrud % dotnet new sln -f slnx
The template "Solution File" was created successfully.

sinannar@Sinans-MacBook-Pro AspireCrud % dotnet sln add */*.csproj
Project `AspireCrud.ApiService/AspireCrud.ApiService.csproj` added to the solution.
Project `AspireCrud.ServiceDefaults/AspireCrud.ServiceDefaults.csproj` added to the solution.
Project `AspireCrud.AppHost/AspireCrud.AppHost.csproj` added to the solution.
Project `AspireCrud.Web/AspireCrud.Web.csproj` added to the solution.
Solution /Users/sinannar/source/BlogTemp/AspireCrud/AspireCrud.slnx already contains project AspireCrud.ServiceDefaults/AspireCrud.ServiceDefaults.csproj.
Solution /Users/sinannar/source/BlogTemp/AspireCrud/AspireCrud.slnx already contains project AspireCrud.Web/AspireCrud.Web.csproj.
This keeps the solution file more lightweight and consistent with newer tooling.
Initializing Git
Finally, let’s initialise version control:
sinannar@Sinans-MacBook-Pro AspireCrud % dotnet new gitignore
The template "dotnet gitignore file" was created successfully.

sinannar@Sinans-MacBook-Pro AspireCrud % git init
Initialized empty Git repository in /Users/sinannar/source/BlogTemp/AspireCrud/.git/

sinannar@Sinans-MacBook-Pro AspireCrud % git add .
sinannar@Sinans-MacBook-Pro AspireCrud % git commit -m "init"
At this point, we have a clean Aspire project ready to evolve.
Running the application
Before making any changes, let’s run the application to make sure everything is working as expected.
From the root of the solution, simply run aspire run:
sinannar@Sinans-MacBook-Pro AspireCrud % pwd
/Users/sinannar/source/BlogTemp/AspireCrud
sinannar@Sinans-MacBook-Pro AspireCrud % ls
AspireCrud.ApiService           AspireCrud.slnx
AspireCrud.AppHost              AspireCrud.Web
AspireCrud.ServiceDefaults
sinannar@Sinans-MacBook-Pro AspireCrud % aspire run
🔍 Finding apphosts...
AspireCrud.AppHost/AspireCrud.AppHost.csproj

🗄  Created settings file at '.aspire/settings.json'.

     AppHost:  AspireCrud.AppHost/AspireCrud.AppHost.csproj

   Dashboard:  https://localhost:17042/login?t=ecf82c23a3093940e3513da6bcc4d142

        Logs:  /Users/sinannar/.aspire/cli/logs/apphost-8063-2026-02-16-06-49-23.log

               Press CTRL+C to stop the apphost and exit.
Aspire will automatically detect the AppHost project and start the entire application:
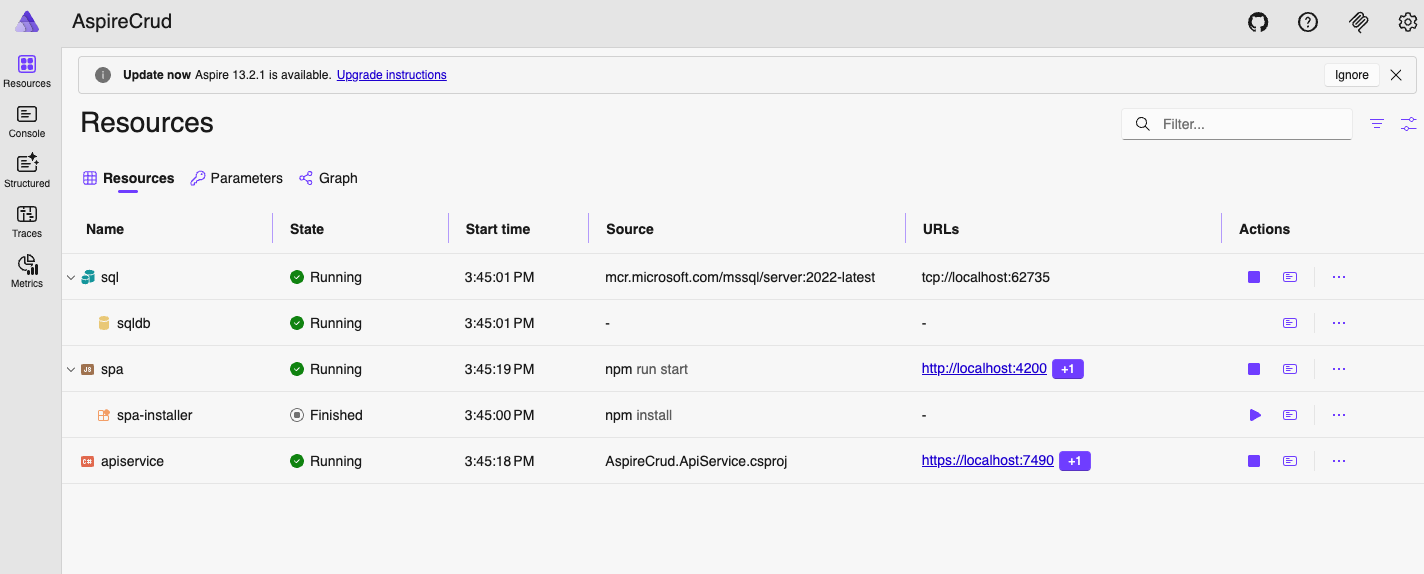
Exploring the Aspire Dashboard
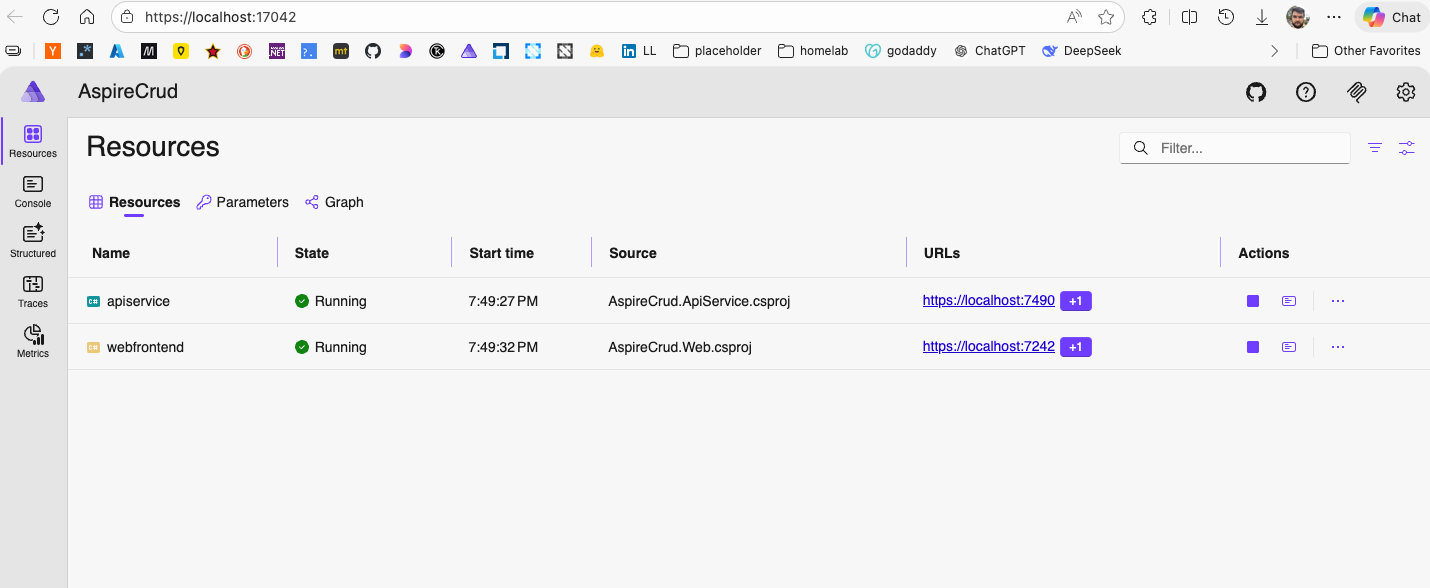
Once the app is running, open the dashboard URL in your browser. You’ll see that Aspire has already started two services:
- apiservice
- webfrontend
These are the default services created by the template, running with minimal configuration. We’ll extend and customise them in the next steps.
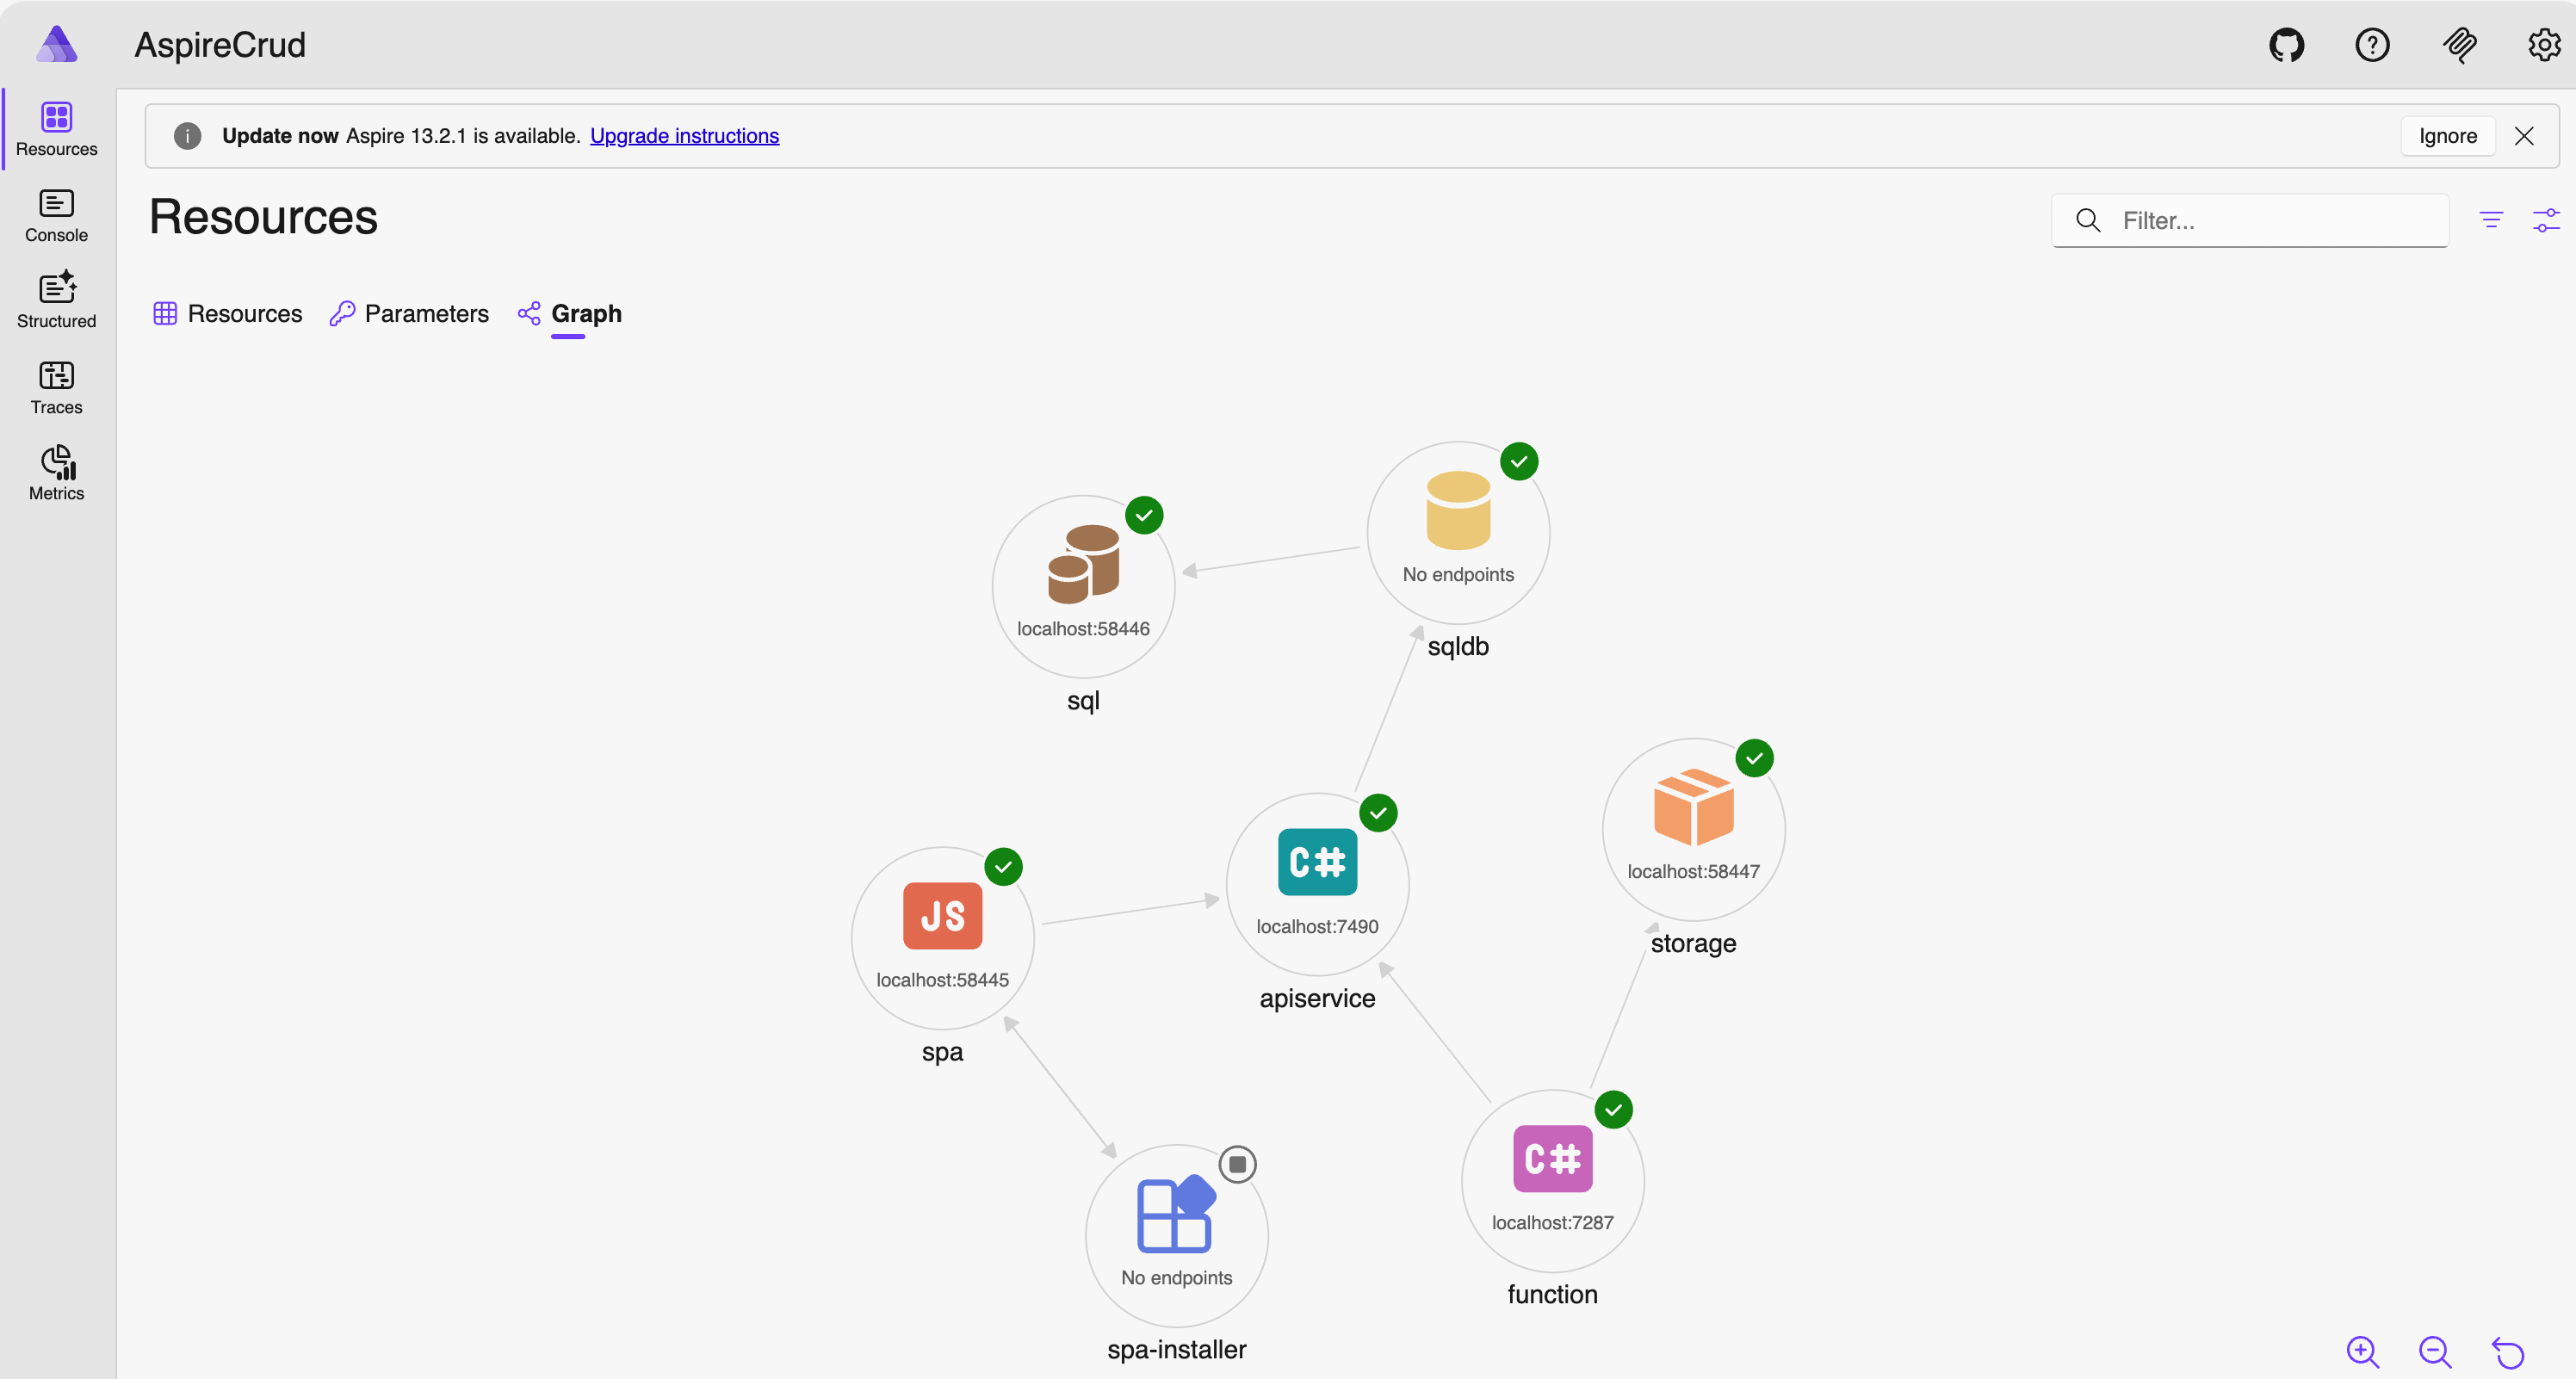
Visualising Your Architecture
One of the most useful features of Aspire is the graph view, which shows how your services and resources are connected. As your application grows, this becomes incredibly valuable—you can quickly understand dependencies and interactions across your system.

Centralised Logs and Built-in Observability
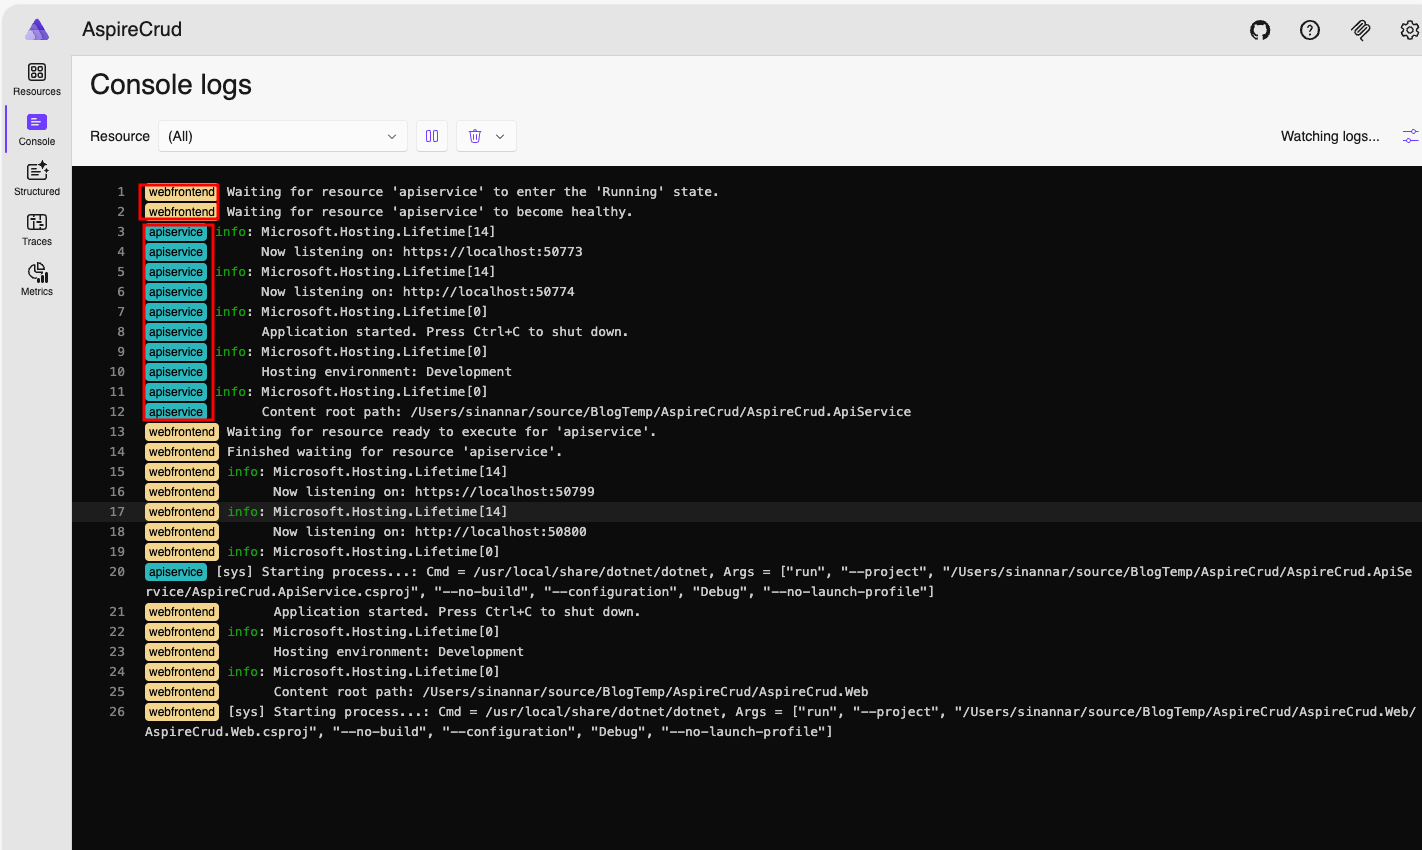
You can see the logs of each service on the dashboard as well, which is pretty useful for debugging and monitoring. This is not limited to your own services, but also includes the logs of the containers you are running as part of your infrastructure, such as sql server, redis, etc. You can see the logs of these containers and services in the same place, which is pretty convenient.
Aspire gives you ability to view traces and metrics locally without setting up any external monitoring tools. You can see the traces and metrics of your services on the dashboard, which is pretty useful for debugging and performance monitoring.

Sql Servere and CRUD
Now let’s extend the application by integrating SQL Server and implementing CRUD operations for the WeatherForecast endpoints. To do that, we’ll use two packages:
Aspire.Hosting.SqlServerto register SQL Server as a resource in the AppHostAspire.Microsoft.EntityFrameworkCore.SqlServerto integrate Entity Framework Core into the API serviceMicrosoft.EntityFrameworkCore.Designto enable migrations and design-time features for Entity Framework Core
Let’s start by adding the required packages:
sinannar@Sinans-MacBook-Pro AspireCrud % pwd
/Users/sinannar/source/BlogTemp/AspireCrud
sinannar@Sinans-MacBook-Pro AspireCrud % aspire add sqlserver
✔  The package Aspire.Hosting.SqlServer::13.1.1 was added successfully.

sinannar@Sinans-MacBook-Pro AspireCrud % cd AspireCrud.ApiService
sinannar@Sinans-MacBook-Pro AspireCrud.ApiService % dotnet add package Aspire.Microsoft.EntityFrameworkCore.SqlServer
sinannar@Sinans-MacBook-Pro AspireCrud.ApiService % dotnet add package Microsoft.EntityFrameworkCore.Design
Using SQL Server in AppHost
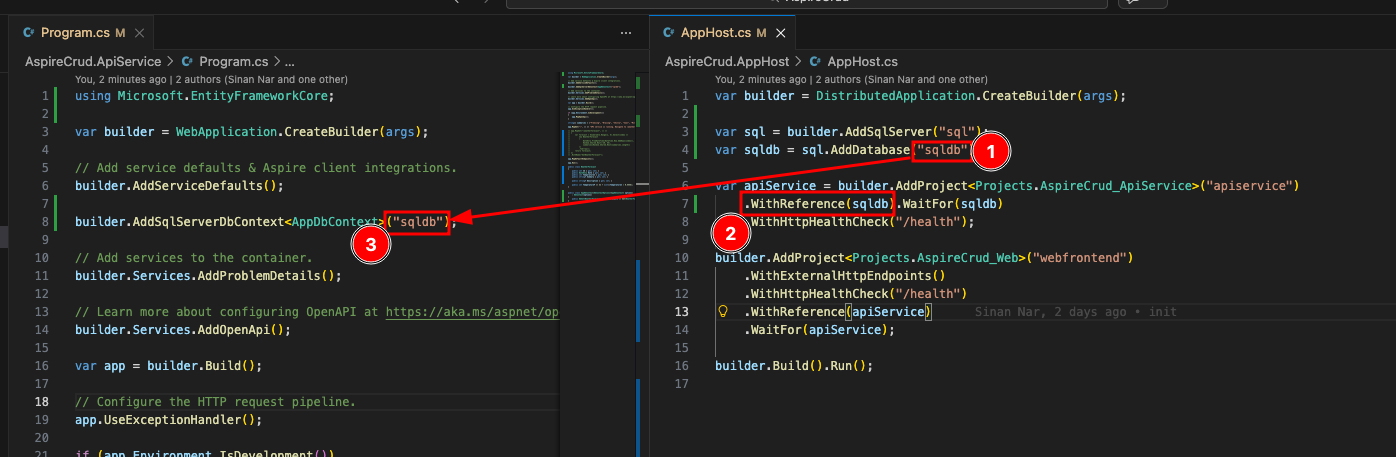
Next, we need to register SQL Server in the AppHost and create a database resource that our API service can use. Add the following code to the AppHost:
var sql = builder.AddSqlServer("sql");
var sqldb = sql.AddDatabase("sqldb");
This registers a SQL Server resource named sql and a database named sqldb.
Once the database resource is available, we can reference it from other services. In this case, we’ll wire it into the API service configuration:
var apiService = builder.AddProject<Projects.AspireCrud_ApiService>("apiservice")
    .WithReference(sqldb).WaitFor(sqldb)
    .WithHttpHealthCheck("/health");
With that in place, Aspire can automatically make the database connection available to the API service. In the next step, we’ll configure the API project to use this database through Entity Framework Core.
Replacing the WeatherForecast model
The default template includes a simple WeatherForecast record in Program.cs:
// Find the WeatherForecast record in Program.cs in ApiService project
record WeatherForecast(DateOnly Date, int TemperatureC, string? Summary)
{
    public int TemperatureF => 32 + (int)(TemperatureC / 0.5556);
}
To support persistence with Entity Framework Core, we need to replace this with a proper entity class that includes an Id property and can be mapped to a database table:
// Replace it with the following code and move it to a new file called WeatherForecast.cs in the same project
public class WeatherForecast
{
    public int Id { get; set; }
    public DateOnly Date { get; set; }
    public int TemperatureC { get; set; }
    public string? Summary { get; set; }

    public string? Description { get; set; }

    public int TemperatureF => 32 + (int)(TemperatureC / 0.5556);
}
This change introduces an Id property for database storage and a Description field so we can enrich the model later.
Because the existing GET /weatherforecast endpoint still relies on the original record and returns hard-coded data, it will no longer fit our updated model. For now, comment it out and we’ll replace it once the database and DbContext are in place.
// Comment out the existing implementation of the endpoint in Program.cs in ApiService project
// app.MapGet("/weatherforecast", () =>
// {
//    ...
// })
// .WithName("GetWeatherForecast");
Adding DbContext
To work with the database, we need to introduce a DbContext.
While it’s best practice to place classes in separate files, for the sake of this demo we’ll keep everything in Program.cs. You can refactor this later if needed.
Make sure you have the following using statement:
using Microsoft.EntityFrameworkCore;Then add the DbContext:
// Add the following DbContext class to the same project, you can name it AppDbContext.cs
public class AppDbContext(DbContextOptions<AppDbContext> options)
    : DbContext(options)
{
    public DbSet<WeatherForecast> WeatherForecasts => Set<WeatherForecast>();
}
Configuring the Database (Aspire Way)
Next, we need to configure the API service to use the SQL Server resource we registered earlier.
builder.AddSqlServerDbContext<AppDbContext>("sqldb");Instead of using the traditional builder.Services.AddDbContext, Aspire provides AddSqlServerDbContext, which:
- Automatically resolves the connection string from AppHost
- Integrates with Aspire’s service discovery
- Adds diagnostic and telemetry enrichment out of the box
The "sqldb" name is important—it matches the database resource we defined in the AppHost and is how Aspire wires everything together.
Behind the Scenes: Service Defaults
A lot of this “magic” comes from the default configuration added via:
builder.AddServiceDefaults();This pulls in shared setup from the ServiceDefaults project, which includes:
- Open Telemetry
- Default Health Checks
- Service Discovery
- Http Client Defaults (eg. Service discovery for http clients, retry policies, etc.)
This is one of the key benefits of Aspire—it standardises these concerns so you don’t have to configure them manually for every service.
Creating Migrations and Updating the Database
Before creating a migration, let’s add a small piece of code to automatically apply migrations and seed some data when the application starts.
Place the following between app.MapDefaultEndpoints(); and app.Run(); in the API service:
using (var scope = app.Services.CreateScope())
{
    var db = scope.ServiceProvider.GetRequiredService<AppDbContext>();
    db.Database.Migrate();
    if (!db.WeatherForecasts.Any())
    {
        var rng = new Random();
        var forecasts = Enumerable.Range(1, 3).Select(index => new WeatherForecast
        {
            Date = DateOnly.FromDateTime(DateTime.Now.AddDays(index)),
            TemperatureC = rng.Next(-20, 55),
            Summary = summaries[rng.Next(summaries.Length)]
        }).ToArray();

        db.WeatherForecasts.AddRange(forecasts);
        db.SaveChanges();
    }
}
This ensures that:
- The database schema is automatically updated on startup
- Some sample data is inserted for testing the read endpoints
Creating the Migration
Now we’re ready to create our first migration. Navigate to the ApiService project and run:
sinannar@Sinans-MacBook-Pro AspireCrud % pwd
/Users/sinannar/source/BlogTemp/AspireCrud
sinannar@Sinans-MacBook-Pro AspireCrud % cd AspireCrud.ApiService
sinannar@Sinans-MacBook-Pro AspireCrud.ApiService % dotnet ef migrations add InitialWeatherForecast
Build started...
Build succeeded.
The Entity Framework tools version '10.0.0' is older than that of the runtime '10.0.3'. Update the tools for the latest features and bug fixes. See https://aka.ms/AAc1fbw for more information.
Done. To undo this action, use 'ef migrations remove'
sinannar@Sinans-MacBook-Pro AspireCrud.ApiService % ls Migrations
20260216072957_InitialWeatherForecast.cs
20260216072957_InitialWeatherForecast.Designer.cs
AppDbContextModelSnapshot.cs
sinannar@Sinans-MacBook-Pro AspireCrud.ApiService %
A new Migrations folder will be created containing the generated migration files.
Implementing CRUD Endpoints
Now we can replace the previously commented GET /weatherforecast endpoint with a full set of CRUD operations backed by the database.
These endpoints use AppDbContext to interact with SQL Server:
app.MapGet("/weatherforecast", async (AppDbContext db) =>
{
    return await db.WeatherForecasts
                   .OrderBy(w => w.Date)
                   .ToListAsync();
});

app.MapPost("/weatherforecast", async (WeatherForecast forecast, AppDbContext db) =>
{
    db.WeatherForecasts.Add(forecast);
    await db.SaveChangesAsync();
    return Results.Created($"/weatherforecast/{forecast.Id}", forecast);
});

app.MapPut("/weatherforecast/{id:int}", async (int id, WeatherForecast input, AppDbContext db) =>
{
    var existing = await db.WeatherForecasts.FindAsync(id);
    if (existing is null) return Results.NotFound();

    existing.Date = input.Date;
    existing.TemperatureC = input.TemperatureC;
    existing.Summary = input.Summary;
    existing.Description = input.Description;

    await db.SaveChangesAsync();
    return Results.NoContent();
});

app.MapDelete("/weatherforecast/{id:int}", async (int id, AppDbContext db) =>
{
    var existing = await db.WeatherForecasts.FindAsync(id);
    if (existing is null) return Results.NotFound();

    db.WeatherForecasts.Remove(existing);
    await db.SaveChangesAsync();
    return Results.NoContent();
});

app.MapPost("/weatherforecast/batch", async (AppDbContext db) =>
{
    var rng = new Random();
    var forecasts = Enumerable.Range(1, 5).Select(index => new WeatherForecast
    {
        Date = DateOnly.FromDateTime(DateTime.Now.AddDays(index)),
        TemperatureC = rng.Next(-20, 55),
        Summary = summaries[rng.Next(summaries.Length)]
    }).ToArray();
    db.WeatherForecasts.AddRange(forecasts);
    await db.SaveChangesAsync();
    return Results.Created("/weatherforecast/batch", forecasts);
});
At this point, the API is fully wired to the database and supports standard create, read, update, and delete operations.
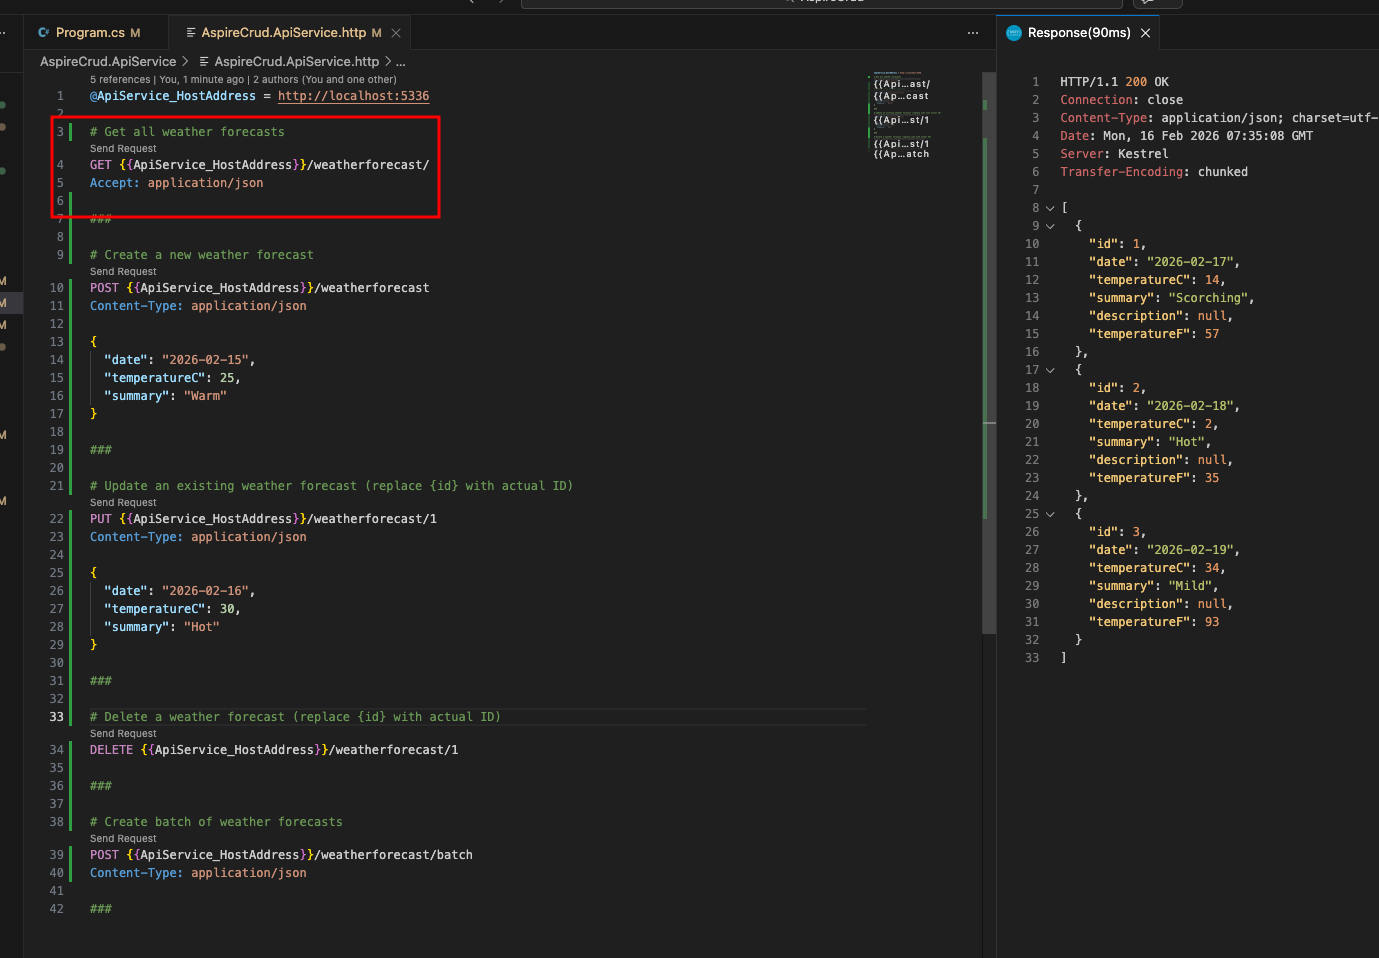
Testing the Endpoints
You can quickly test these endpoints using the .http file included in the API project.
If you’re using VS Code, the REST Client extension makes this especially convenient. Alternatively, you can use tools like Postman or curl.
GET {{ApiService_HostAddress}}/weatherforecast/
Accept: application/json
###
POST {{ApiService_HostAddress}}/weatherforecast
Content-Type: application/json

{
  "date": "2026-02-15",
  "temperatureC": 25,
  "summary": "Warm"
}
###
PUT {{ApiService_HostAddress}}/weatherforecast/1
Content-Type: application/json

{
  "date": "2026-02-16",
  "temperatureC": 30,
  "summary": "Hot"
}
###
DELETE {{ApiService_HostAddress}}/weatherforecast/1

###
POST {{ApiService_HostAddress}}/weatherforecast/batch
Content-Type: application/json

###
Running and Verifying
Run the application:
aspire runYou should now be able to:
- Create and retrieve data from SQL Server
- Update and delete records via the API
- Observe logs, traces, and metrics in the Aspire dashboard
Replacing Blazor with Angular
So far, we’ve built a backend powered by SQL Server with fully functional CRUD endpoints. However, the application is still using the default Blazor frontend generated by the Aspire template.
While Blazor works well, in many real-world scenarios you may want to integrate with an existing JavaScript framework. In this section, we’ll replace the frontend with an Angular application and connect it to the same API.
Removing the Blazor Frontend
First, remove the existing Blazor project from the solution:
sinannar@Sinans-MacBook-Pro AspireCrud % pwd
sinannar@Sinans-MacBook-Pro AspireCrud % dotnet reference remove AspireCrud.Web/AspireCrud.Web.csproj --project AspireCrud.AppHost/AspireCrud.AppHost.csproj
Project reference `../AspireCrud.Web/AspireCrud.Web.csproj` removed.
/Users/sinannar/source/BlogTemp/AspireCrud
sinannar@Sinans-MacBook-Pro AspireCrud % dotnet sln remove AspireCrud.Web/AspireCrud.Web.csproj
Project `AspireCrud.Web/AspireCrud.Web.csproj` removed from the solution.
sinannar@Sinans-MacBook-Pro AspireCrud % rm -rf AspireCrud.Web
Next, remove the frontend configuration from AppHost.cs:
builder.AddProject<Projects.AspireCrud_Web>("webfrontend")
    .WithExternalHttpEndpoints()
    .WithHttpHealthCheck("/health")
    .WithReference(apiService)
    .WaitFor(apiService);
After this change, your AppHost.cs should look like:
var builder = DistributedApplication.CreateBuilder(args);

var sql = builder.AddSqlServer("sql");
var sqldb = sql.AddDatabase("sqldb");

var apiService = builder.AddProject<Projects.AspireCrud_ApiService>("apiservice")
    .WithReference(sqldb).WaitFor(sqldb)
    .WithHttpHealthCheck("/health");

builder.Build().Run();
Creating the Angular Application
Before creating the Angular project, verify your environment:
sinannar@Sinans-MacBook-Pro AspireCrud % node --version
v22.15.1
sinannar@Sinans-MacBook-Pro AspireCrud % npm --version
11.8.0
sinannar@Sinans-MacBook-Pro AspireCrud % ng --version
19.2.12
Then create a new Angular app at the root of the repository:
sinannar@Sinans-MacBook-Pro AspireCrud % ng new AspiredAngular --style css --routing true --ssr=no
CREATE AspiredAngular/README.md (1478 bytes)
CREATE AspiredAngular/.editorconfig (314 bytes)
CREATE AspiredAngular/.gitignore (587 bytes)
CREATE AspiredAngular/angular.json (2623 bytes)
CREATE AspiredAngular/package.json (1010 bytes)
CREATE AspiredAngular/tsconfig.json (915 bytes)
CREATE AspiredAngular/tsconfig.app.json (424 bytes)
CREATE AspiredAngular/tsconfig.spec.json (434 bytes)
CREATE AspiredAngular/.vscode/extensions.json (130 bytes)
CREATE AspiredAngular/.vscode/launch.json (470 bytes)
CREATE AspiredAngular/.vscode/tasks.json (938 bytes)
CREATE AspiredAngular/src/main.ts (250 bytes)
CREATE AspiredAngular/src/index.html (300 bytes)
CREATE AspiredAngular/src/styles.css (80 bytes)
CREATE AspiredAngular/src/app/app.component.css (0 bytes)
CREATE AspiredAngular/src/app/app.component.html (19903 bytes)
CREATE AspiredAngular/src/app/app.component.spec.ts (940 bytes)
CREATE AspiredAngular/src/app/app.component.ts (290 bytes)
CREATE AspiredAngular/src/app/app.config.ts (310 bytes)
CREATE AspiredAngular/src/app/app.routes.ts (77 bytes)
CREATE AspiredAngular/public/favicon.ico (15086 bytes)
✔ Packages installed successfully.
    Directory is already under version control. Skipping initialization of git.
This will scaffold a new Angular project with the default configuration.
Adding JavaScript Support to Aspire
While Angular dependencies are installing, we can prepare Aspire to host the frontend:
sinannar@Sinans-MacBook-Pro AspireCrud % aspire add javascript
✔  The package Aspire.Hosting.JavaScript::13.1.1 was added successfully.
Now update AppHost.cs to include the Angular app:
var builder = DistributedApplication.CreateBuilder(args);

var sql = builder.AddSqlServer("sql");
var sqldb = sql.AddDatabase("sqldb");

var apiService = builder.AddProject<Projects.AspireCrud_ApiService>("apiservice")
    .WithReference(sqldb).WaitFor(sqldb)
    .WithHttpHealthCheck("/health");

var spaWeb = builder.AddJavaScriptApp("spa", "../AspiredAngular", runScriptName: "start")
    .WithNpm(installCommand: "install")
    .WithReference(apiService).WaitFor(apiService)
    .WithUrl("http://localhost:4200")
    .WithHttpEndpoint(env: "PORT");

builder.Build().Run();
This tells Aspire to:
- Run the Angular app using npm start
- Install dependencies automatically
- Wire it to the API service
- Expose it on http://localhost:4200
Running the Application
When you run via aspire run, you should see spa-installer will be run before spa is running.

 Once everything is ready, navigate to: http://localhost:4200 and you should see the default angular application running.
Configuring and Registering Proxy
Before calling the API directly from Angular, we’ll configure a development proxy. This allows the frontend to communicate with the API without running into CORS issues and keeps the setup aligned with Aspire’s service discovery.
Create a new file in the Angular project called proxy.conf.js and add the following:
module.exports = {
  "/api": {
    target:
      process.env["services__apiservice__https__0"] ||
      process.env["services__apiservice__http__0"],
    secure: false,
    changeOrigin: true,
    pathRewrite: {
      "^/api": "",
    },
    logLevel: "debug"
  },
};
Next, update angular.json to enable the proxy configuration.
Under projects.AspiredAngular.architect.serve, add:
"options": {
  "proxyConfig": "proxy.conf.js"
},
Should look like this:
{
  "projects": {
    // other properties
    "AspiredAngular": {
      // other properties
      "architect": {
        // other properties
        "serve": {
          "builder": "@angular-devkit/build-angular:dev-server",
          "options": {
            "proxyConfig": "proxy.conf.js"
          },
        },
      }
    }
  }
}
With this setup:
- Angular can call the API using /api/… paths
- Requests are automatically routed to the correct Aspire service
- You avoid CORS issues during local development
- The setup stays environment-aware (no hardcoded URLs)
Creating Models and Services in Angular
Start by defining a model that matches the API contract. Create src/app/models/weather-forecast.model.ts:
export interface WeatherForecast {
  id?: number;
  date: string;
  temperatureC: number;
  temperatureF?: number;
  summary: string;
  description?: string;
}
Next, create a service to encapsulate all API interactions. Create src/app/services/weather.service.ts:
import { Injectable } from '@angular/core';
import { HttpClient } from '@angular/common/http';
import { Observable } from 'rxjs';
import { WeatherForecast } from '../models/weather-forecast.model';

@Injectable({
  providedIn: 'root'
})
export class WeatherService {
  private apiUrl = '/api/weatherforecast';

  constructor(private http: HttpClient) {}

  getAll(): Observable<WeatherForecast[]> {
    return this.http.get<WeatherForecast[]>(this.apiUrl);
  }

  create(forecast: WeatherForecast): Observable<WeatherForecast> {
    return this.http.post<WeatherForecast>(this.apiUrl, forecast);
  }

  update(id: number, forecast: WeatherForecast): Observable<void> {
    return this.http.put<void>(`${this.apiUrl}/${id}`, forecast);
  }

  delete(id: number): Observable<void> {
    return this.http.delete<void>(`${this.apiUrl}/${id}`);
  }

  createBatch(): Observable<WeatherForecast[]> {
    return this.http.post<WeatherForecast[]>(`${this.apiUrl}/batch`, null);
  }

  getById(id: number): Observable<WeatherForecast> {
    return this.http.get<WeatherForecast>(`${this.apiUrl}/${id}`);
  }
}
By using /api/... as the base URL, requests are automatically routed through the Aspire proxy to the API service.
Configuring HttpClient
Finally, enable HTTP support in your Angular application. Update app.config.ts:
import { ApplicationConfig, provideZoneChangeDetection } from '@angular/core';
import { provideRouter } from '@angular/router';
import { provideHttpClient } from '@angular/common/http';

import { routes } from './app.routes';

export const appConfig: ApplicationConfig = {
  providers: [
    provideZoneChangeDetection({ eventCoalescing: true }),
    provideRouter(routes),
    provideHttpClient()
  ]
};
At this point:
- Angular is fully connected to your Aspire API
- All CRUD operations are accessible via a typed service
- No hardcoded URLs are required (thanks to the proxy + Aspire)
Updating the App Component
Now that the Angular service is in place, we can connect it to the UI.
Update app.component.ts to consume the WeatherService and manage the data displayed in the application:
import { Component, OnInit } from '@angular/core';
import { CommonModule } from '@angular/common';
import { FormsModule } from '@angular/forms';
import { WeatherService } from './services/weather.service';
import { WeatherForecast } from './models/weather-forecast.model';

@Component({
  selector: 'app-root',
  imports: [CommonModule, FormsModule],
  templateUrl: './app.component.html',
  styleUrl: './app.component.css'
})
export class AppComponent implements OnInit {
  title = 'Weather Forecast Manager';
  forecasts: WeatherForecast[] = [];
  loading = false;
  error: string | null = null;

  // Form model
  formModel: WeatherForecast = {
    date: new Date().toISOString().split('T')[0],
    temperatureC: 20,
    summary: '',
    description: ''
  };

  isEditing = false;
  showForm = false;

  constructor(private weatherService: WeatherService) {}

  ngOnInit(): void {
    this.loadForecasts();
  }

  loadForecasts(): void {
    this.loading = true;
    this.error = null;
    this.weatherService.getAll().subscribe({
      next: (data) => {
        console.log('Loaded forecasts:', data);
        this.forecasts = data;
        this.loading = false;
      },
      error: (err) => {
        this.error = 'Failed to load forecasts: ' + err.message;
        this.loading = false;
      }
    });
  }

  createForecast(): void {
    this.loading = true;
    this.error = null;
    this.weatherService.create(this.formModel).subscribe({
      next: (forecast) => {
        this.forecasts.push(forecast);
        this.resetForm();
        this.loading = false;
      },
      error: (err) => {
        this.error = 'Failed to create forecast: ' + err.message;
        this.loading = false;
      }
    });
  }

  editForecast(forecast: WeatherForecast): void {
    this.formModel = { ...forecast };
    this.isEditing = true;
    this.showForm = true;
  }

  updateForecast(): void {
    if (!this.formModel?.id) return;

    this.loading = true;
    this.error = null;
    const updatedData = { ...this.formModel };
    this.weatherService.update(this.formModel.id, this.formModel).subscribe({
      next: () => {
        // Update successful (204 No Content), update local data
        const index = this.forecasts.findIndex(f => f.id === updatedData.id);
        if (index !== -1) {
          this.forecasts[index] = updatedData;
        }
        this.cancelEdit();
        this.loading = false;
      },
      error: (err) => {
        this.error = 'Failed to update forecast: ' + err.message;
        this.loading = false;
      }
    });
  }

  deleteForecast(id: number | undefined): void {
    if (!id || !confirm('Are you sure you want to delete this forecast?')) return;

    this.loading = true;
    this.error = null;
    this.weatherService.delete(id).subscribe({
      next: () => {
        this.forecasts = this.forecasts.filter(f => f.id !== id);
        this.loading = false;
      },
      error: (err) => {
        this.error = 'Failed to delete forecast: ' + err.message;
        this.loading = false;
      }
    });
  }

  createBatch(): void {
    this.loading = true;
    this.error = null;
    this.weatherService.createBatch().subscribe({
      next: (newForecasts) => {
        this.forecasts.push(...newForecasts);
        this.loading = false;
      },
      error: (err) => {
        this.error = 'Failed to create batch: ' + err.message;
        this.loading = false;
      }
    });
  }

  resetForm(): void {
    this.formModel = {
      date: new Date().toISOString().split('T')[0],
      temperatureC: 20,
      summary: '',
      description: ''
    };
    this.isEditing = false;
    this.showForm = false;
  }

  cancelEdit(): void {
    this.resetForm();
  }

  getTemperatureF(temperatureC: number): number {
    return Math.round(32 + temperatureC * 9 / 5);
  }

  getTemperatureColor(tempC: number): string {
    if (tempC < 0) return '#3b82f6'; // blue
    if (tempC < 15) return '#06b6d4'; // cyan
    if (tempC < 25) return '#10b981'; // green
    if (tempC < 35) return '#f59e0b'; // orange
    return '#ef4444'; // red
  }
}
Next, update app.component.html to render the weather forecasts and provide a simple interface for create, update, delete, and batch operations:
<div class="container">
<header>
<h1>🌤️ {{ title }}</h1>
<p class="subtitle">Manage your weather forecasts with full CRUD operations</p>
</header>
<!-- Error Message -->
<div class="error" *ngIf="error">
<span>⚠️ {{ error }}</span>
<button (click)="error = null" class="close-btn">×</button>
</div>
<!-- Action Buttons -->
<div class="actions">
<button (click)="showForm = !showForm; isEditing = false; resetForm()" class="btn btn-primary">
{{ showForm ? '❌ Cancel' : '➕ New Forecast' }}
</button>
<button (click)="createBatch()" class="btn btn-secondary" [disabled]="loading">
📦 Create Batch
</button>
<button (click)="loadForecasts()" class="btn btn-secondary" [disabled]="loading">
🔄 Refresh
</button>
</div>
<!-- Create/Edit Form -->
<div class="form-card" *ngIf="showForm">
<h2>{{ isEditing ? '✏️ Edit Forecast' : '➕ Create New Forecast' }}</h2>
<form (ngSubmit)="isEditing ? updateForecast() : createForecast()">
<div class="form-group">
<label for="date">Date</label>
<input
type="date"
id="date"
[(ngModel)]="formModel.date"
name="date"
required
/>
</div>
<div class="form-group">
<label for="temperature">Temperature (°C)</label>
<input
type="number"
id="temperature"
[(ngModel)]="formModel.temperatureC"
name="temperature"
required
/>
<small>
≈ {{ getTemperatureF(formModel.temperatureC) }}°F
</small>
</div>
<div class="form-group">
<label for="summary">Summary</label>
<select
id="summary"
[(ngModel)]="formModel.summary"
name="summary"
required
>
<option value="">Select weather...</option>
<option value="Freezing">❄️ Freezing</option>
<option value="Bracing">🥶 Bracing</option>
<option value="Chilly">🧊 Chilly</option>
<option value="Cool">😌 Cool</option>
<option value="Mild">🌤️ Mild</option>
<option value="Warm">☀️ Warm</option>
<option value="Balmy">🌞 Balmy</option>
<option value="Hot">🔥 Hot</option>
<option value="Sweltering">🥵 Sweltering</option>
<option value="Scorching">♨️ Scorching</option>
</select>
</div>
<div class="form-group">
<label for="description">Description</label>
<textarea
id="description"
[(ngModel)]="formModel.description"
name="description"
rows="3"
placeholder="Add detailed weather description..."
></textarea>
</div>
<div class="form-actions">
<button type="submit" class="btn btn-success" [disabled]="loading">
{{ isEditing ? '💾 Update' : '✅ Create' }}
</button>
<button type="button" (click)="cancelEdit(); resetForm()" class="btn btn-secondary">
Cancel
</button>
</div>
</form>
</div>
<!-- Loading Spinner -->
<div class="loading" *ngIf="loading">
<div class="spinner"></div>
<p>Loading...</p>
</div>
<!-- Forecasts Grid -->
<div class="forecasts-grid" *ngIf="!loading">
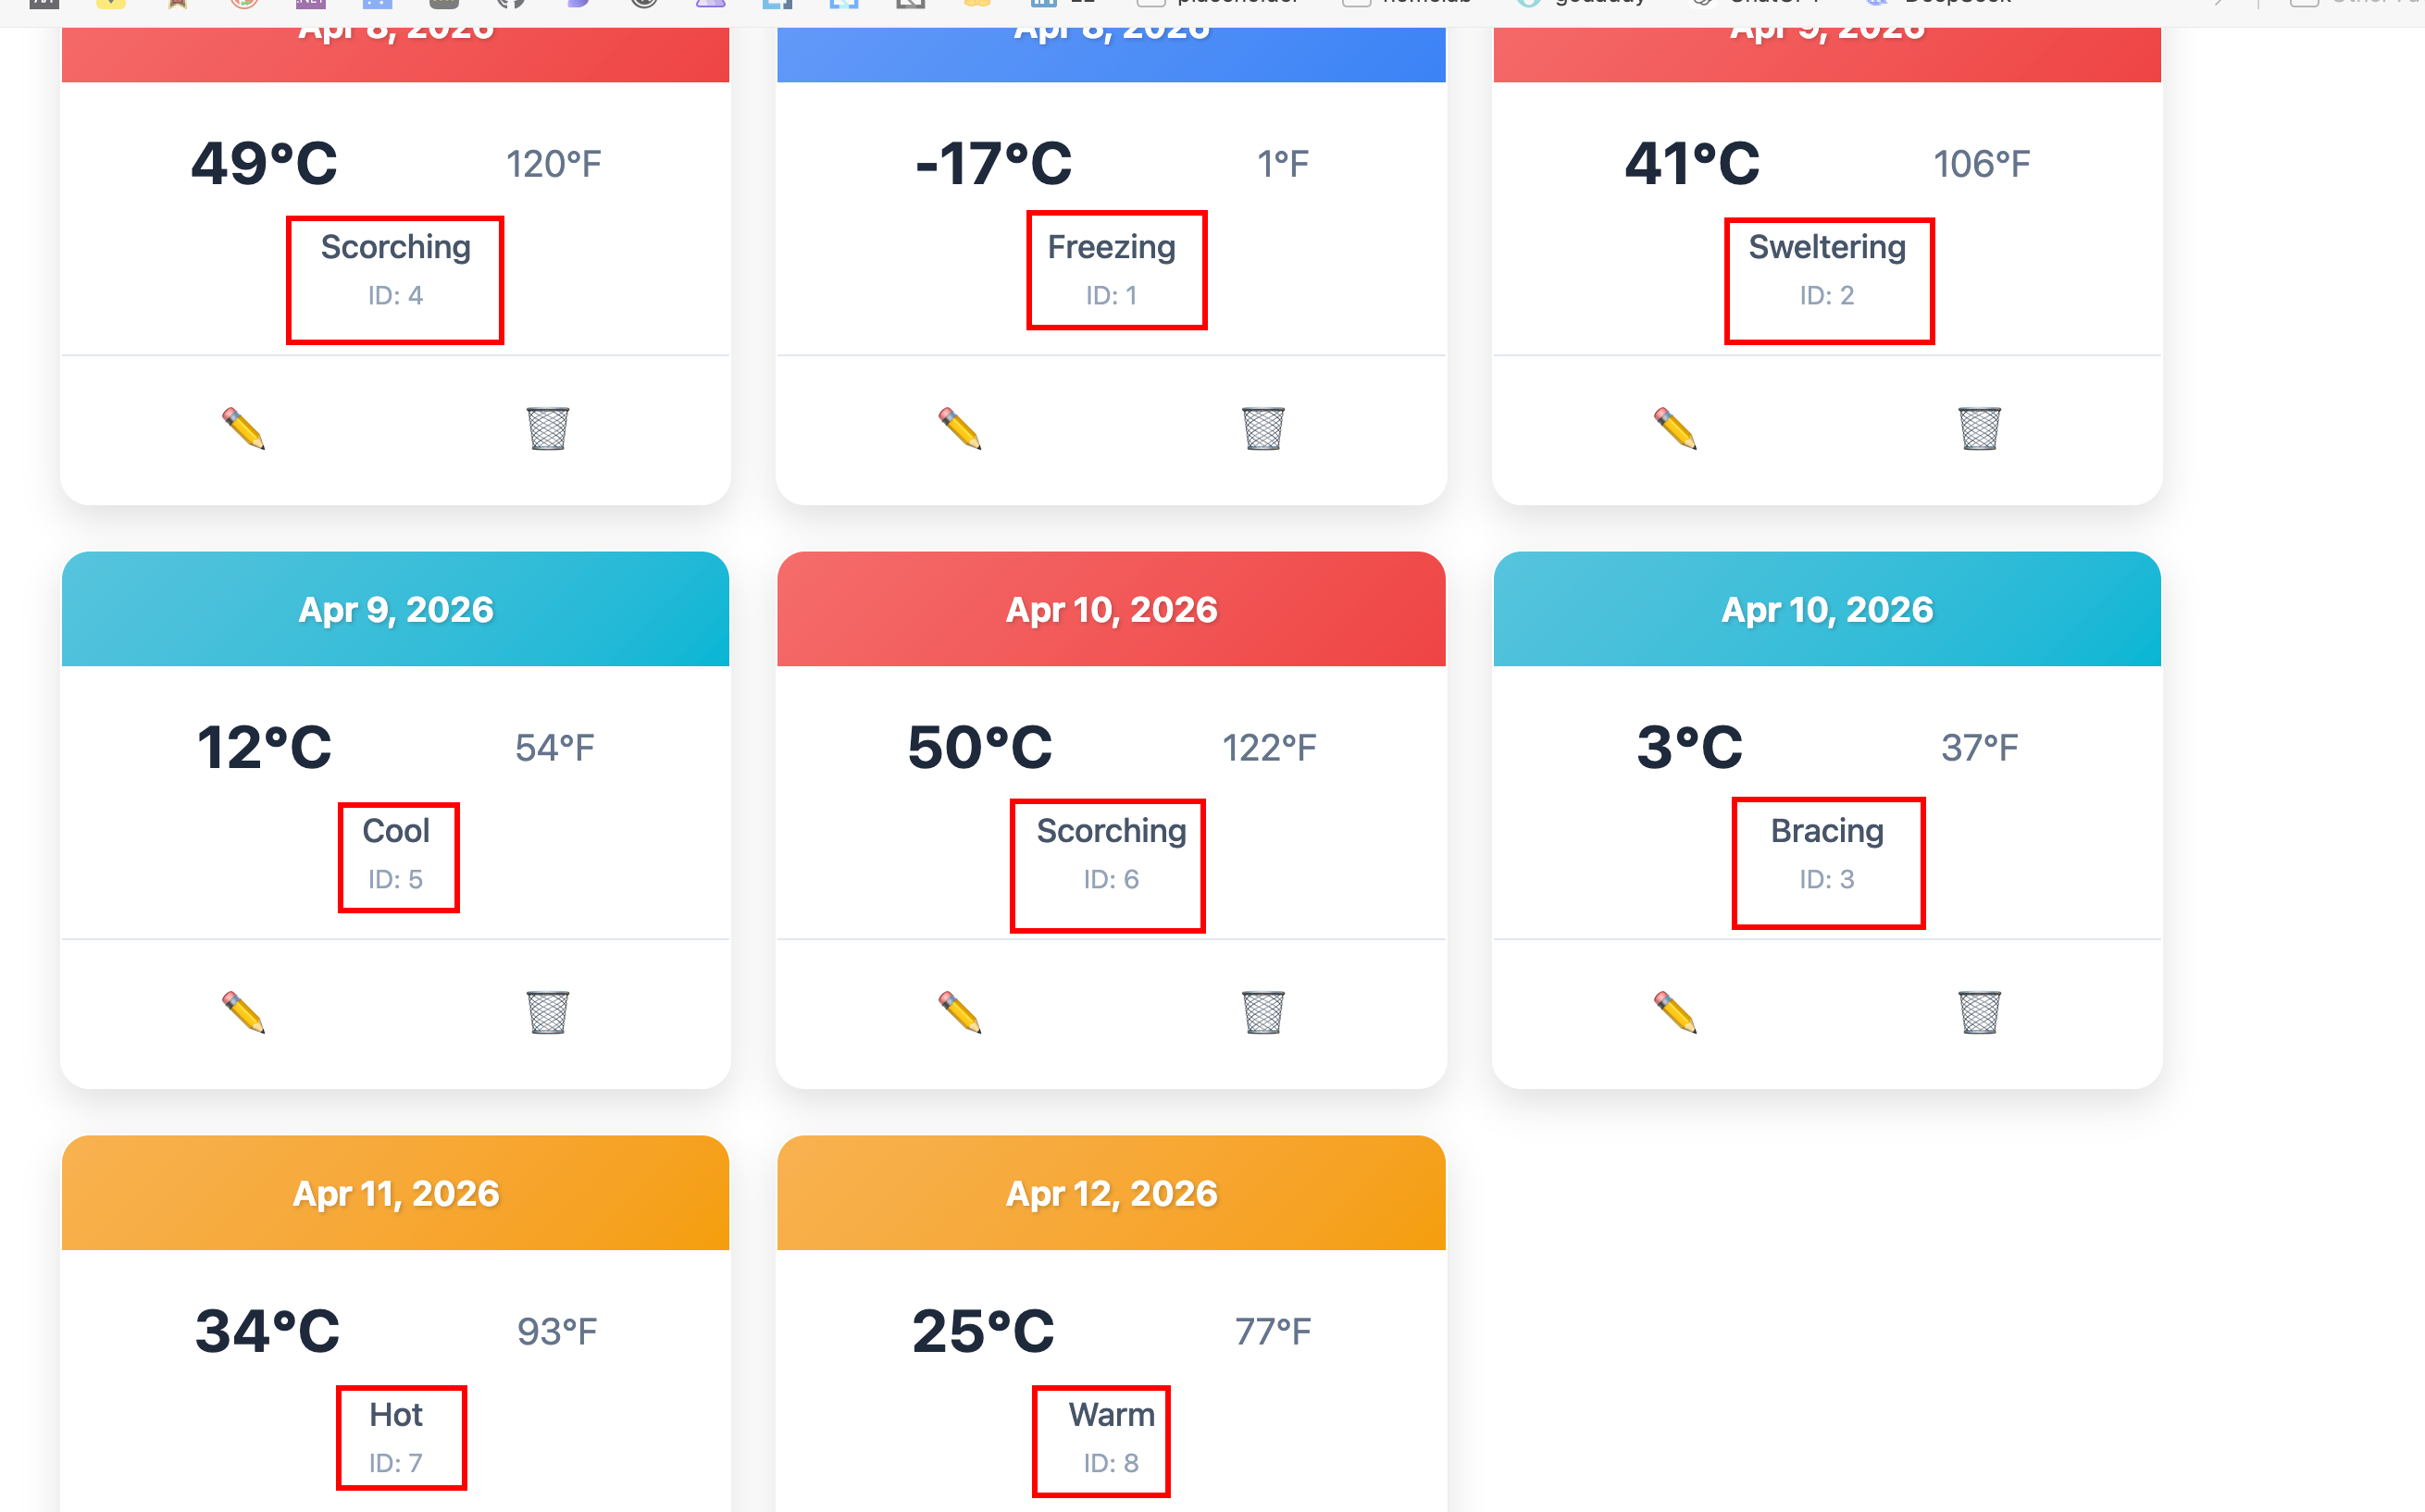
<div class="forecast-card" *ngFor="let forecast of forecasts">
<div class="forecast-header" [style.background]="getTemperatureColor(forecast.temperatureC)">
<h3>{{ forecast.date | date: 'MMM d, y' }}</h3>
</div>
<div class="forecast-body">
<div class="temperature">
<span class="temp-c">{{ forecast.temperatureC }}°C</span>
<span class="temp-f">{{ getTemperatureF(forecast.temperatureC) }}°F</span>
</div>
<div class="summary">{{ forecast.summary }}</div>
<div class="description" *ngIf="forecast.description && forecast.description.trim().length > 0">
{{ forecast.description }}
</div>
<div class="forecast-id">ID: {{ forecast.id }}</div>
</div>
<div class="forecast-actions">
<button (click)="editForecast(forecast)" class="btn-icon" title="Edit">
✏️
</button>
<button (click)="deleteForecast(forecast.id)" class="btn-icon btn-danger" title="Delete">
🗑️
</button>
</div>
</div>
</div>
<!-- Empty State -->
<div class="empty-state" *ngIf="!loading && forecasts.length === 0">
<p>📭 No forecasts found</p>
<p>Create your first forecast or load a batch!</p>
</div>
</div>Finally, add some basic styling in app.component.css:
* {
  box-sizing: border-box;
  margin: 0;
  padding: 0;
}

.container {
  max-width: 1200px;
  margin: 0 auto;
  padding: 2rem;
  font-family: -apple-system, BlinkMacSystemFont, 'Segoe UI', Roboto, Oxygen, Ubuntu, Cantarell, sans-serif;
}

header {
  text-align: center;
  margin-bottom: 2rem;
}

h1 {
  color: #ffffff;
  font-size: 2.5rem;
  margin-bottom: 0.5rem;
  text-shadow: 2px 2px 4px rgba(0, 0, 0, 0.3);
  font-weight: 700;
}

.subtitle {
  color: #f0f4ff;
  font-size: 1.1rem;
  text-shadow: 1px 1px 2px rgba(0, 0, 0, 0.2);
}

/* Error Message */
.error {
  background: linear-gradient(135deg, #fee2e2 0%, #fecaca 100%);
  border: 2px solid #ef4444;
  color: #7f1d1d;
  padding: 1rem 1.5rem;
  border-radius: 12px;
  margin-bottom: 1.5rem;
  display: flex;
  justify-content: space-between;
  align-items: center;
  box-shadow: 0 4px 12px rgba(239, 68, 68, 0.3);
  font-weight: 500;
}

.close-btn {
  background: none;
  border: none;
  font-size: 1.5rem;
  cursor: pointer;
  color: #991b1b;
  transition: transform 0.2s;
}

.close-btn:hover {
  transform: scale(1.2);
}

/* Actions */
.actions {
  display: flex;
  gap: 1rem;
  margin-bottom: 2rem;
  flex-wrap: wrap;
}

.btn {
  padding: 0.75rem 1.5rem;
  border: none;
  border-radius: 8px;
  font-size: 1rem;
  font-weight: 500;
  cursor: pointer;
  transition: all 0.2s;
}

.btn:disabled {
  opacity: 0.5;
  cursor: not-allowed;
}

.btn-primary {
  background: linear-gradient(135deg, #3b82f6 0%, #2563eb 100%);
  color: white;
  box-shadow: 0 4px 12px rgba(59, 130, 246, 0.3);
}

.btn-primary:hover:not(:disabled) {
  background: linear-gradient(135deg, #2563eb 0%, #1d4ed8 100%);
  transform: translateY(-2px);
  box-shadow: 0 6px 20px rgba(59, 130, 246, 0.5);
}

.btn-secondary {
  background: linear-gradient(135deg, #8b5cf6 0%, #7c3aed 100%);
  color: white;
  box-shadow: 0 4px 12px rgba(139, 92, 246, 0.3);
}

.btn-secondary:hover:not(:disabled) {
  background: linear-gradient(135deg, #7c3aed 0%, #6d28d9 100%);
  transform: translateY(-2px);
  box-shadow: 0 6px 20px rgba(139, 92, 246, 0.5);
}

.btn-success {
  background: linear-gradient(135deg, #10b981 0%, #059669 100%);
  color: white;
  box-shadow: 0 4px 12px rgba(16, 185, 129, 0.3);
}

.btn-success:hover:not(:disabled) {
  background: linear-gradient(135deg, #059669 0%, #047857 100%);
  transform: translateY(-2px);
  box-shadow: 0 6px 20px rgba(16, 185, 129, 0.5);
}

/* Form Card */
.form-card {
  background: linear-gradient(to bottom, #ffffff 0%, #f8fafc 100%);
  border: 2px solid #e0e7ff;
  border-radius: 16px;
  padding: 2rem;
  margin-bottom: 2rem;
  box-shadow: 0 10px 30px rgba(0, 0, 0, 0.15);
}

.form-card h2 {
  color: #1e293b;
  margin-bottom: 1.5rem;
}

.form-group {
  margin-bottom: 1.5rem;
}

.form-group label {
  display: block;
  color: #475569;
  font-weight: 500;
  margin-bottom: 0.5rem;
}

.form-group input,
.form-group select,
.form-group textarea {
  width: 100%;
  padding: 0.75rem;
  border: 2px solid #e2e8f0;
  border-radius: 8px;
  font-size: 1rem;
  transition: border-color 0.2s;
  font-family: inherit;
}

.form-group textarea {
  resize: vertical;
  min-height: 80px;
}

.form-group input:focus,
.form-group select:focus,
.form-group textarea:focus {
  outline: none;
  border-color: #8b5cf6;
  box-shadow: 0 0 0 3px rgba(139, 92, 246, 0.2);
}

.form-group small {
  display: block;
  margin-top: 0.5rem;
  color: #64748b;
}

.form-actions {
  display: flex;
  gap: 1rem;
  margin-top: 2rem;
}

/* Loading */
.loading {
  text-align: center;
  padding: 3rem;
}

.spinner {
  width: 50px;
  height: 50px;
  border: 4px solid rgba(255, 255, 255, 0.3);
  border-top-color: #ffffff;
  border-radius: 50%;
  animation: spin 1s linear infinite;
  margin: 0 auto 1rem;
}

.loading p {
  color: #ffffff;
  font-weight: 500;
  text-shadow: 1px 1px 2px rgba(0, 0, 0, 0.2);
}

@keyframes spin {
  to { transform: rotate(360deg); }
}

/* Forecasts Grid */
.forecasts-grid {
  display: grid;
  grid-template-columns: repeat(auto-fill, minmax(280px, 1fr));
  gap: 1.5rem;
  margin-top: 2rem;
}

.forecast-card {
  background: white;
  border-radius: 16px;
  overflow: hidden;
  box-shadow: 0 8px 20px rgba(0, 0, 0, 0.12);
  transition: transform 0.3s, box-shadow 0.3s;
  border: 1px solid rgba(255, 255, 255, 0.8);
}

.forecast-card:hover {
  transform: translateY(-8px);
  box-shadow: 0 16px 40px rgba(0, 0, 0, 0.2);
}

.forecast-header {
  padding: 1.25rem;
  color: white;
  text-align: center;
  font-weight: 600;
  text-shadow: 1px 1px 2px rgba(0, 0, 0, 0.2);
  position: relative;
  overflow: hidden;
}

.forecast-header::before {
  content: '';
  position: absolute;
  top: 0;
  left: 0;
  right: 0;
  bottom: 0;
  background: linear-gradient(135deg, rgba(255, 255, 255, 0.2) 0%, rgba(255, 255, 255, 0) 100%);
  pointer-events: none;
}

.forecast-body {
  padding: 1.5rem;
}

.temperature {
  display: flex;
  justify-content: space-around;
  align-items: center;
  margin-bottom: 1rem;
}

.temp-c {
  font-size: 2rem;
  font-weight: bold;
  color: #1e293b;
}

.temp-f {
  font-size: 1.25rem;
  color: #64748b;
}

.summary {
  text-align: center;
  font-size: 1.1rem;
  color: #475569;
  margin-bottom: 0.5rem;
  font-weight: 500;
}

.description {
  text-align: center;
  font-size: 0.9rem;
  color: #64748b;
  margin: 0.75rem 0;
  padding: 0.5rem;
  background: #f8fafc;
  border-radius: 6px;
  font-style: italic;
  line-height: 1.4;
}

.forecast-id {
  text-align: center;
  font-size: 0.875rem;
  color: #94a3b8;
}

.forecast-actions {
  display: flex;
  justify-content: space-around;
  padding: 1rem;
  border-top: 1px solid #e2e8f0;
}

.btn-icon {
  background: none;
  border: none;
  font-size: 1.5rem;
  cursor: pointer;
  padding: 0.5rem;
  border-radius: 8px;
  transition: all 0.2s;
}

.btn-icon:hover {
  background: linear-gradient(135deg, #e0e7ff 0%, #ddd6fe 100%);
  transform: scale(1.15);
}

.btn-danger:hover {
  background: linear-gradient(135deg, #fee2e2 0%, #fecaca 100%);
}

/* Empty State */
.empty-state {
  text-align: center;
  padding: 4rem 2rem;
  color: #ffffff;
  background: rgba(255, 255, 255, 0.1);
  border-radius: 16px;
}

.empty-state p {
  font-size: 1.25rem;
  margin-bottom: 0.5rem;
  text-shadow: 1px 1px 2px rgba(0, 0, 0, 0.2);
  font-weight: 500;
}

/* Responsive */
@media (max-width: 768px) {
  .container {
    padding: 1rem;
  }

  h1 {
    font-size: 2rem;
  }

  .forecasts-grid {
    grid-template-columns: 1fr;
  }

  .actions {
    flex-direction: column;
  }

  .btn {
    width: 100%;
  }
}
Running the Application
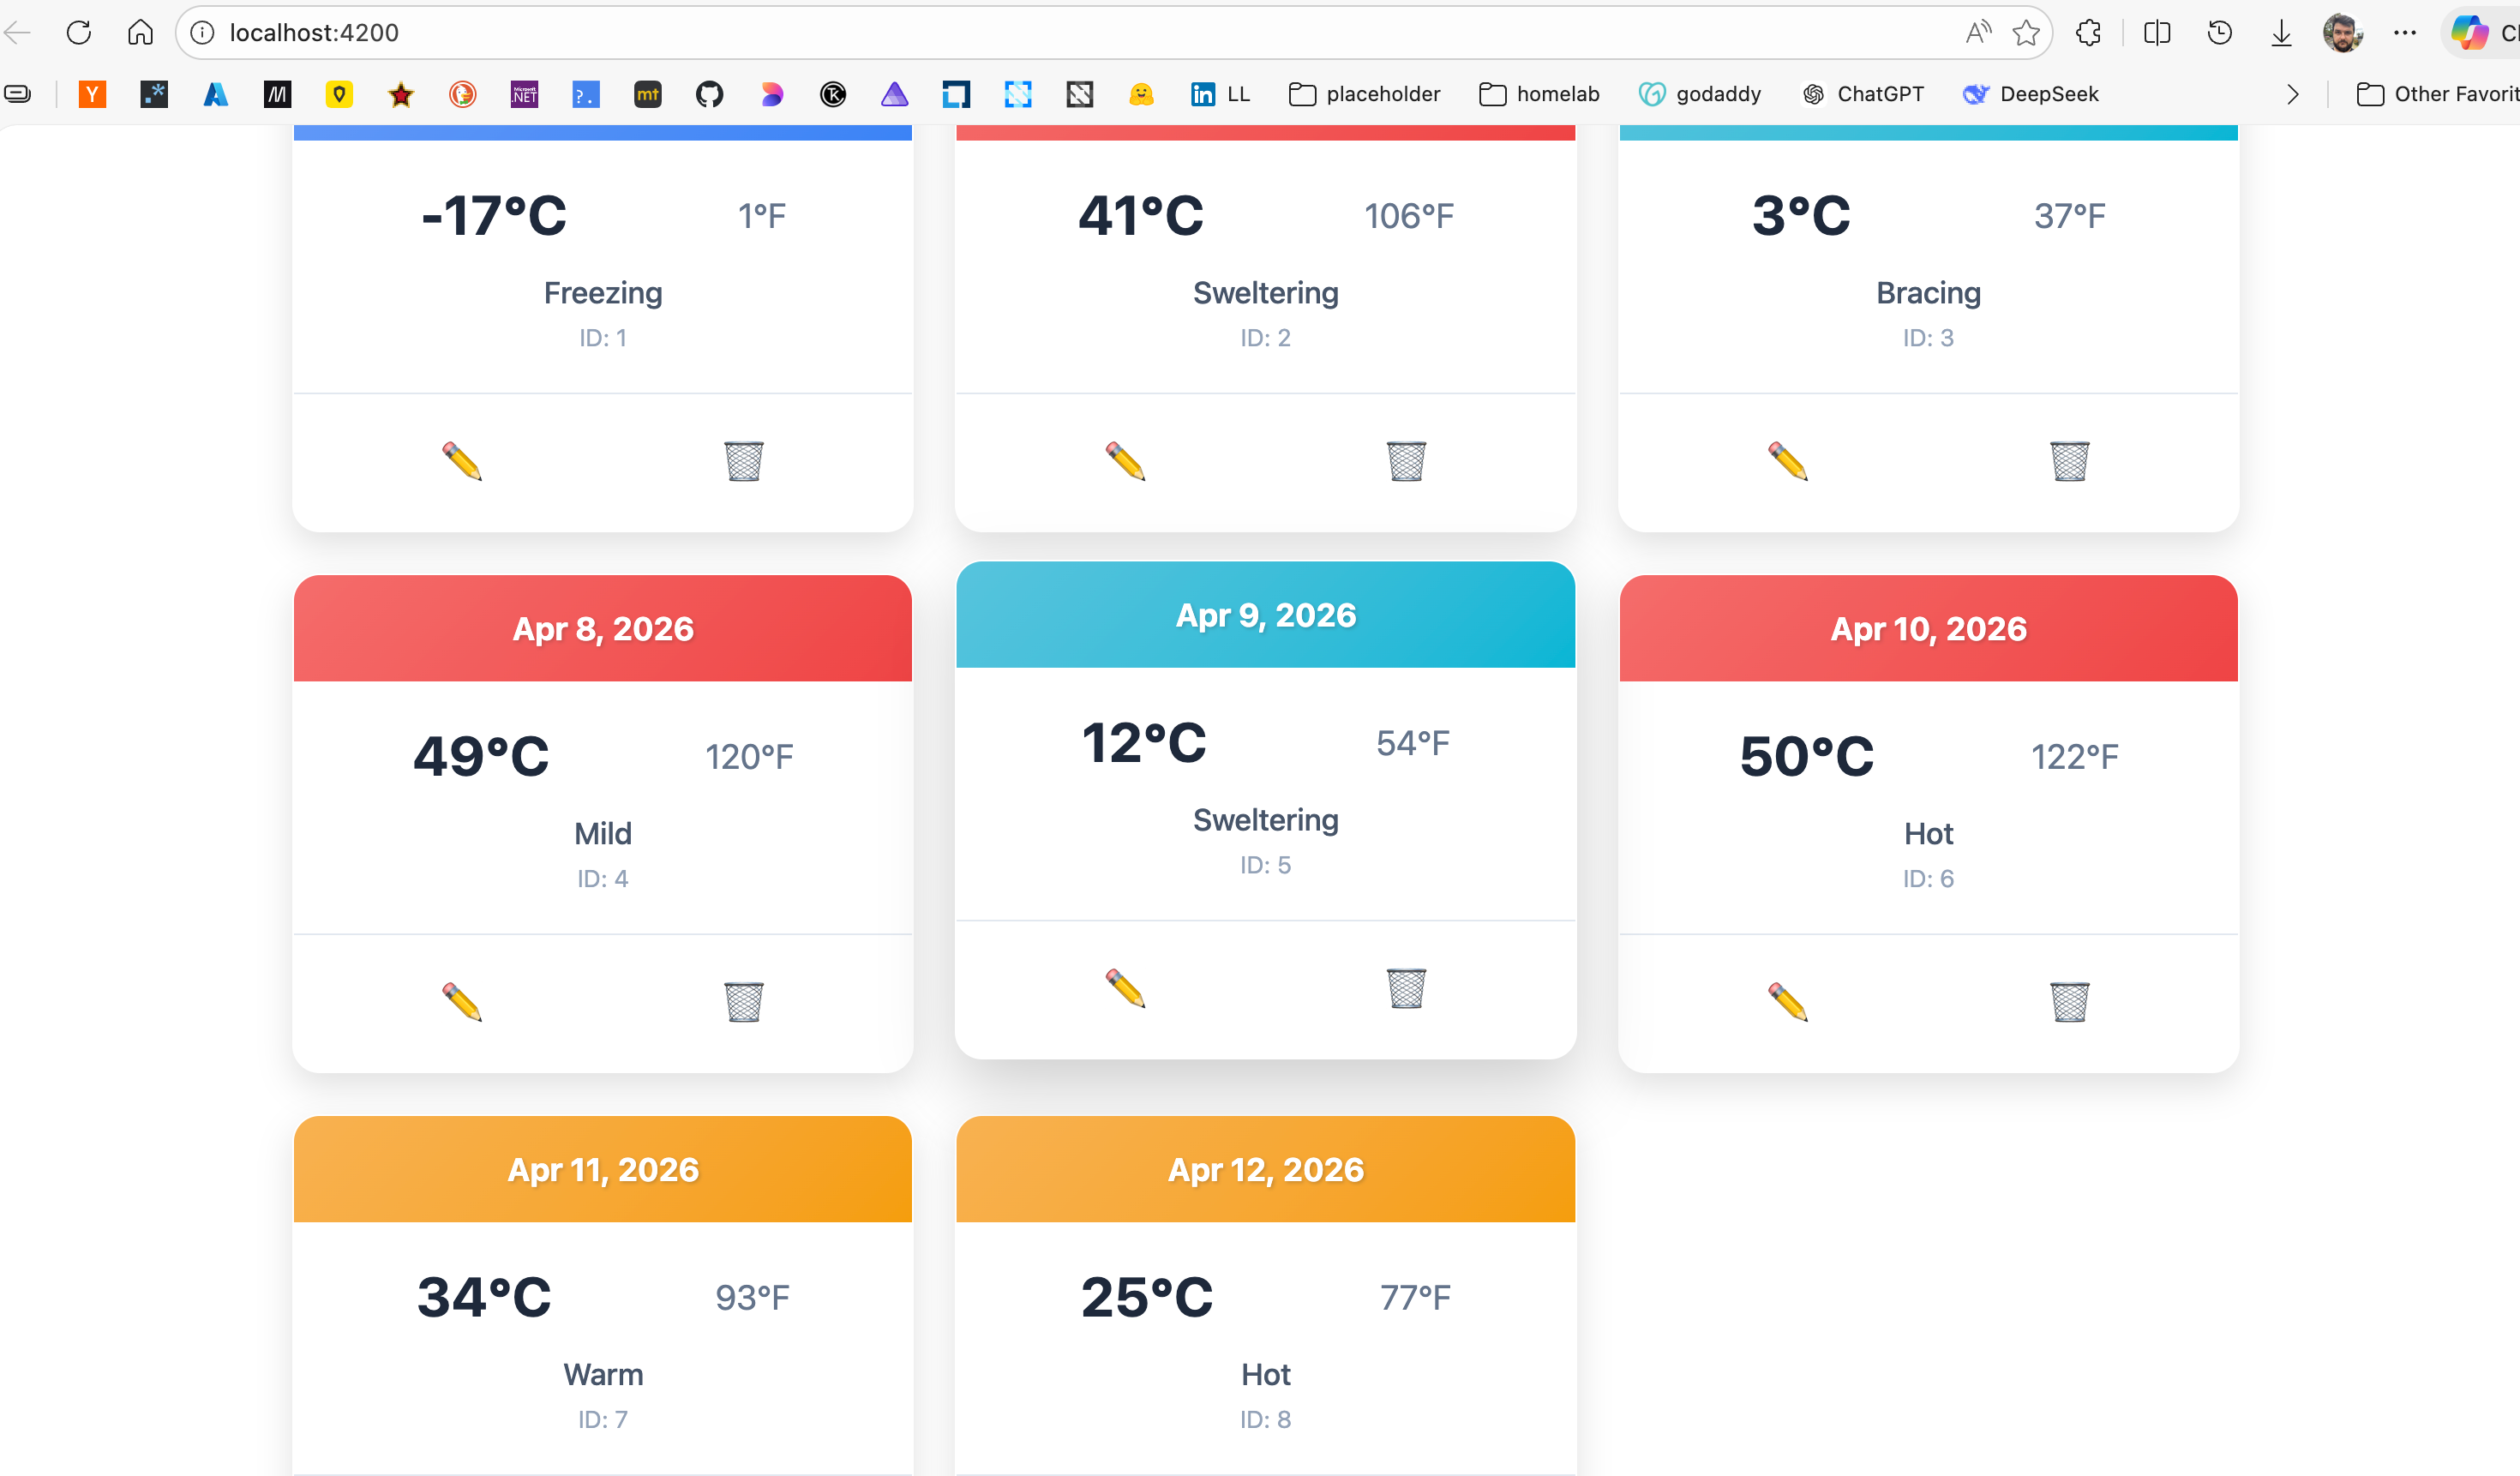
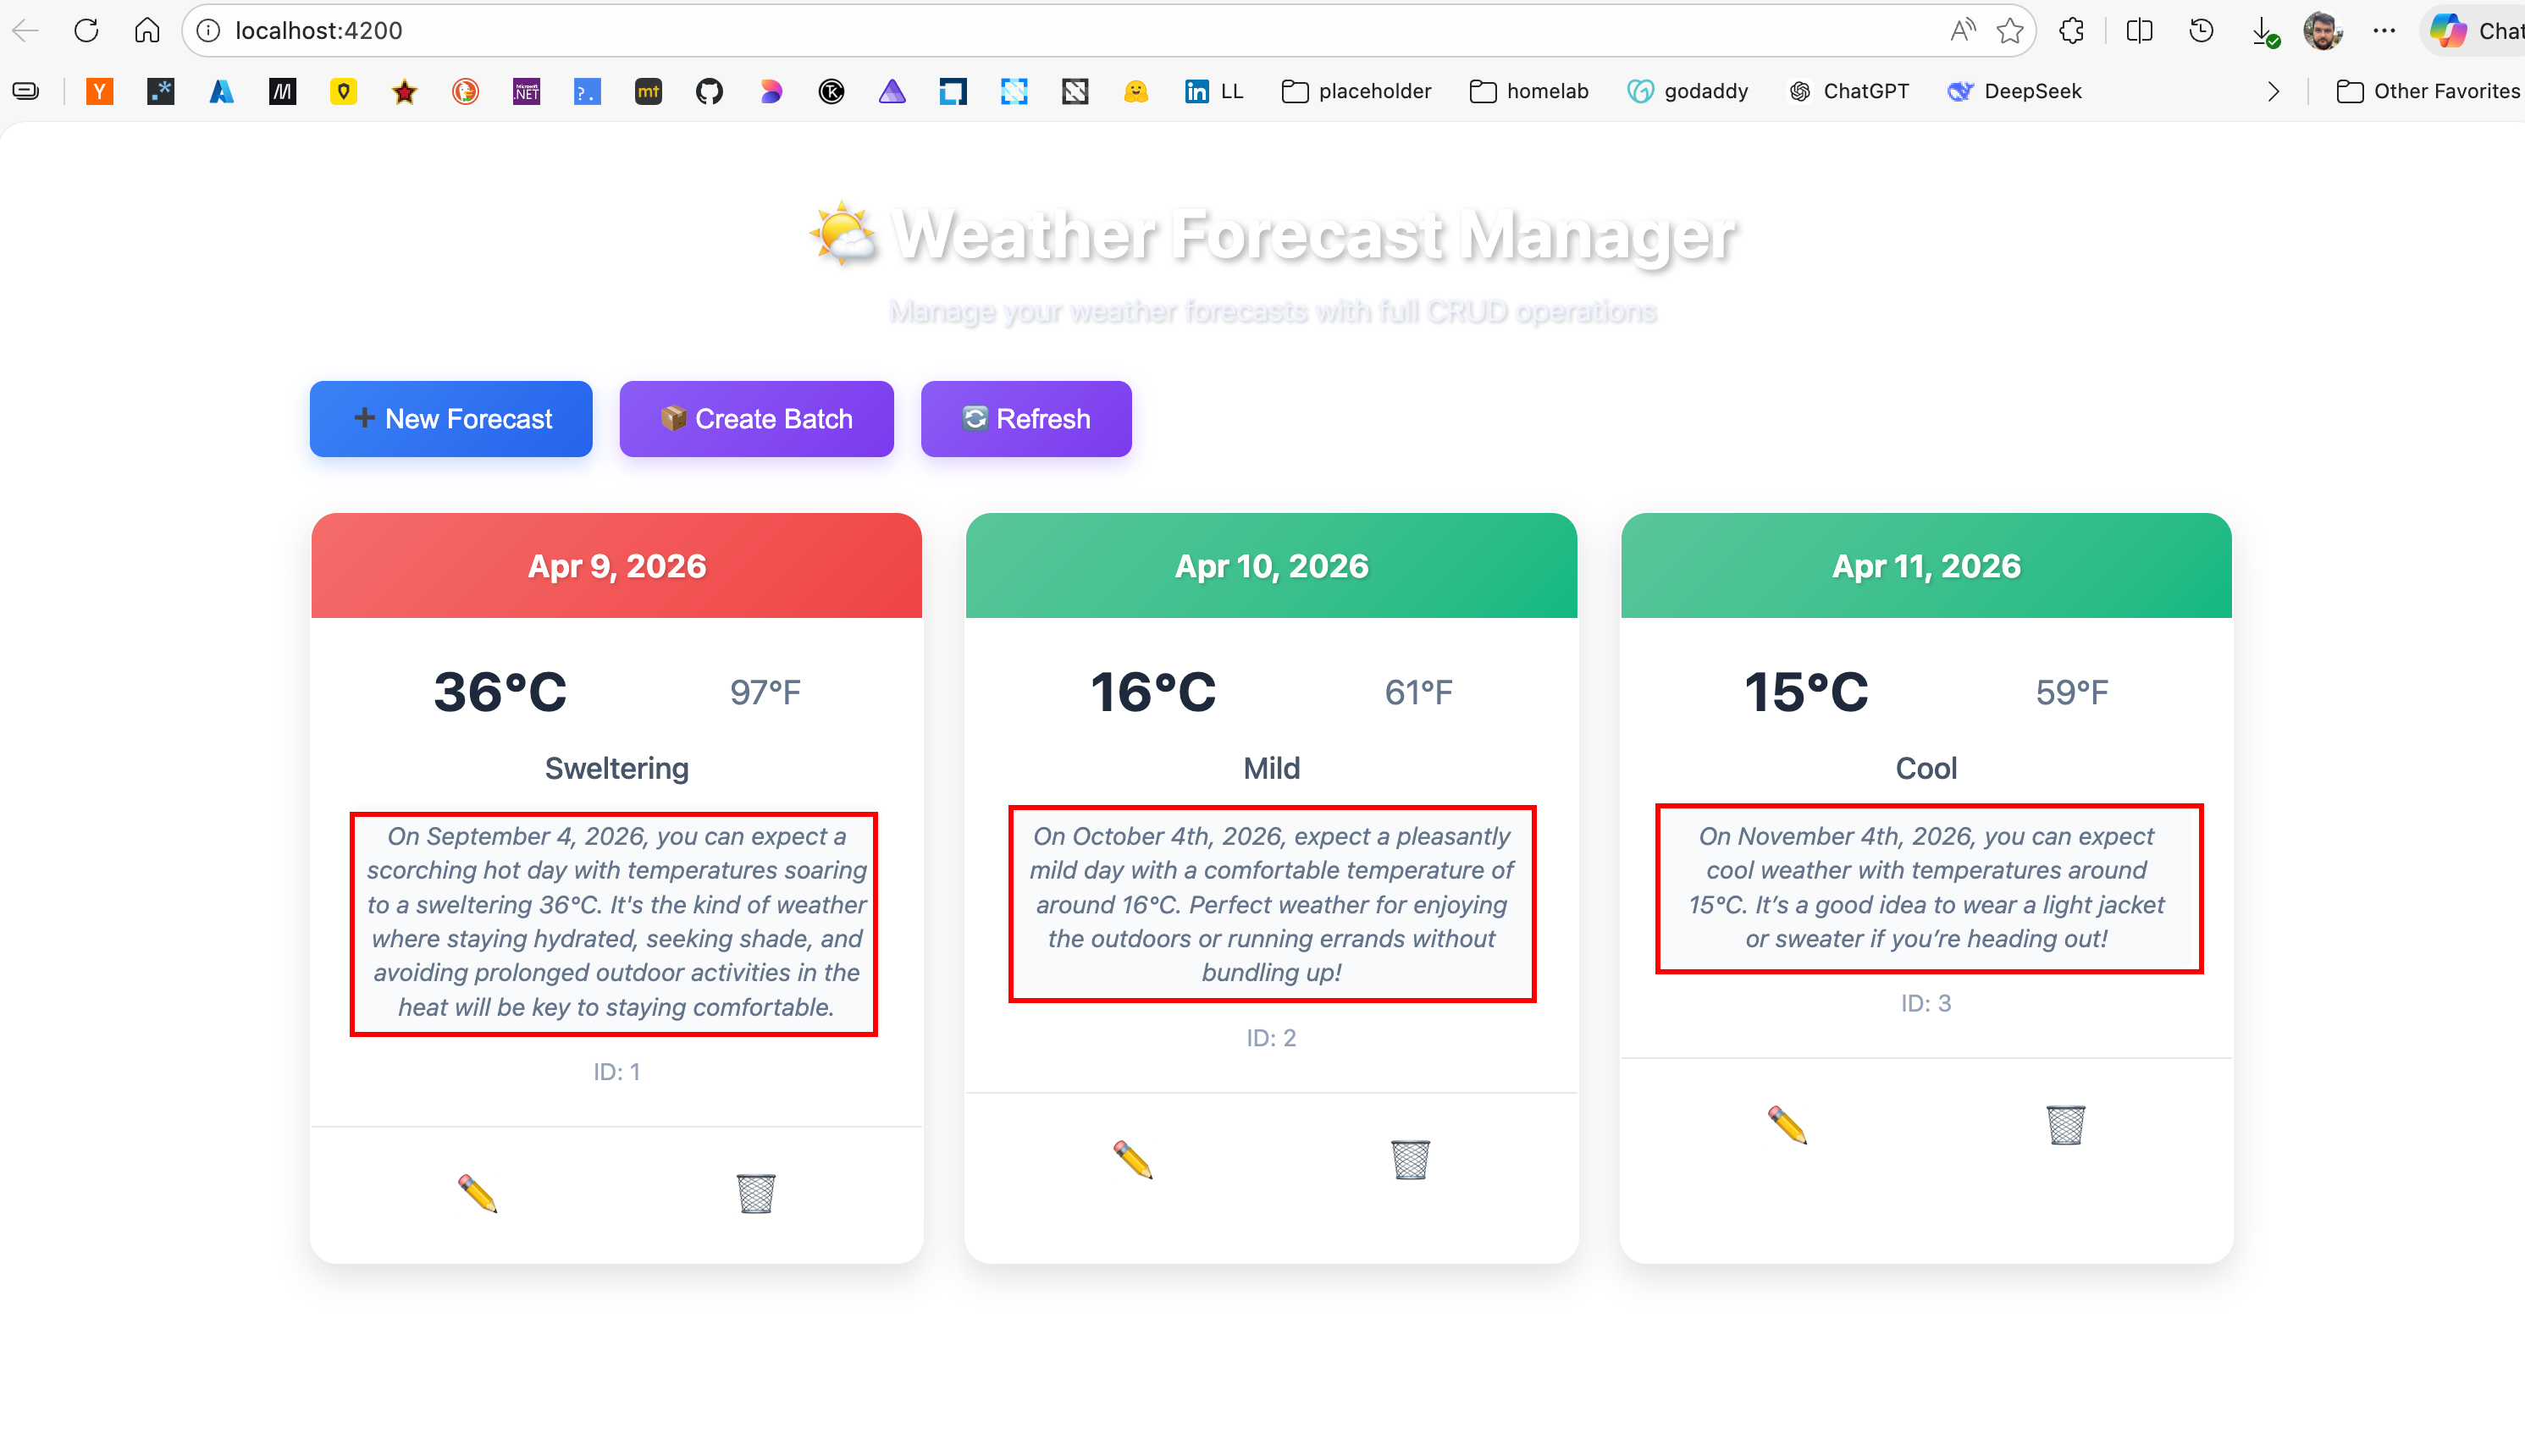
With those changes in place, run the application again using aspire run, then navigate to http://localhost:4200. You should now see the Angular frontend loading weather forecast data from the API service. From the UI, you can create, update, delete, and batch-create forecasts, with changes reflected immediately in both the interface and the database.
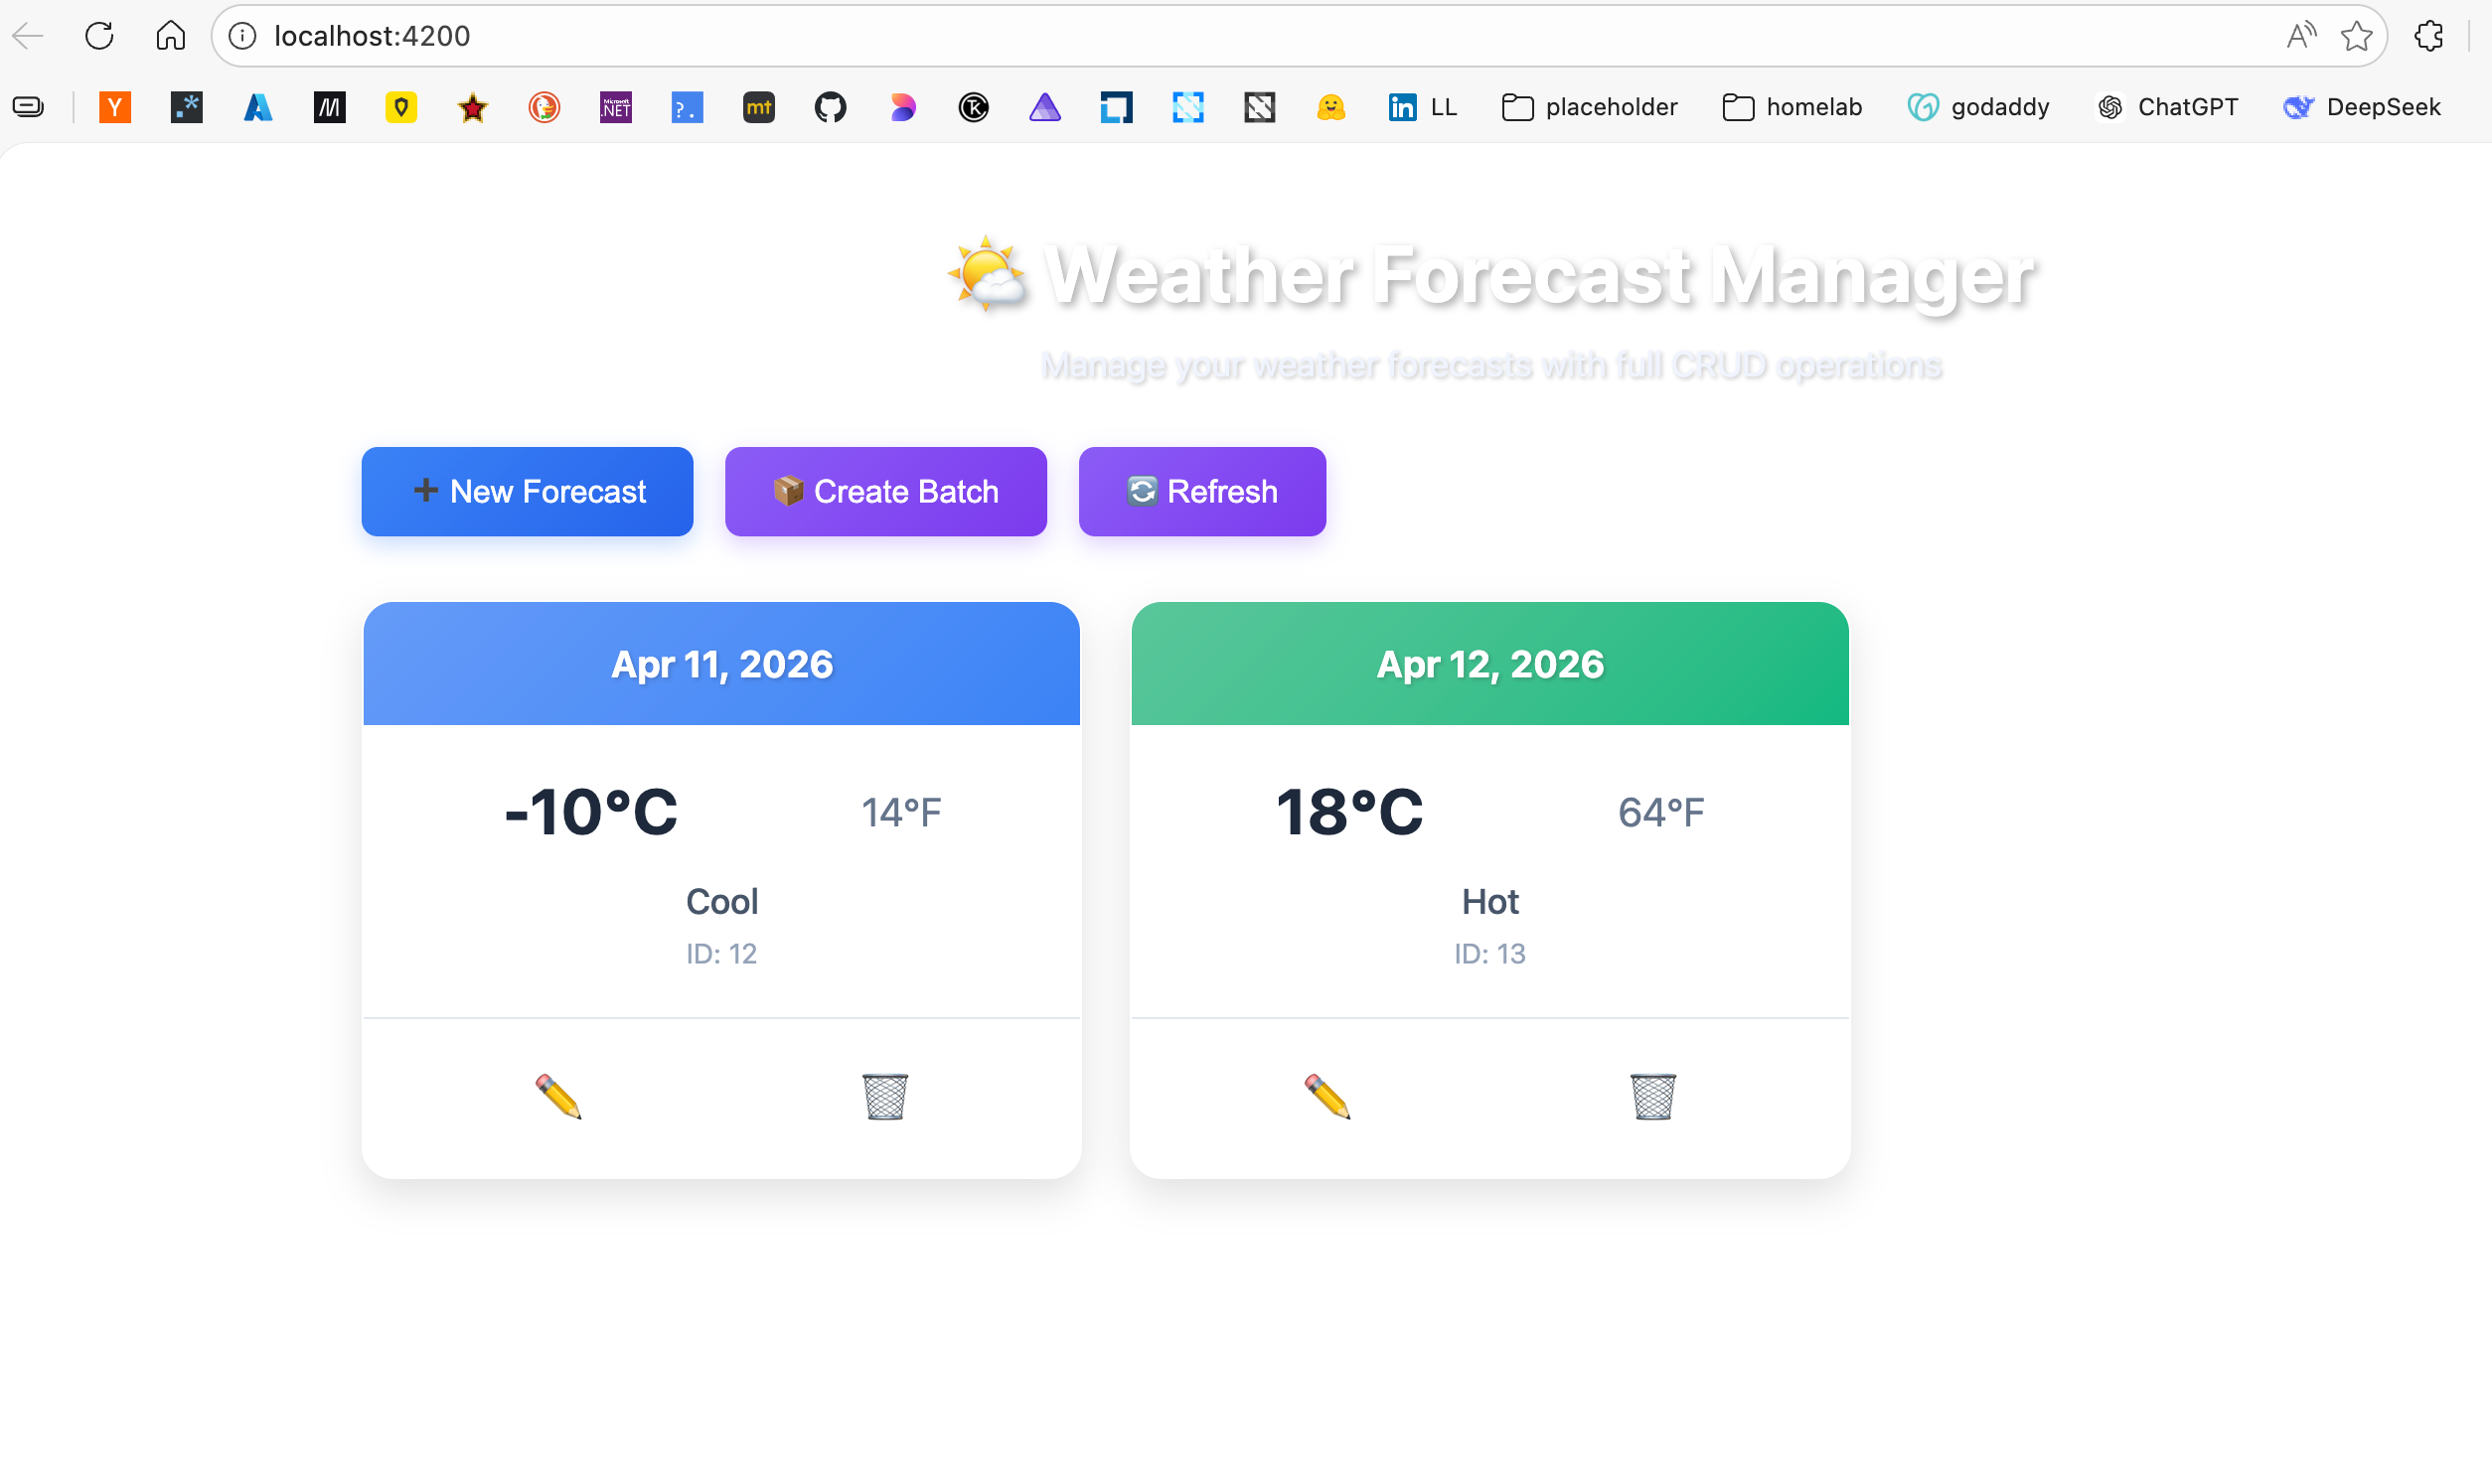
You can also edit existing items, generate a batch of forecasts, and remove records as needed.

At this point, the application demonstrates one of the key strengths of this approach: a decoupled frontend working seamlessly with a well-defined backend API, all orchestrated through Aspire.
Azure Function Integration
Creating the Function Project
Next, let’s introduce Azure Functions to handle background or event-driven workloads.
Azure Functions provide a serverless compute model, and with Aspire, we can integrate them seamlessly into our existing application.
We’ll start by creating a new function project using the func CLI:
sinannar@Sinans-MacBook-Pro AspireCrud % func --version
4.5.0
sinannar@Sinans-MacBook-Pro AspireCrud % func init AspireCrud.Function --worker-runtime dotnet-isolated
Writing /Users/sinannar/source/BlogTemp/AspireCrud/AspireCrud.Function/.vscode/extensions.json
sinannar@Sinans-MacBook-Pro AspireCrud % dotnet sln add AspireCrud.Function/AspireCrud_Function.csproj
Project `AspireCrud.Function/AspireCrud_Function.csproj` added to the solution.
sinannar@Sinans-MacBook-Pro AspireCrud % dotnet reference add AspireCrud.Function/AspireCrud_Function.csproj --project AspireCrud.AppHost/AspireCrud.AppHost.csproj
Reference `..\AspireCrud.Function\AspireCrud_Function.csproj` added to the project.
Updating the Target Framework
By default, as of now, the Functions project targets .NET 8. Since our solution is using .NET 10, update the target framework in AspireCrud.Function.csproj:
<Project Sdk="Microsoft.NET.Sdk">
  <PropertyGroup>
    <TargetFramework>net10.0</TargetFramework>
  </PropertyGroup>
</Project>
Applying Service Defaults
Then we will reference ServiceDefault project to our function project to use opinionated best practices by running the following command in terminal
sinannar@Sinans-MacBook-Pro AspireCrud % dotnet reference add AspireCrud.ServiceDefaults/AspireCrud.ServiceDefaults.csproj --project AspireCrud.Function/AspireCrud_Function.csproj
Reference `..\AspireCrud.ServiceDefaults\AspireCrud.ServiceDefaults.csproj` added to the project.
This brings in the same defaults we’ve been using across the application (telemetry, service discovery, etc.).
Adding Azure Resources to Aspire and Updating AppHost.cs
Next, install the required Aspire integrations: Since we successfully created the function project and added it to our solution, lets work on our aspire setup.
sinannar@Sinans-MacBook-Pro AspireCrud % aspire add azure-storage
✔  The package Aspire.Hosting.Azure.Storage::13.1.1 was added successfully.
sinannar@Sinans-MacBook-Pro AspireCrud % aspire add azure-functions
✔  The package Aspire.Hosting.Azure.Functions::13.1.1 was added successfully.
Now we can wire everything together in AppHost.cs:
var builder = DistributedApplication.CreateBuilder(args);

var storage = builder.AddAzureStorage("storage")
    .RunAsEmulator();

var sql = builder.AddSqlServer("sql");
var sqldb = sql.AddDatabase("sqldb");


var apiService = builder.AddProject<Projects.AspireCrud_ApiService>("apiservice")
    .WithReference(sqldb).WaitFor(sqldb)
    .WithHttpHealthCheck("/health");

var function = builder.AddAzureFunctionsProject<Projects.AspireCrud_Function>("function")
    .WithReference(apiService).WaitFor(apiService)
    .WithHostStorage(storage);

var spaWeb = builder.AddJavaScriptApp("spa", "../AspiredAngular", runScriptName: "start")
    .WithNpm(installCommand: "install")
    .WithReference(apiService).WaitFor(apiService)
    .WithUrl("http://localhost:4200")
    .WithHttpEndpoint(env: "PORT");

builder.Build().Run();
With this setup:
- Azure Storage is provisioned locally using an emulator
- The Function App is registered and connected to the API
- Aspire manages dependencies and startup order automatically
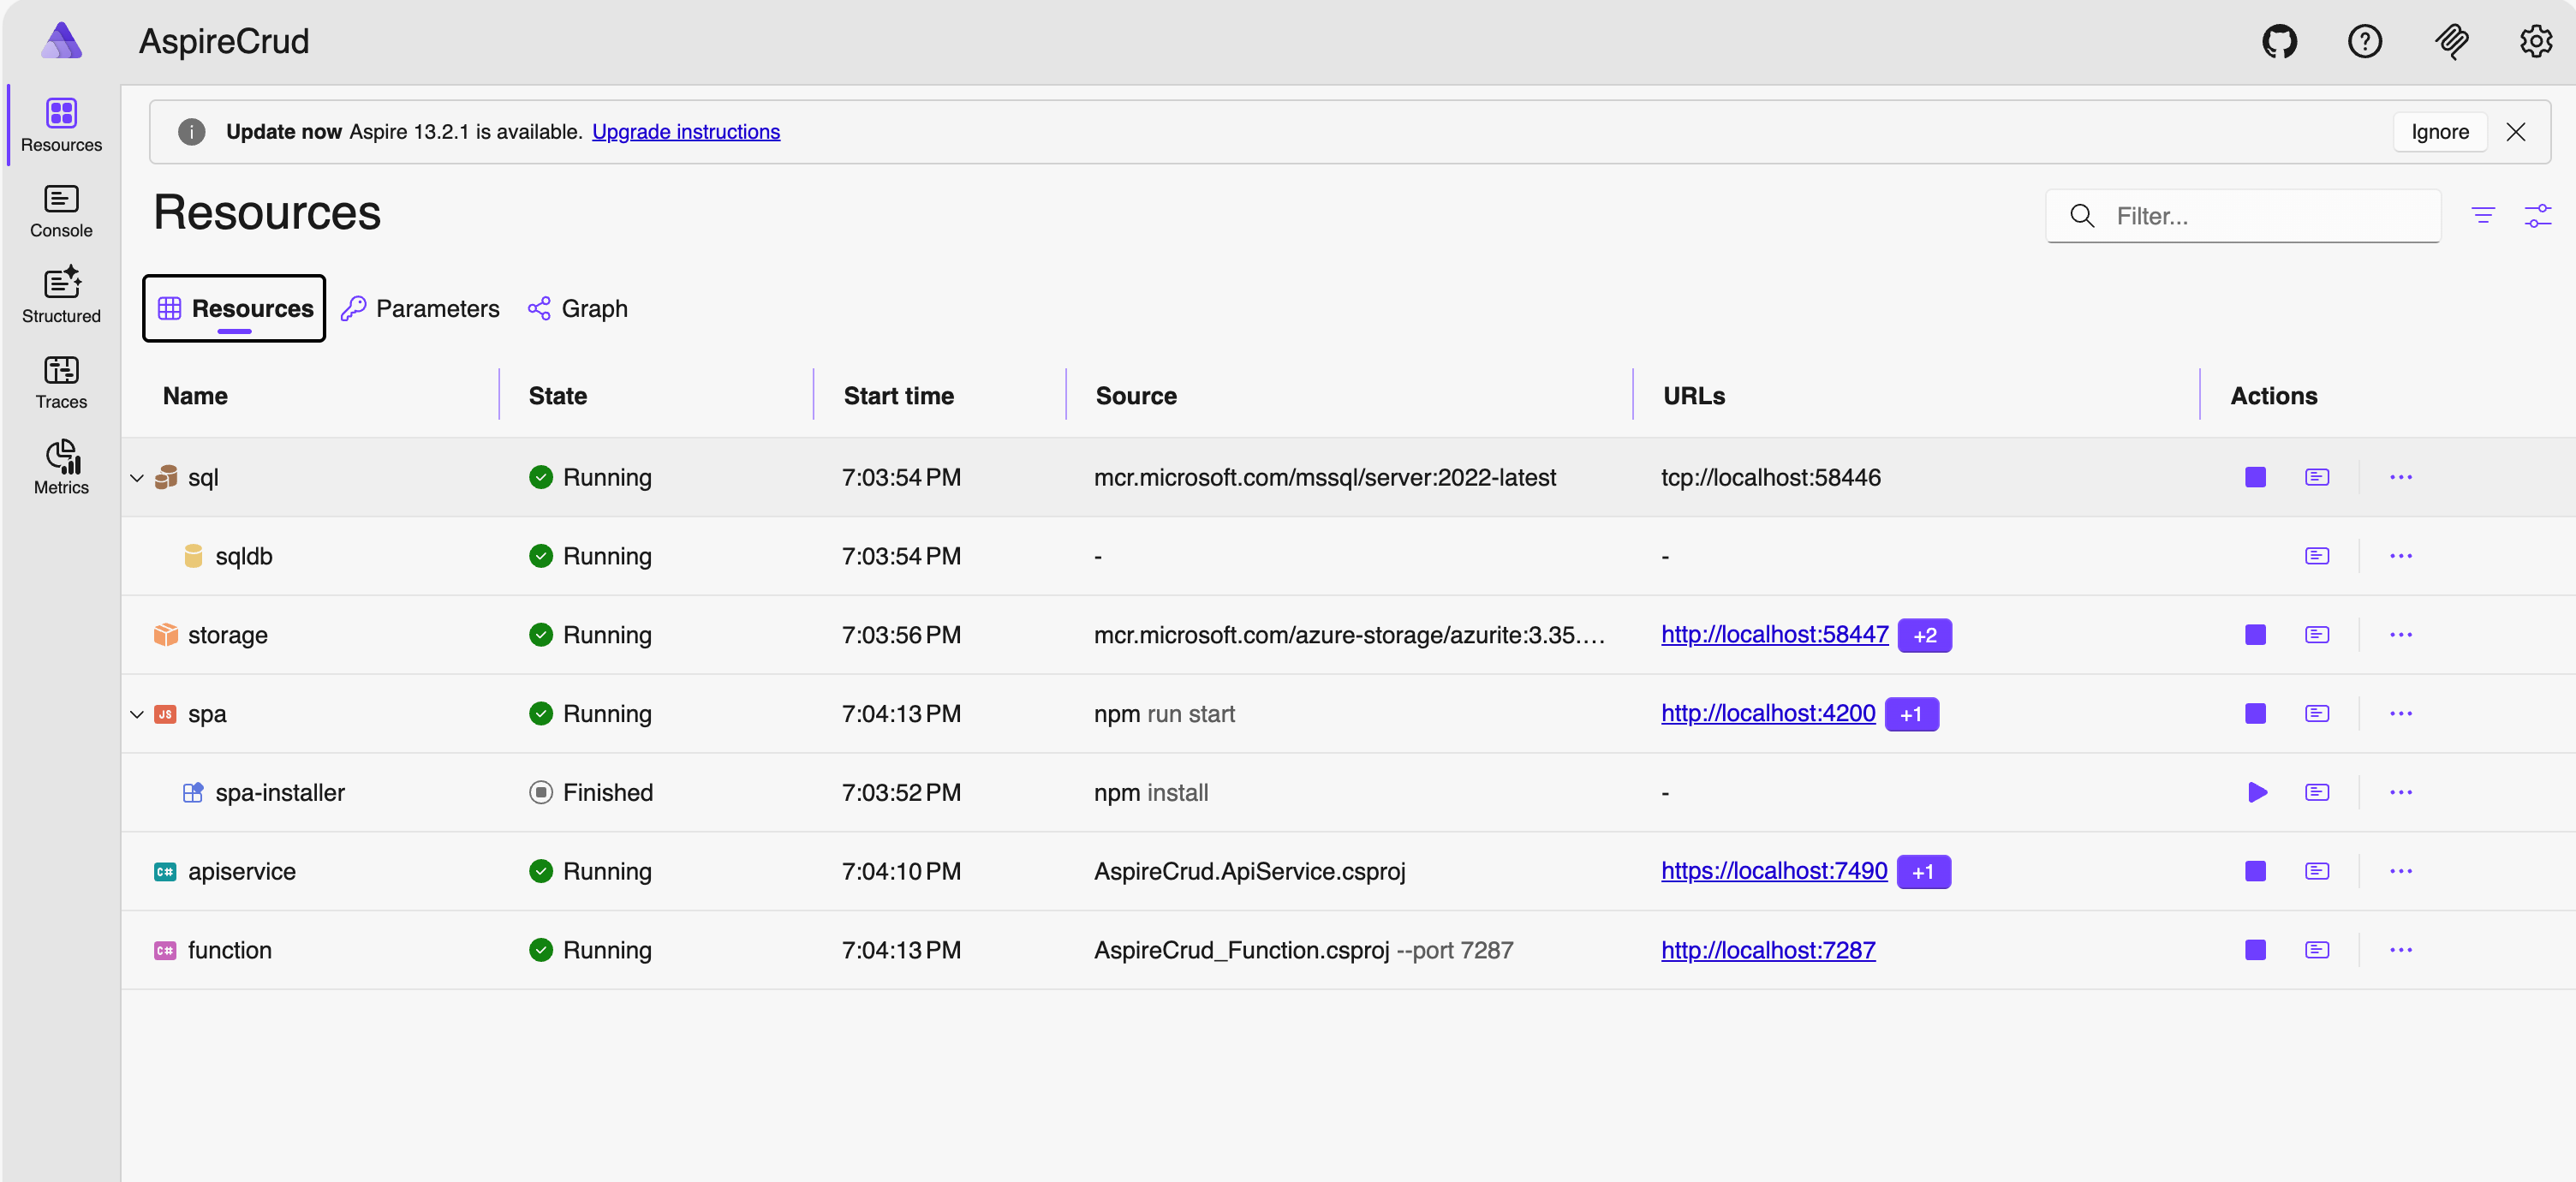
Running the Application
Run the application again withaspire run, You should now see the Azure Function as part of the distributed application in the Aspire dashboard. The dependency graph clearly shows how the function integrates with the rest of the system, making it easier to reason about interactions between services.
Creating a Function and Interacting with API Service
Now that the function project is part of our Aspire application, let’s implement a function that interacts with the API service.
We’ll create a timer-triggered function: func new in AspireCrud.Function project.
sinannar@Sinans-MacBook-Pro AspireCrud % cd AspireCrud.Function
sinannar@Sinans-MacBook-Pro AspireCrud.Function % func new --name WeatherSummaryEnricher --template "Timer trigger"
'local.settings.json' found in root directory (/Users/sinannar/source/BlogTemp/AspireCrud/AspireCrud.Function).
Resolving worker runtime to 'dotnet-isolated'.
Template: Timer trigger
Function name: [Timer trigger] WeatherSummaryEnricher

Creating dotnet function...
The function "WeatherSummaryEnricher" was created successfully from the "Timer trigger" template.
This creates a function that runs on a schedule and allows us to execute background logic.
Calling the API from the Function
To enable communication with the API service, update Program.cs in the function project to register an HttpClient:
using System.Net.Http.Json;
using Microsoft.Azure.Functions.Worker;
using Microsoft.Azure.Functions.Worker.Builder;
using Microsoft.Extensions.DependencyInjection;
using Microsoft.Extensions.Hosting;

var builder = FunctionsApplication.CreateBuilder(args);

builder.ConfigureFunctionsWebApplication();
builder.AddServiceDefaults();

builder.Services
    .AddApplicationInsightsTelemetryWorkerService()
    .ConfigureFunctionsApplicationInsights();

builder.Services.AddHttpClient<WeatherForecastClient>(client =>
{
    client.BaseAddress = new Uri("https+http://apiservice");
});

builder.Build().Run();
Notice the base address:👉 https+http://apiservice
This uses Aspire’s service discovery, allowing the function to call the API without hardcoding URLs.
Creating the API Client
Next, define a simple client to interact with the API. This keeps all API interactions encapsulated and reusable.
public class WeatherForecastClient
{
    private readonly HttpClient _httpClient;

    public WeatherForecastClient(HttpClient httpClient)
    {
        _httpClient = httpClient;
    }

    public async Task<List<WeatherForecast>?> GetAllForecastsAsync(CancellationToken cancellationToken = default)
    {
        return await _httpClient.GetFromJsonAsync<List<WeatherForecast>>("/weatherforecast", cancellationToken);
    }

    public async Task<WeatherForecast?> CreateForecastAsync(WeatherForecast forecast, CancellationToken cancellationToken = default)
    {
        var response = await _httpClient.PostAsJsonAsync("/weatherforecast", forecast, cancellationToken);
        response.EnsureSuccessStatusCode();
        return await response.Content.ReadFromJsonAsync<WeatherForecast>(cancellationToken: cancellationToken);
    }

    public async Task UpdateForecastAsync(int id, WeatherForecast forecast, CancellationToken cancellationToken = default)
    {
        var response = await _httpClient.PutAsJsonAsync($"/weatherforecast/{id}", forecast, cancellationToken);
        response.EnsureSuccessStatusCode();
    }

    public async Task DeleteForecastAsync(int id, CancellationToken cancellationToken = default)
    {
        var response = await _httpClient.DeleteAsync($"/weatherforecast/{id}", cancellationToken);
        response.EnsureSuccessStatusCode();
    }

    public async Task<List<WeatherForecast>?> CreateBatchForecastsAsync(CancellationToken cancellationToken = default)
    {
        var response = await _httpClient.PostAsync("/weatherforecast/batch", null, cancellationToken);
        response.EnsureSuccessStatusCode();
        return await response.Content.ReadFromJsonAsync<List<WeatherForecast>>(cancellationToken: cancellationToken);
    }
}

public class WeatherForecast
{
    public int Id { get; set; }
    public DateOnly Date { get; set; }
    public int TemperatureC { get; set; }
    public string? Summary { get; set; }
    public string? Description { get; set; }
    public int TemperatureF => 32 + (int)(TemperatureC / 0.5556);
}
Implementing the Function
Now update WeatherSummaryEnricher.cs:
using System;
using Microsoft.Azure.Functions.Worker;
using Microsoft.Extensions.Logging;

namespace AspireCrud.Function;

public class WeatherSummaryEnricher(ILoggerFactory loggerFactory, WeatherForecastClient weatherClient)
{
    private readonly ILogger _logger = loggerFactory.CreateLogger<WeatherSummaryEnricher>();

    [Function("WeatherSummaryEnricher")]
    public async Task Run([TimerTrigger("30 * * * * *")] TimerInfo myTimer, CancellationToken cancellationToken)
    {
        _logger.LogInformation("C# Timer trigger function executed at: {executionTime}", DateTime.Now);

        if (myTimer.ScheduleStatus is not null)
        {
            _logger.LogInformation("Next timer schedule at: {nextSchedule}", myTimer.ScheduleStatus.Next);
        }

        try
        {
            var forecasts = await weatherClient.GetAllForecastsAsync(cancellationToken);
            _logger.LogInformation("Successfully retrieved {count} weather forecasts", forecasts?.Count ?? 0);

            foreach (var forecast in forecasts ?? [])
            {
                _logger.LogInformation("Forecast for {date}: {summary} with {tempC}°C", forecast.Date, forecast.Summary, forecast.TemperatureC);

                // Determine correct summary based on temperature
                var correctSummary = forecast.TemperatureC switch
                {
                    < 0 => "Freezing",
                    >= 0 and <= 5 => "Bracing",
                    >= 6 and <= 10 => "Chilly",
                    >= 11 and <= 15 => "Cool",
                    >= 16 and <= 20 => "Mild",
                    >= 21 and <= 25 => "Warm",
                    >= 26 and <= 30 => "Balmy",
                    >= 31 and <= 35 => "Hot",
                    >= 36 and <= 45 => "Sweltering",
                    _ => "Scorching"
                };

                // Update if summary is incorrect
                if (forecast.Summary != correctSummary || string.IsNullOrEmpty(forecast.Description))
                {
                    _logger.LogInformation("Updating forecast {id}: '{oldSummary}' -> '{newSummary}'",
                        forecast.Id, forecast.Summary, correctSummary);

                    forecast.Summary = correctSummary;
                    await weatherClient.UpdateForecastAsync(forecast.Id, forecast, cancellationToken);
                }
            }

            _logger.LogInformation("Weather summary enrichment completed");
        }
        catch (Exception ex)
        {
            _logger.LogError(ex, "Error calling ApiService");
        }
    }
}
This function:
- Runs on a timer
- Retrieves weather forecasts from the API
- Normalises the Summary based on temperature
- Updates records when needed
Running and Observing
Once everything is in place, run the application: aspire run
With all the code is put in place, we should see function working on our traces calling our APIs.
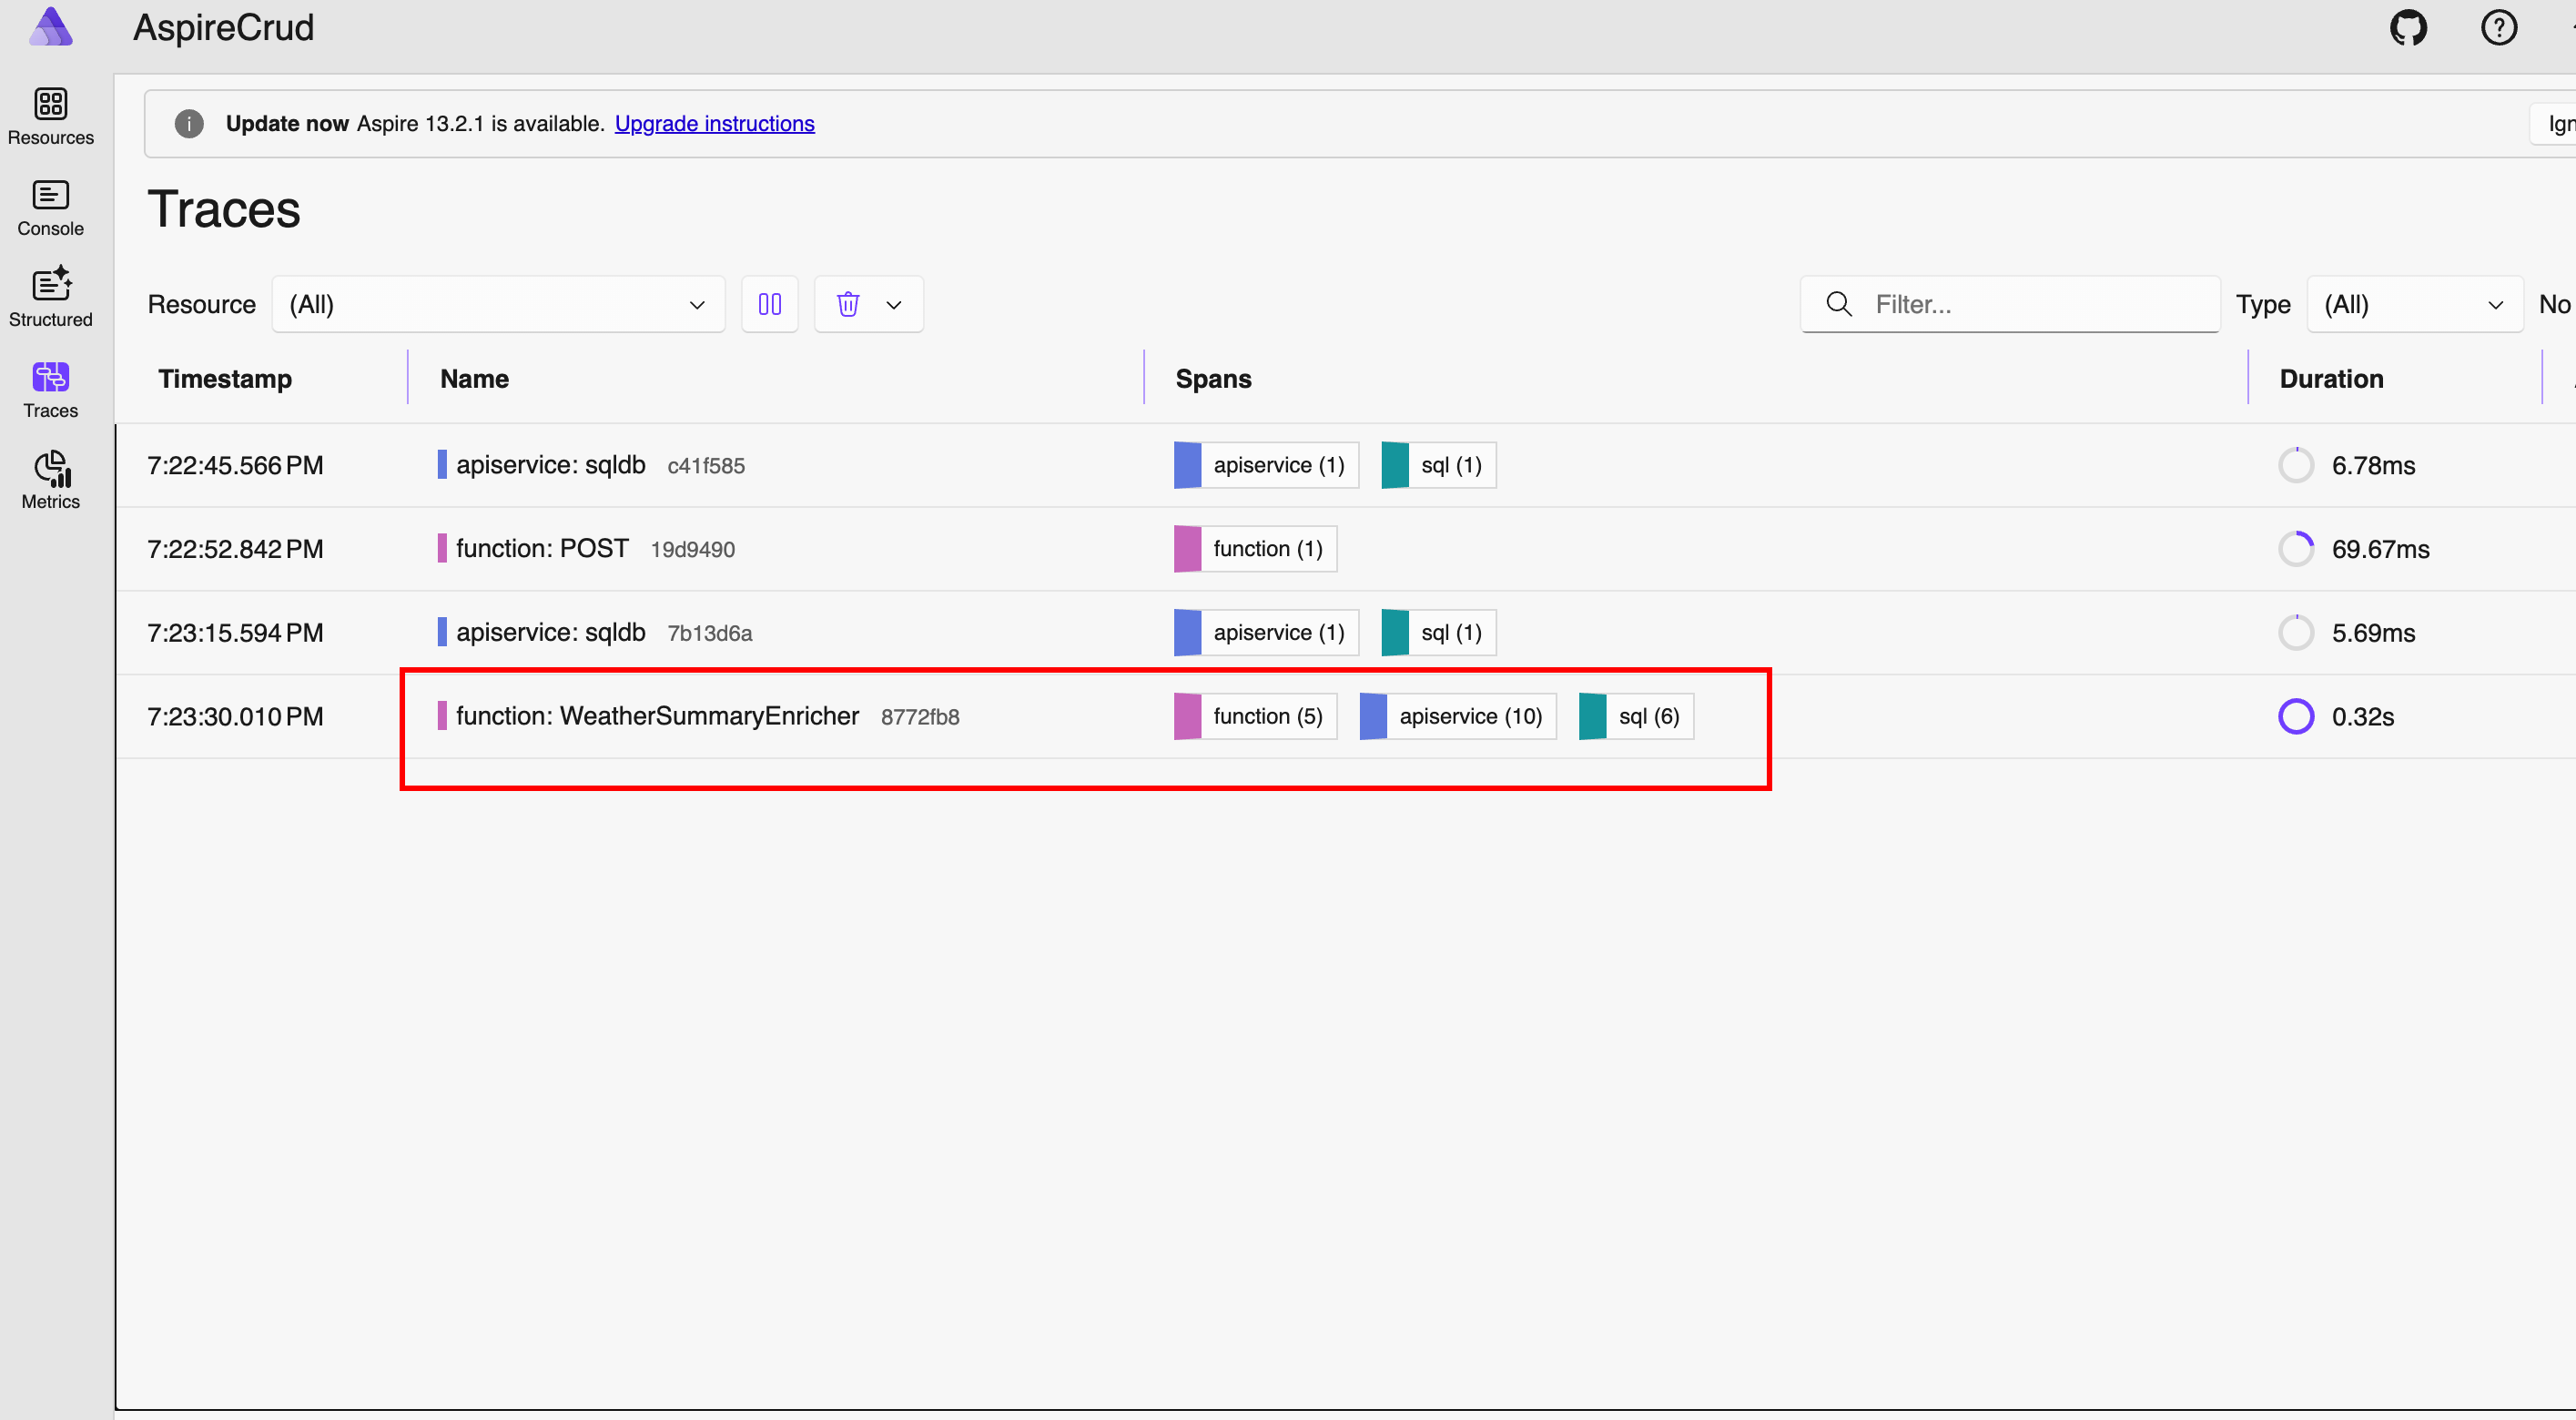
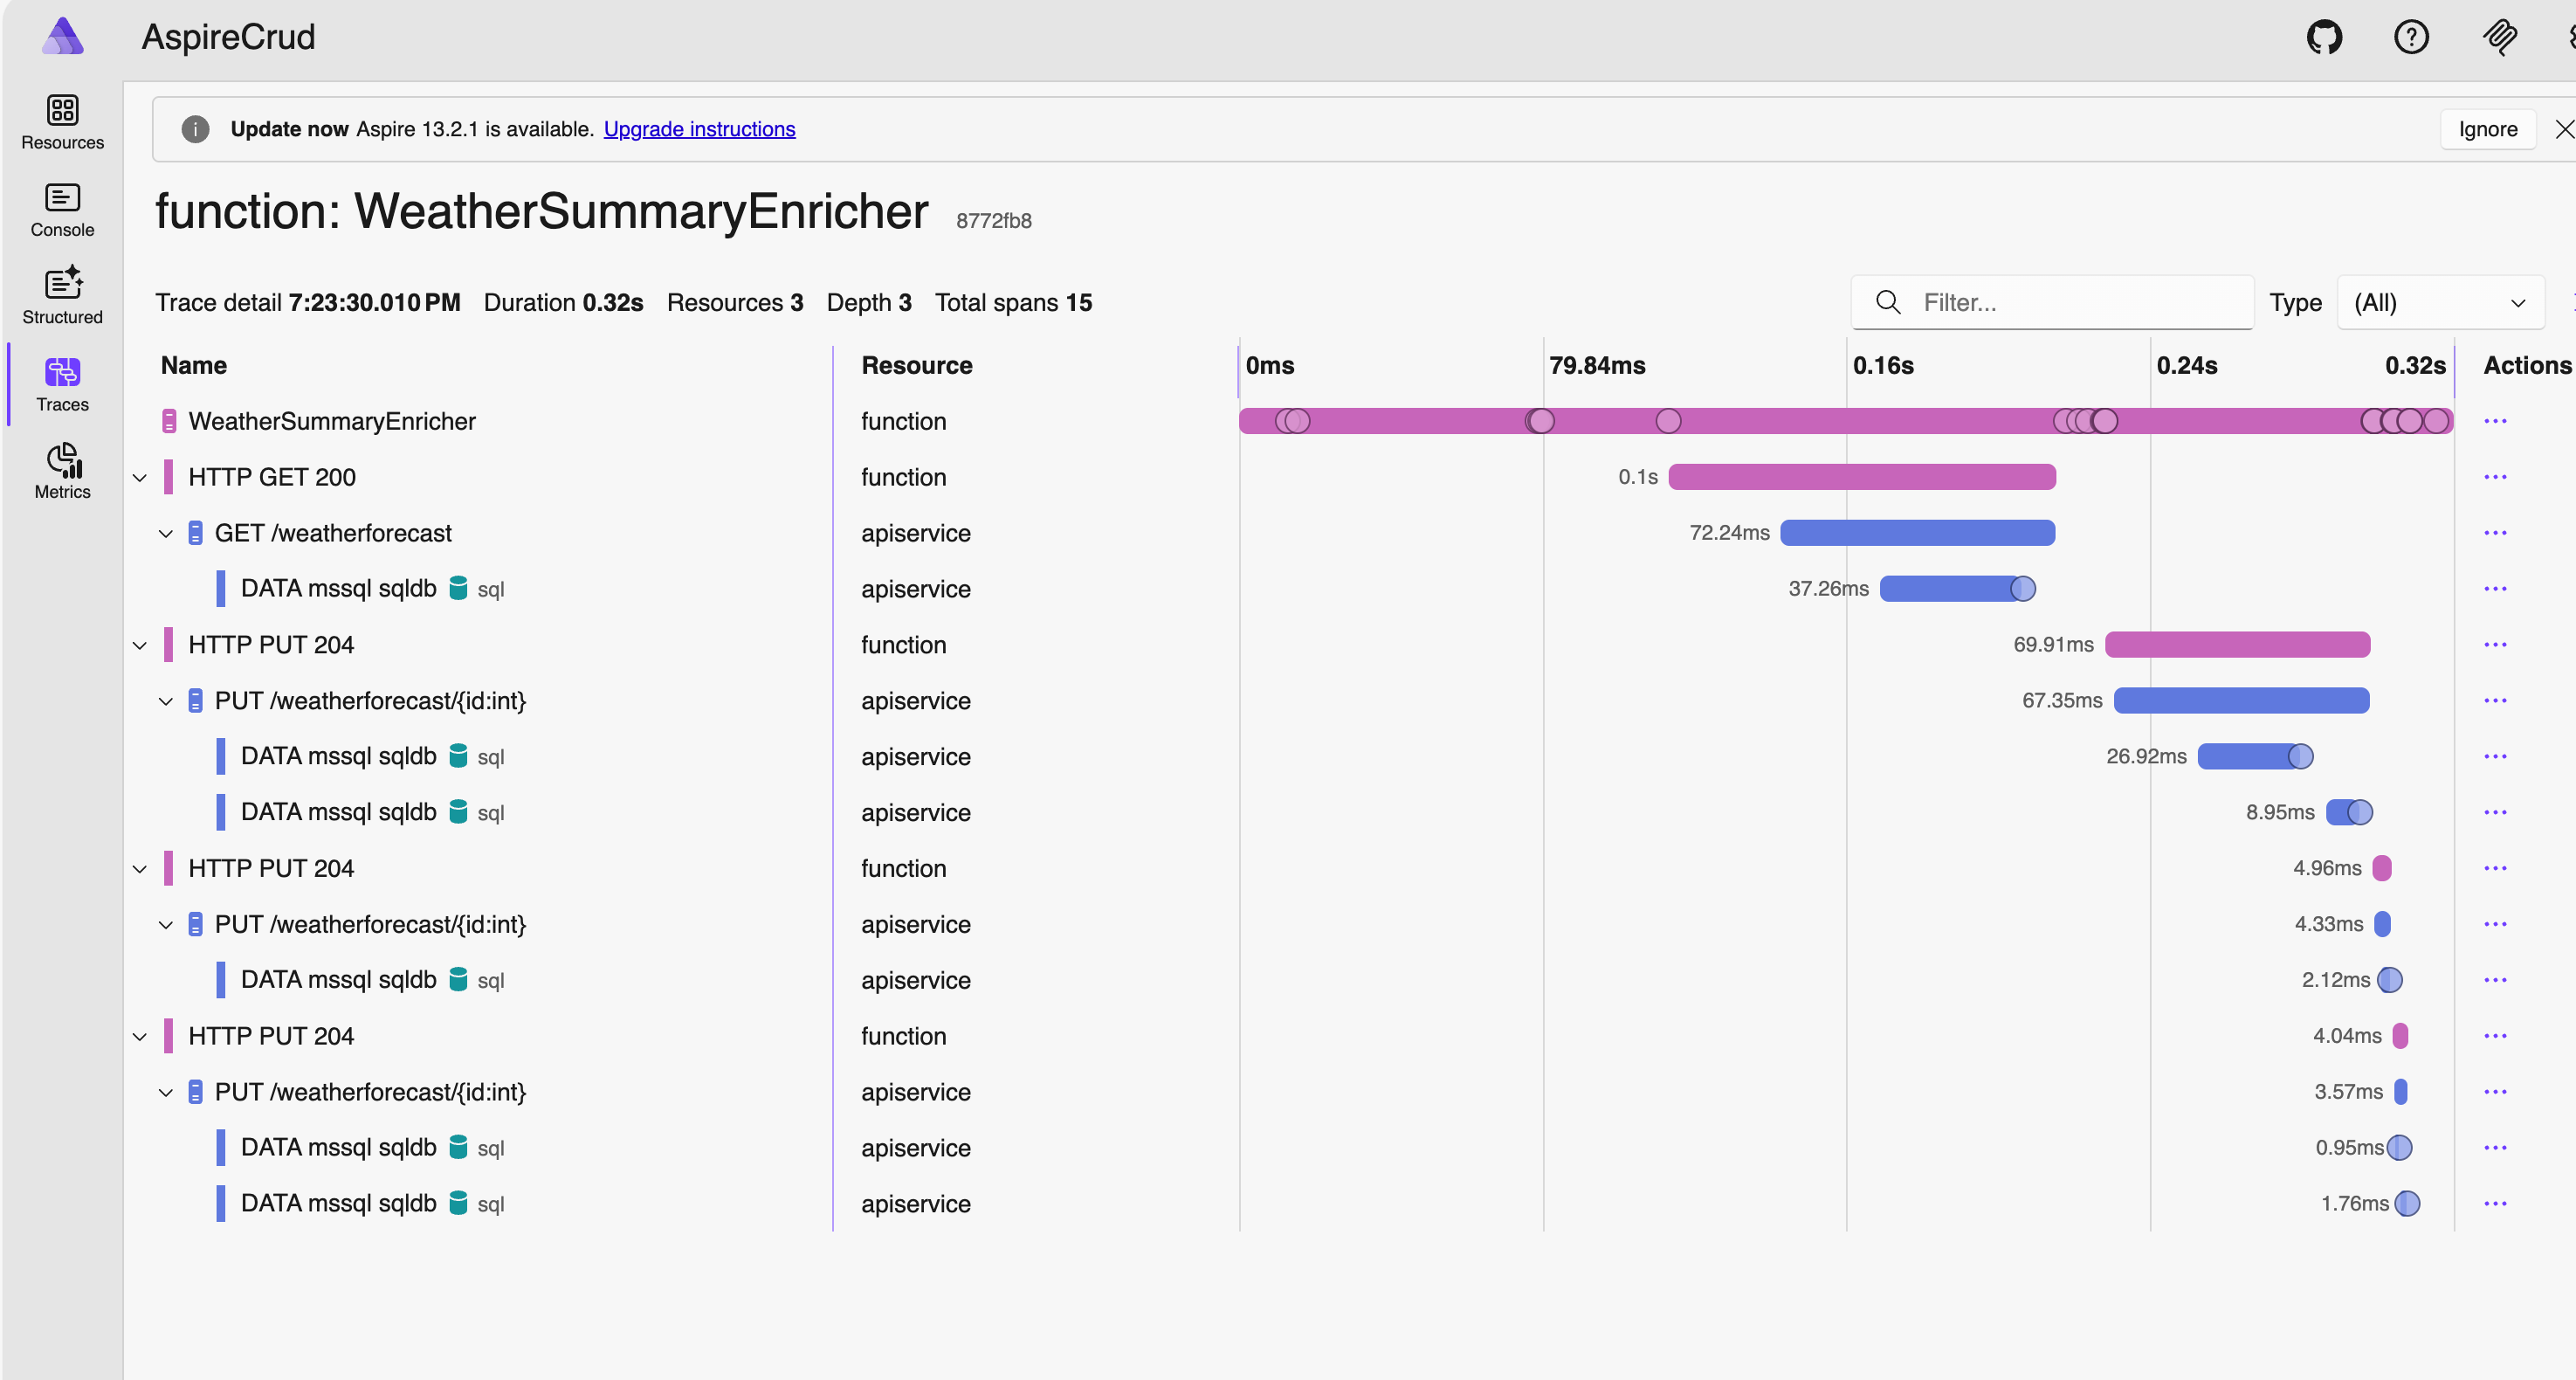
The function is effectively enriching your data in the background:
- Initial data is randomly generated
- The function corrects summaries based on temperature
- Updates are persisted via the API
Github Models Integration
So far, our function standardises weather summaries. Now we’ll take it a step further by using GitHub Models to generate richer, human-friendly descriptions for each forecast.
Adding Dependencies
Start by installing the required packages:
sinannar@Sinans-MacBook-Pro AspireCrud % aspire add github-models
✔  The package Aspire.Hosting.GitHub.Models::13.1.1 was added successfully.
sinannar@Sinans-MacBook-Pro AspireCrud % dotnet add ./AspireCrud.Function/AspireCrud_Function.csproj package Aspire.Azure.AI.Inference --version 13.1.0-preview.1.25616.3
Registering the Model in AppHost
Update AppHost.cs to include a GitHub model:
using Aspire.Hosting.GitHub;

var model = GitHubModel.OpenAI.OpenAIGpt4o;
var chat = builder.AddGitHubModel("chat", model);
Then wire it into the function:
var function = builder.AddAzureFunctionsProject<Projects.AspireCrud_Function>("function")
    .WithReference(apiService).WaitFor(apiService)
    .WithReference(chat).WaitFor(chat)
    .WithHostStorage(storage);
This makes the model available to the function via Aspire’s service wiring. Final AppHost.cs should look like below:
using Aspire.Hosting.GitHub;

var builder = DistributedApplication.CreateBuilder(args);

var storage = builder.AddAzureStorage("storage")
    .RunAsEmulator();

var sql = builder.AddSqlServer("sql");
var sqldb = sql.AddDatabase("sqldb");


var model = GitHubModel.OpenAI.OpenAIGpt4o;
var chat = builder.AddGitHubModel("chat", model);

var apiService = builder.AddProject<Projects.AspireCrud_ApiService>("apiservice")
    .WithReference(sqldb).WaitFor(sqldb)
    .WithHttpHealthCheck("/health");

var function = builder.AddAzureFunctionsProject<Projects.AspireCrud_Function>("function")
    .WithReference(apiService).WaitFor(apiService)
    .WithReference(chat).WaitFor(chat)
    .WithHostStorage(storage);

var spaWeb = builder.AddJavaScriptApp("spa", "../AspiredAngular", runScriptName: "start")
    .WithNpm(installCommand: "install")
    .WithReference(apiService).WaitFor(apiService)
    .WithUrl("http://localhost:4200")
    .WithHttpEndpoint(env: "PORT");

builder.Build().Run();
Creating a Description Service
Next, create a service that uses the model to generate descriptions:
public interface IForecastDescriber
{
Task<string> DescribeAsync(WeatherForecast forecast);
}
public class ForecastDescriber(IChatClient chatClient, ILoggerFactory loggerFactory) : IForecastDescriber
{
private readonly ILogger _logger = loggerFactory.CreateLogger<ForecastDescriber>();
public async Task<string> DescribeAsync(WeatherForecast forecast)
{
try
{
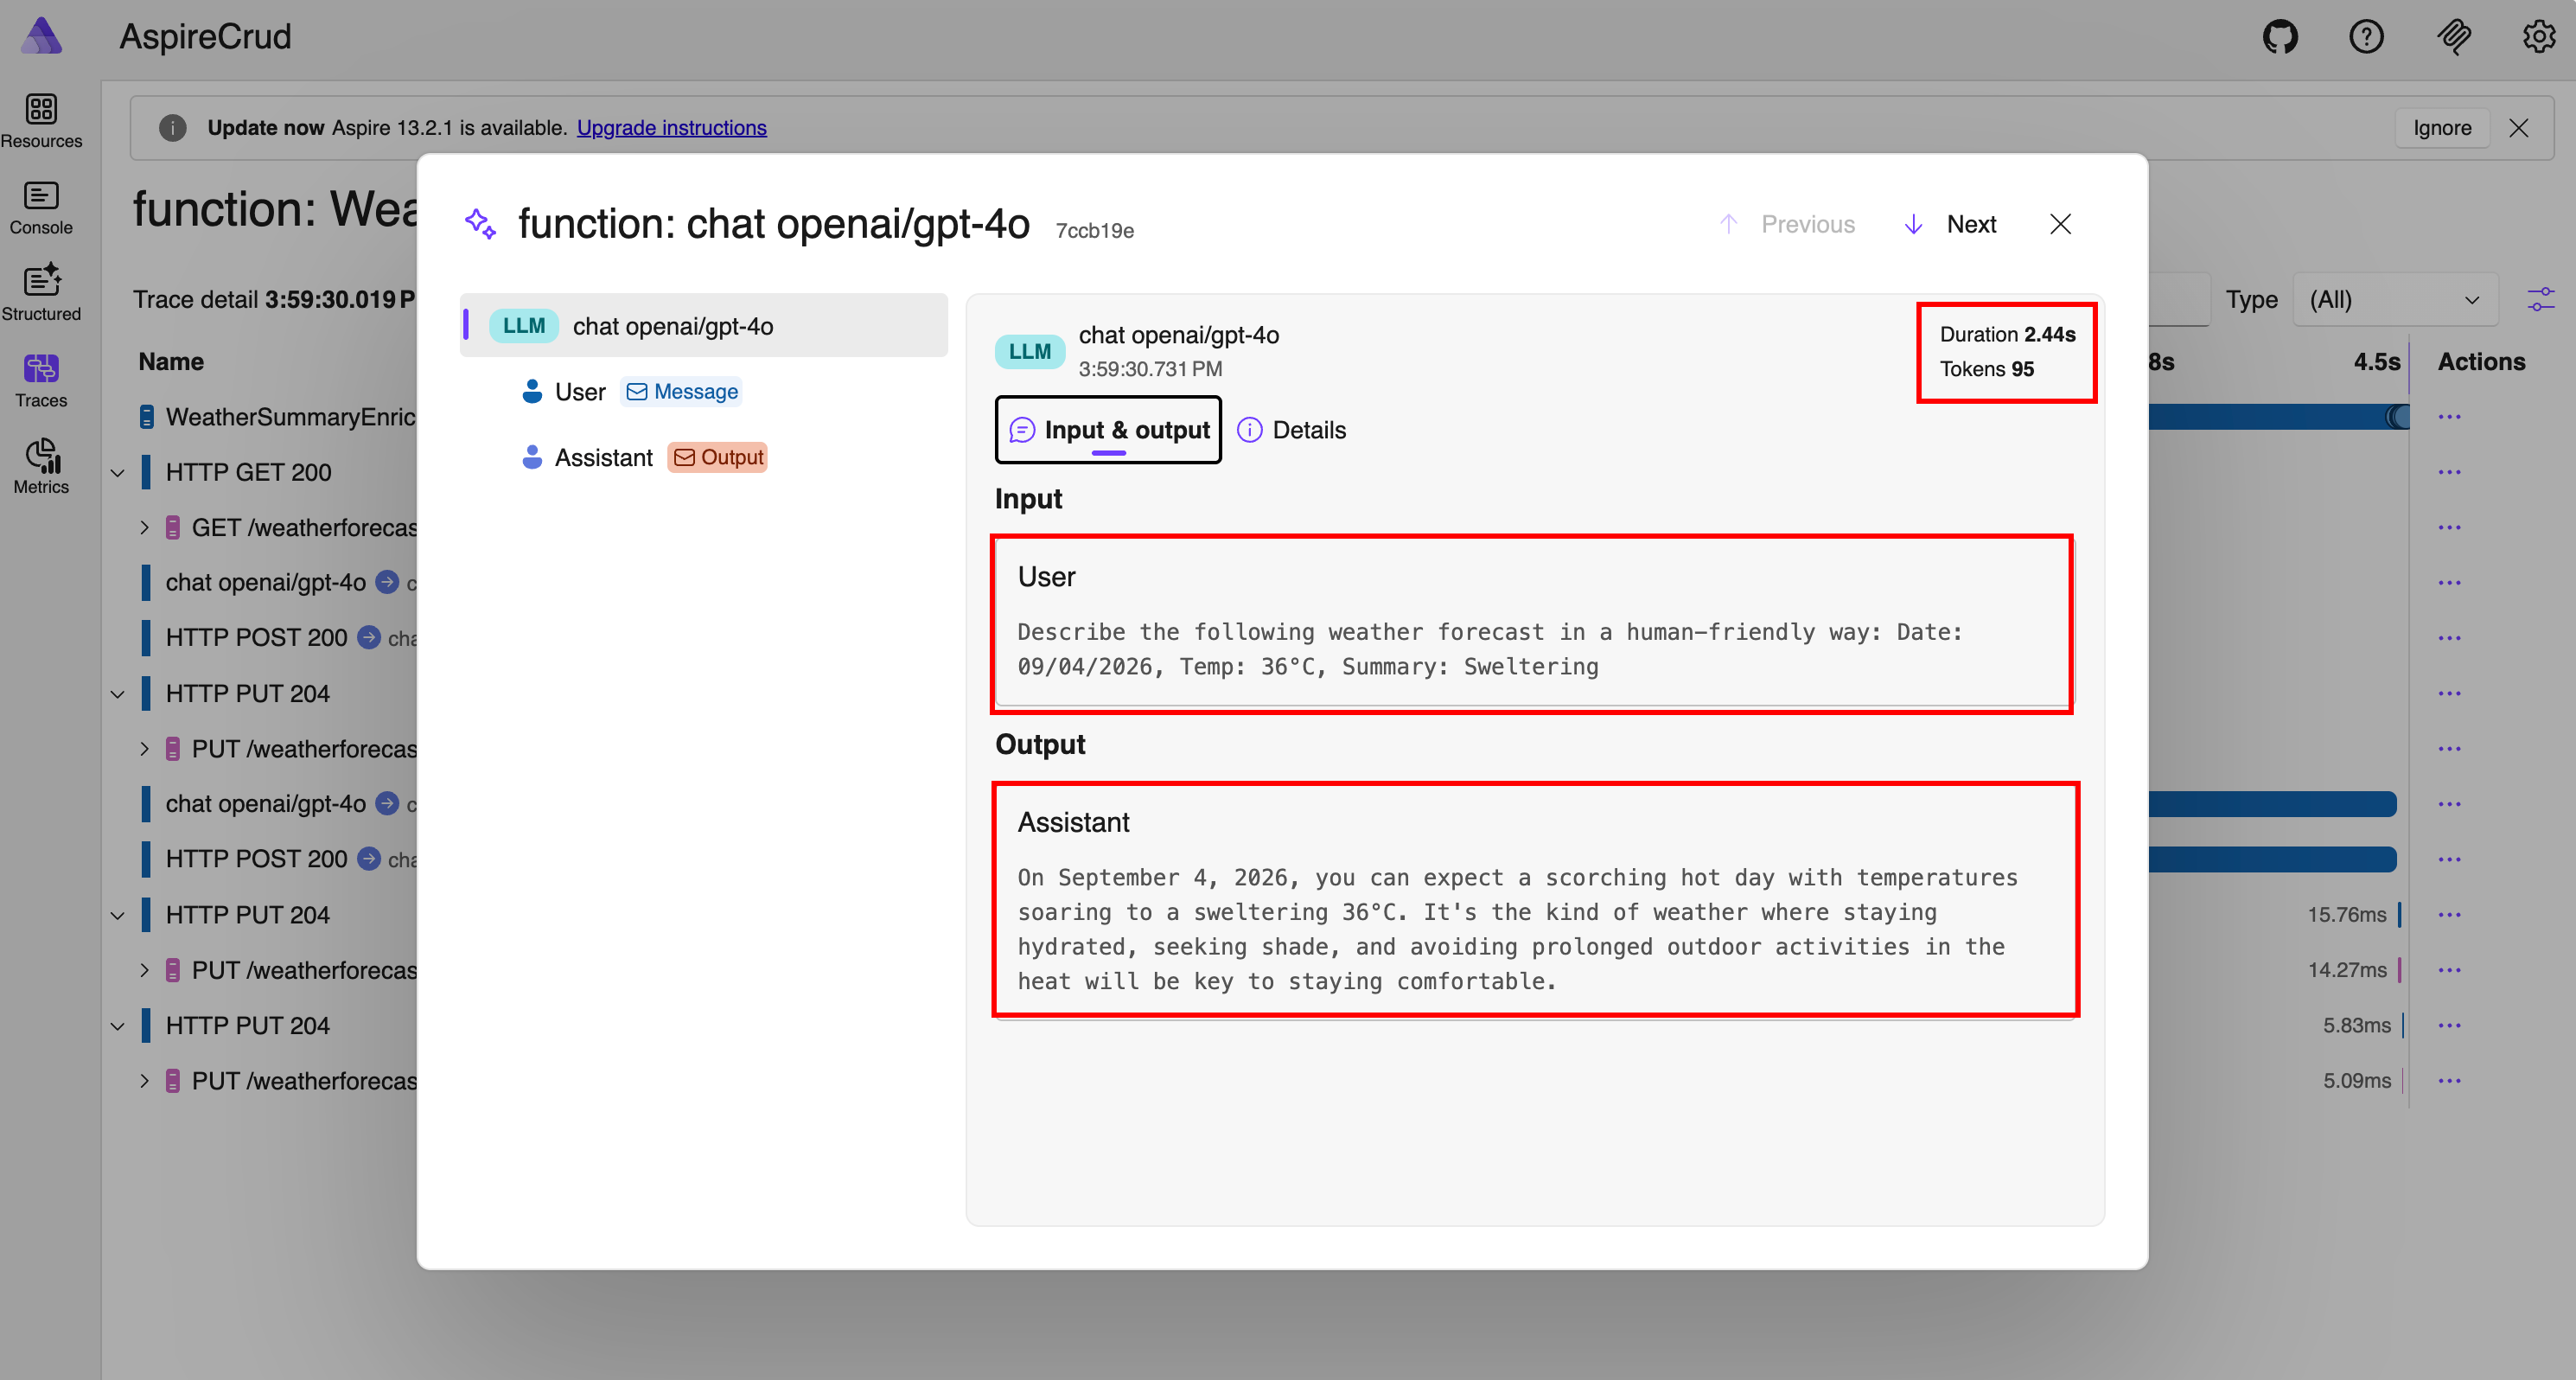
var prompt = $"Describe the following weather forecast in a human-friendly way: Date: {forecast.Date}, Temp: {forecast.TemperatureC}°C, Summary: {forecast.Summary}";
var response = await chatClient.GetResponseAsync(prompt);
return response.Text;
}
catch
{
_logger.LogError("Model couldn't be used with AI");
return string.Empty;
}
}
}Registering the Description Service
In Program.cs of the function app:
builder.AddAzureChatCompletionsClient("chat").AddChatClient();
builder.Services.AddScoped<IForecastDescriber, ForecastDescriber>();
Enhancing the Function
Now update the function to enrich forecasts with AI-generated descriptions. After setting the summary, add:
if(string.IsNullOrWhiteSpace(forecast.Description) && enrichmentCount < 2)
{
    _logger.LogInformation("Calling Enricher");
    Thread.Sleep(100);
    forecast.Description = await describer.DescribeAsync(forecast);
    ++enrichmentCount;
}
And update the constructor:
public class WeatherSummaryEnricher(ILoggerFactory loggerFactory
    , WeatherForecastClient weatherClient
    , IForecastDescriber describer)
The enrichmentCount is used here to limit model calls and avoid excessive token usage during the demo.
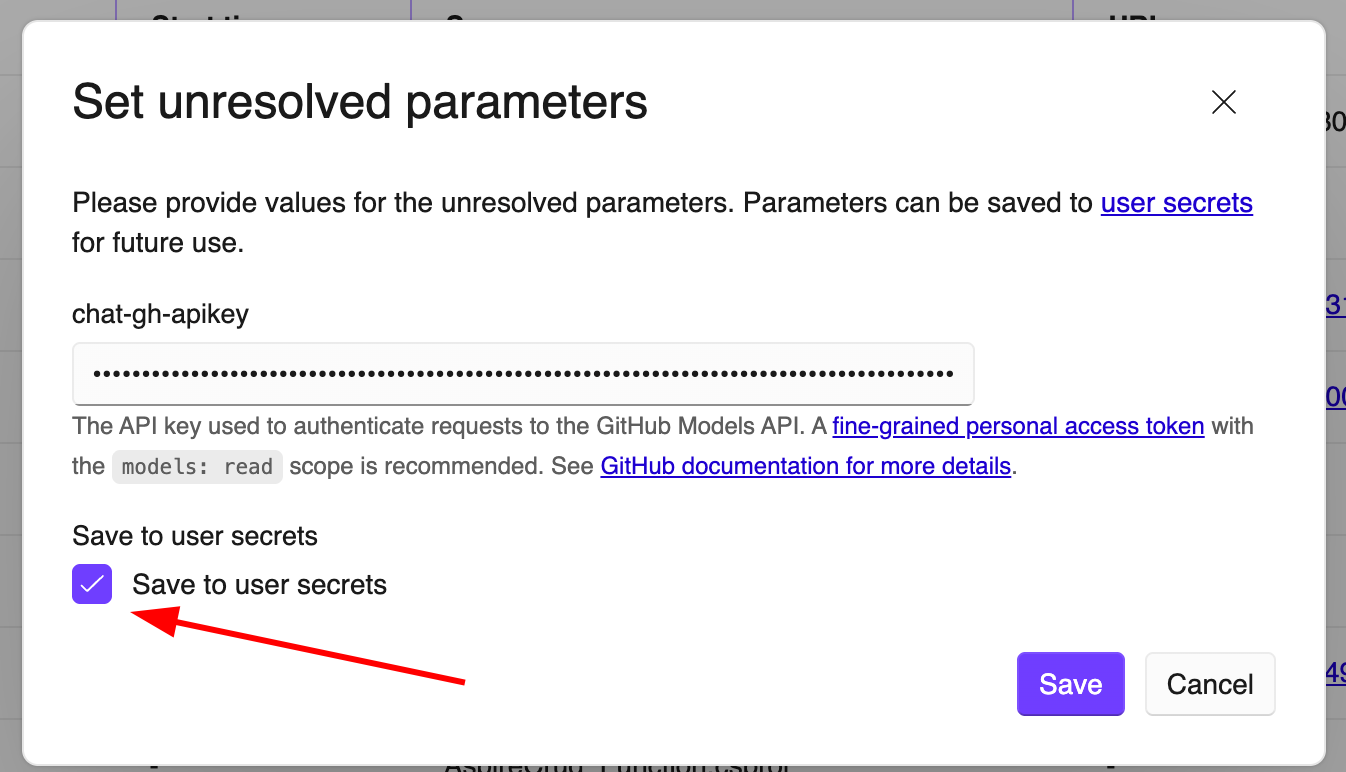
Configuring GitHub Access
To use GitHub Models, you’ll need a personal access token:
- Go to GitHub → Settings → Developer settings
- Create a fine-grained token
- Grant access to:
- Public repositories
- Models permission
- Copy the token
In the Aspire dashboard, provide the token when prompted:
Observing AI in Action
Once the application is running, the function will:
- Fetch forecasts from the API
- Generate descriptions using the model
- Update the database
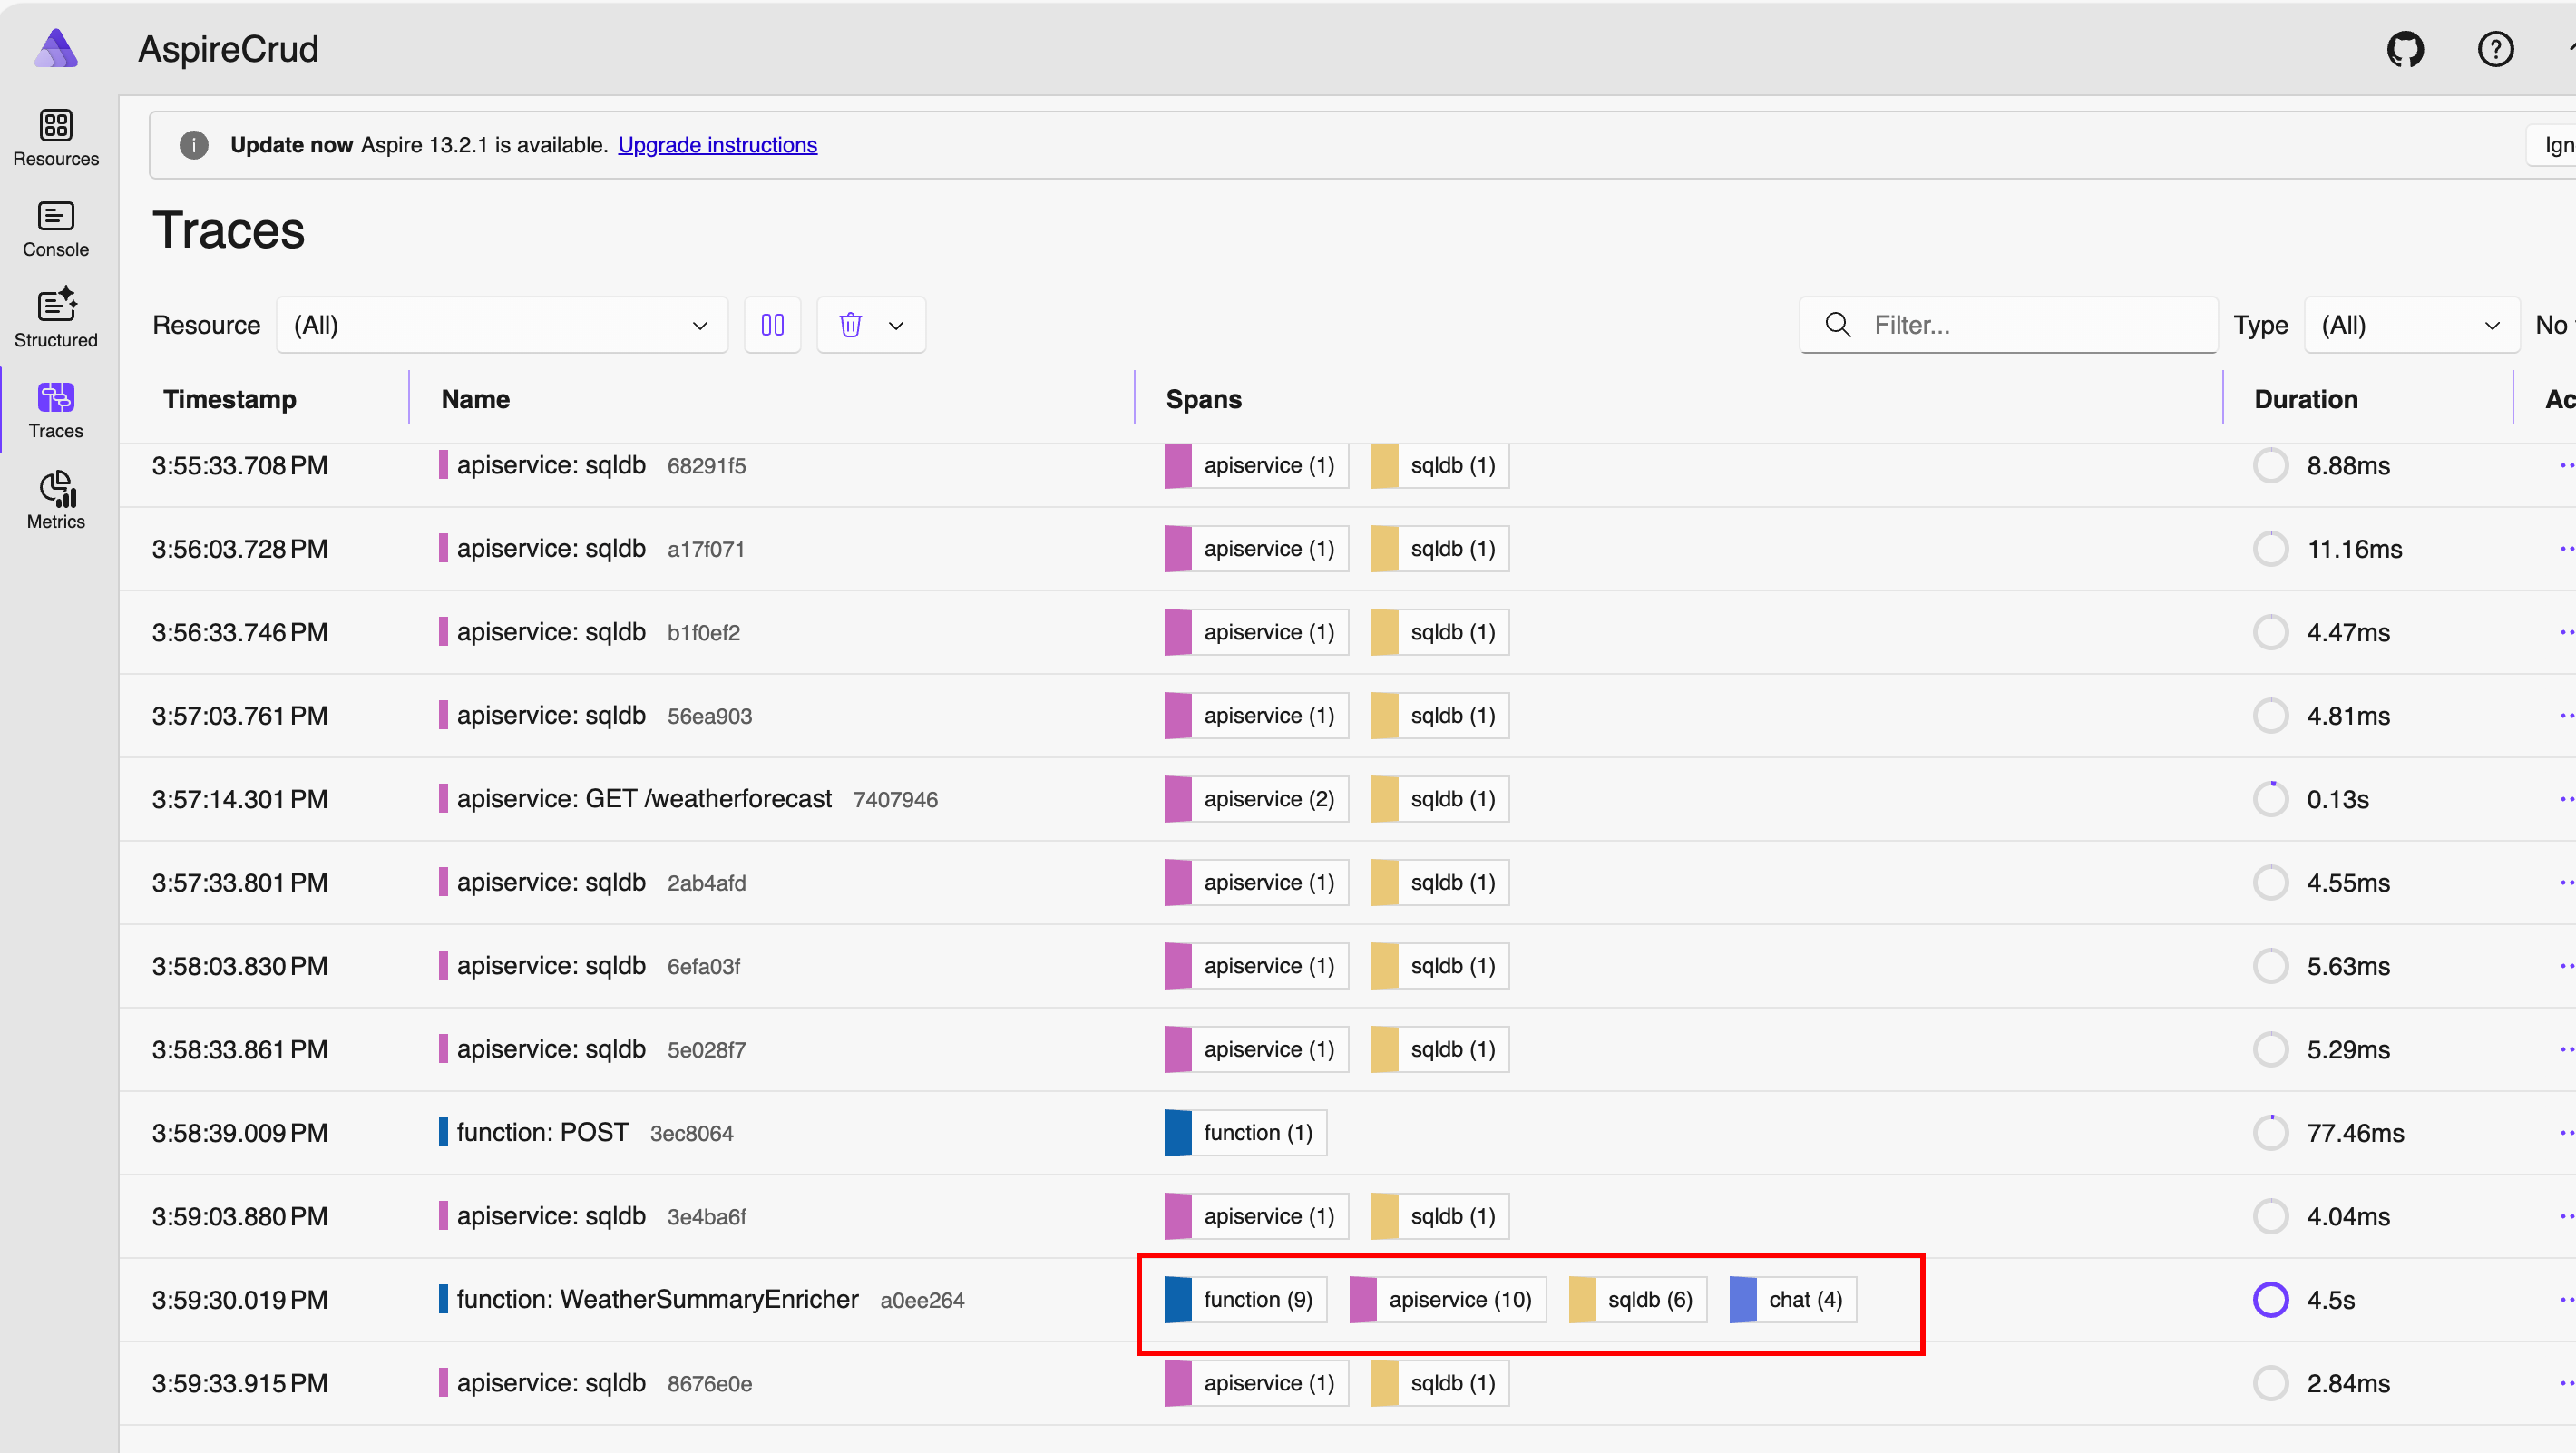
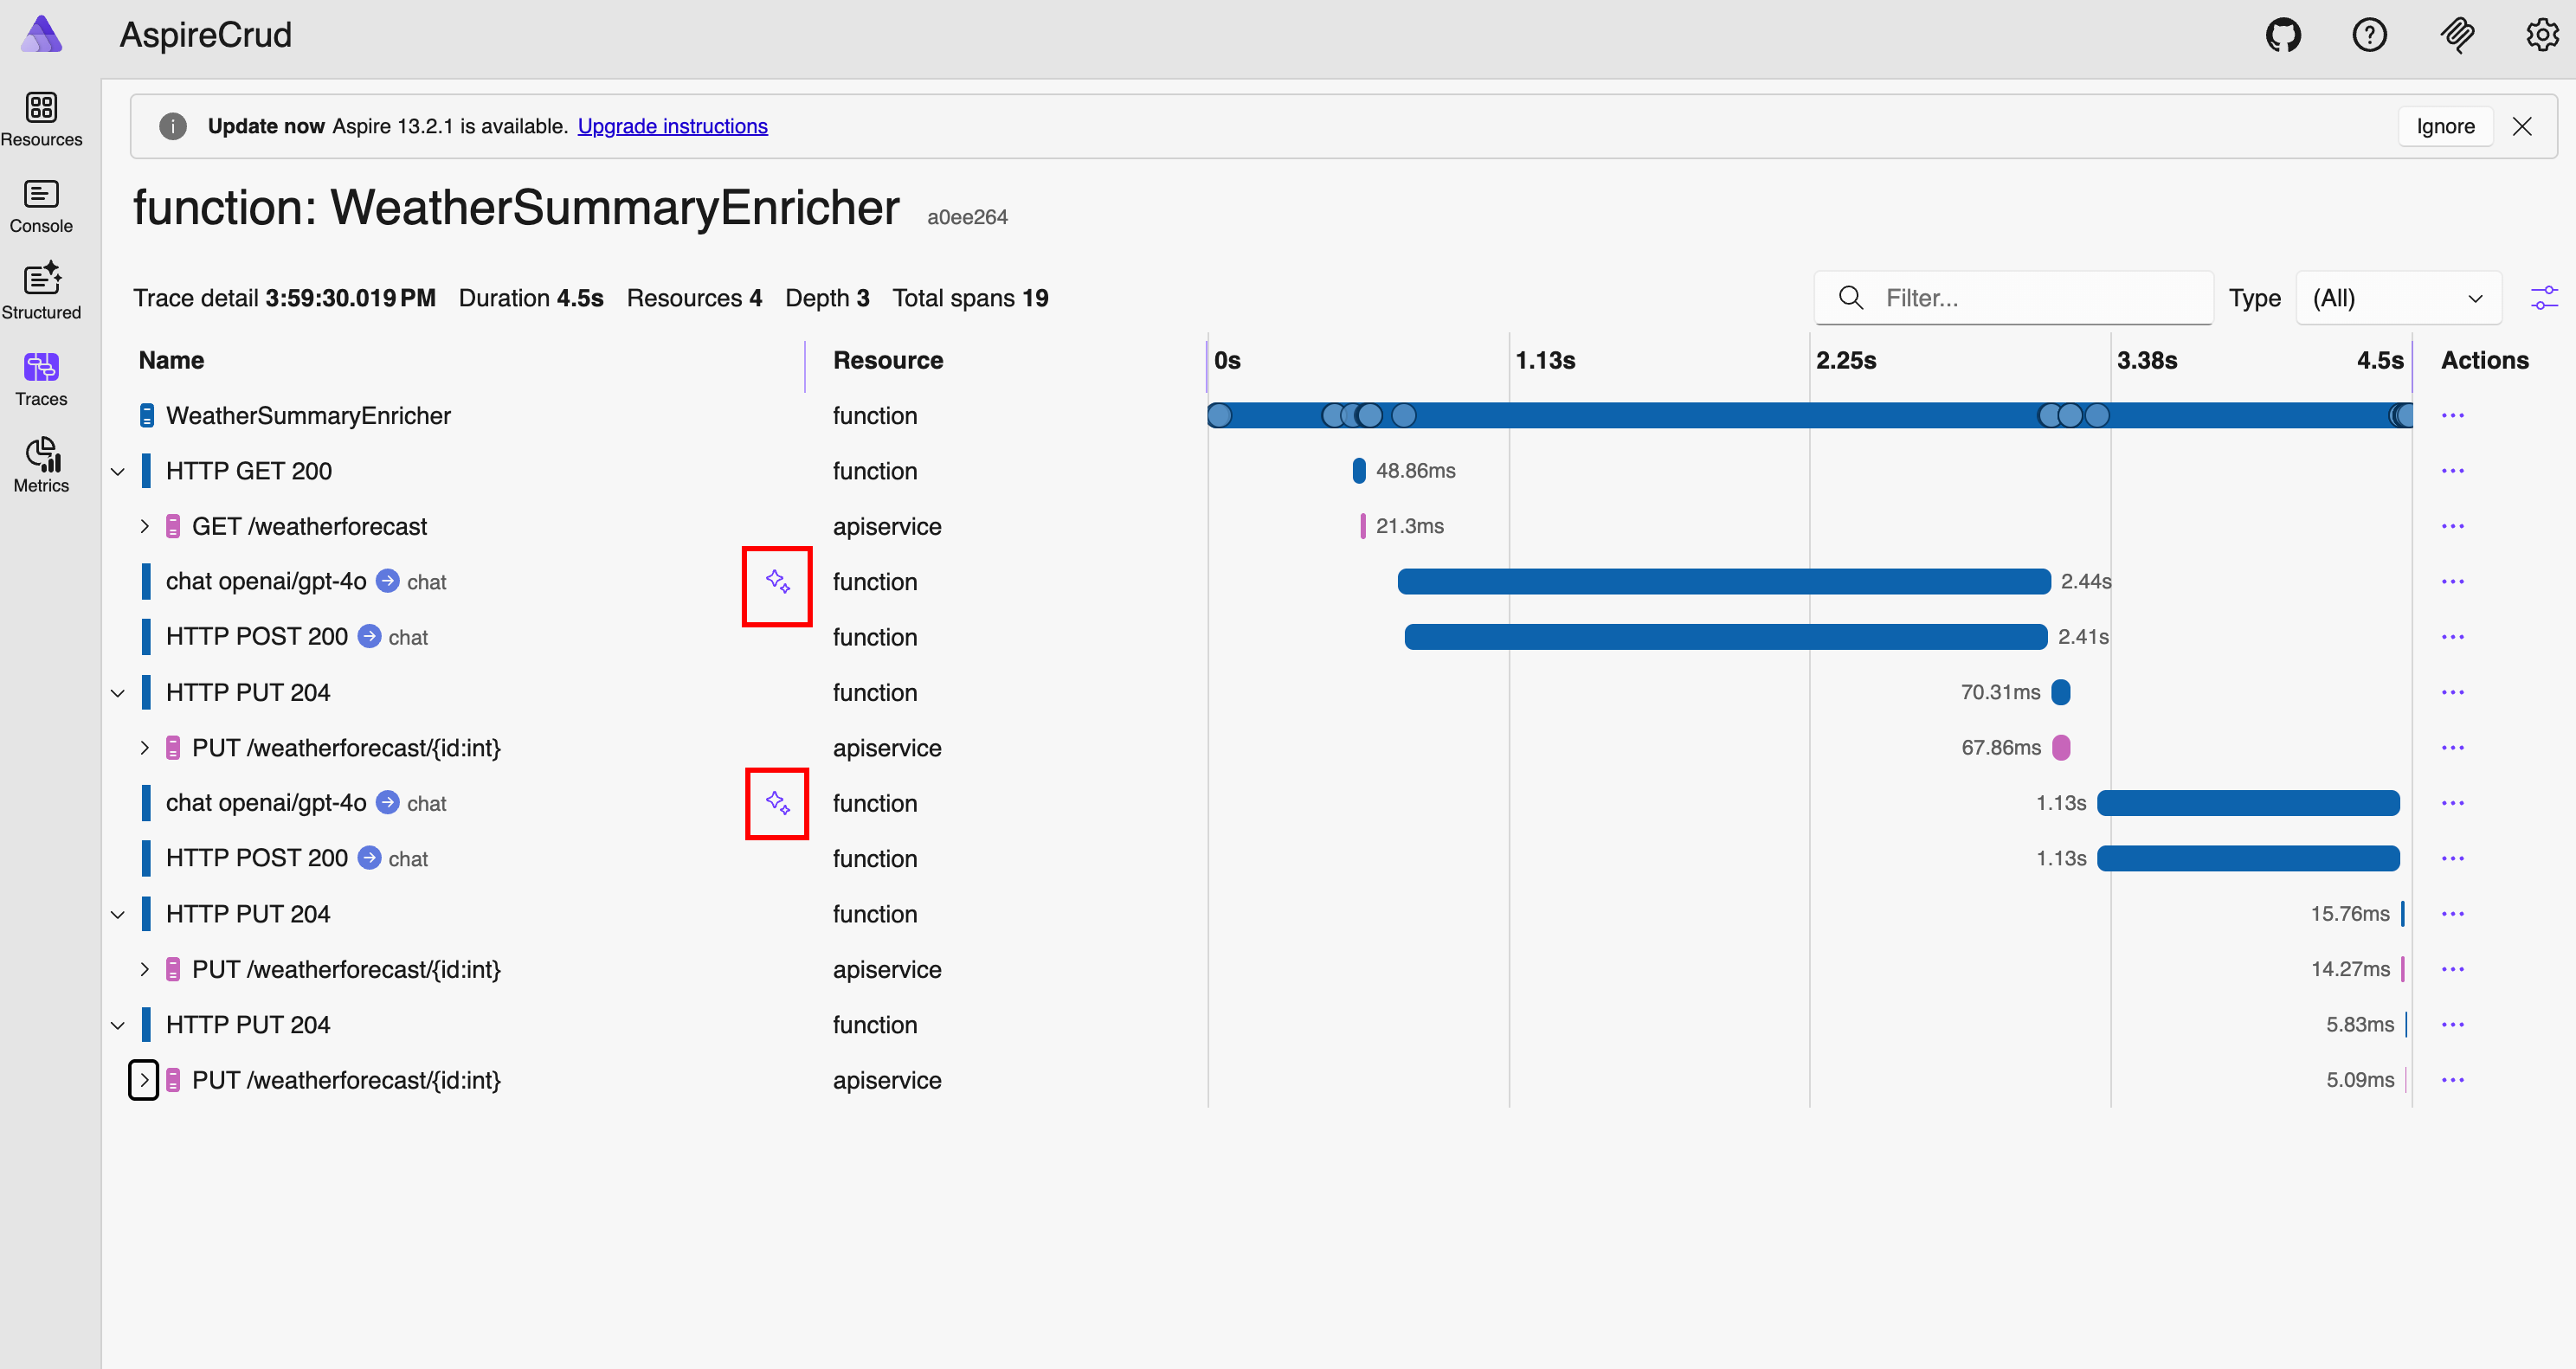
Aspire also provides GenAI tracing, allowing you to inspect:
- Prompts sent to the model
- Responses returned
- Token usage and execution details
What This Enables
At this point, your application:
- Generates data via the API
- Processes it in the background using Functions
- Enriches it using AI models
- Surfaces everything through a frontend
References
- Aspire | SQL Server Integration
- Aspire | JavaScript Integration
- Aspire | Azure Functions Integration
- Aspire | Azure Storage Blobs Integration
- Aspire | GitHub Models Integration
- Aspire Samples | Javascript Integration
- Aspire Samples | Azure Functions Integration
- Angular | Installation
- Angular | ng new
- Azure Function | Local Development
- Azure Function | .NET Aspire Integration
- Tech Comm | Github Model Catalog
- Github Models
- Final Code
- Live Demo Video